EMISSION CONTROL SYSTEM > DETAILS


FUNCTION OF MAIN COMPONENTS
  1. The main components of the 2ZR-FXE emission control system are as follows.

    Component
    Function
    TWC
    Reduces emissions by oxidation of CO and HC in exhaust gas and reduction of NOx.
    Oxygen Sensor
    This sensor detects the oxygen concentration in the exhaust emission by measuring the electromotive force which is generated in the sensor itself.
    Air Fuel Ratio Sensor
    As with the oxygen sensor, this sensor detects the oxygen concentration in the exhaust gas. However, it detects the oxygen concentration in the exhaust gas linearly.
    E.F.I. Vacuum Sensor Assembly
    Uses built-in semiconductors to detect the intake manifold pressure.
    EGR Valve Assembly
    Operates when receiving signals from the ECM, regulating the EGR volume.
    EGR Cooler
    Cools the exhaust gas temperature to improve the EGR efficiency.
    PCV Valve
    Opens and closes the valve using vacuum generated in the intake manifold and controls the flow rate of the blowby gas.
    Charcoal Canister Assembly
    Contains activated charcoal to absorb the fuel vapors that are created in the fuel tank and during refueling.
    Canister Pump Module
    Vent Valve
    Opens and closes the fresh air line in accordance with the signals from the ECM.
    Leak Detection Pump
    Applies vacuum pressure in the evaporative emission control system in accordance with the signals from the ECM.
    Canister Pressure Sensor
    Detects the pressure in the evaporative emission control system and sends the signals to the ECM.
    Canister Filter
    Prevents dust and debris in the fresh air from entering the system.
    Fresh Air Line
    Fresh air goes into the canister and the cleaned drain air goes out into the atmosphere.
    Purge VSV
    Opens in accordance with the signals from the ECM when the system is purging, in order to send the fuel vapor that was absorbed by the canister into the intake manifold.
    ECM
    1. Controls the volume of fuel consumed based primarily on the signal from the air fuel ratio sensor, with minor corrections based on the signal from the oxygen sensor. This control optimizes the air-fuel ratio.
    2. Regulates the EGR volume in accordance with the various sensor signals.
    3. Controls the canister pump module and the purge VSV in accordance with the signals from various sensors, in order to achieve a purge volume that suits the driving conditions.
    4. Monitors the system for any leakage and outputs a DTC if a malfunction is found.


OPERATING CONDITION
  1. Approximately five hours after the power switch has been turned OFF, the ECM operates the canister pump module to detect any evaporative emission leakage occurring between the fuel tank and the canister through changes in the fuel tank pressure.

  2. The following are the typical conditions necessary to enable an evaporative emission leak check.

    Typical Enabling Condition
    1. Five hours have elapsed after the engine has been turned OFF*.
    2. Altitude: Below 2400 m (8000 feet)
    3. Auxiliary Battery Voltage: 10.5 V or more
    4. Power Switch: OFF
    5. Engine Coolant Temperature: 4.4 to 35°C (40 to 95°F)
    6. Intake Air Temperature: 4.4 to 35°C (40 to 95°F)

    1. *: If engine coolant temperature does not drop below 35°C (95°F), this time should be extended to 7 hours. Even after that, if the temperature is not less than 35°C (95°F), the time should be extended to 9.5 hours.

    HINT:
    The canister pump module performs a fuel evaporative emission leakage check. This check is done approximately five hours after the engine is turned off. Sound may be heard coming from underneath the luggage compartment for several minutes. This does not indicate a malfunction. Pinpoint pressure test procedure is adopted by pressurizing the fresh air line that runs from the canister pump module to the air filler neck. For details, refer to the Repair Manual.


SYSTEM CONTROL


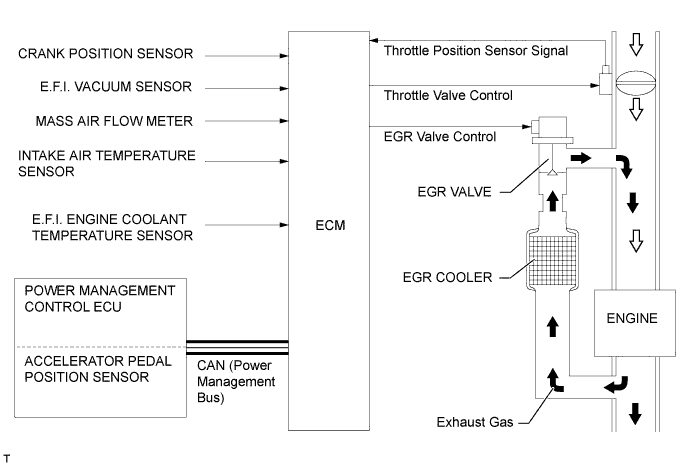
  1. EGR Control

    1. In this system, a small amount of inert gas is allowed to flow into the intake passage, reducing the perk temperature in the engine combustion chamber.


    2. By sensing the engine driving conditions and actual amount of the EGR valve opening, the ECM operates the EGR valve and throttle control motor, and regulates the amount of exhaust gas.

      W101547E03


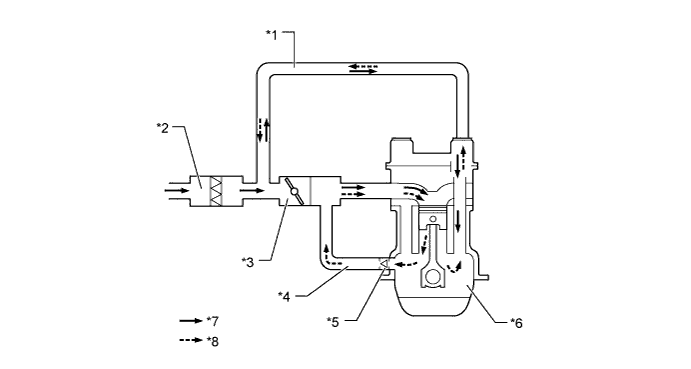
  2. Blowby Gas Ventilation System

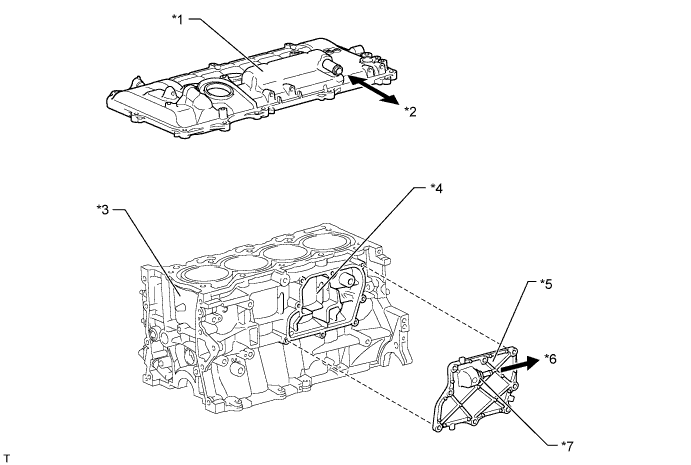
    1. By introducing blowby gas that has a large amount of HC into the air intake side and burning it again, the system attempts to enhance the emission performance. Returning blowby gas volume is regulated to the appropriate amount corresponding to the engine operating conditions, reducing the engine oil quantity taken away and engine idling speeds.

    2. An oil separator is provided in the blowby gas passage inside the cylinder block sub-assembly. This separates the engine oil from the blowby gas in order to reduce oil degradation and reduce the amount of engine oil consumed.

    3. The PCV (Positive Crankcase Ventilation) valve passage returns the blowby gas into the area after the throttle valve in accordance with the intake manifold vacuum.


    4. When load is low, the passage from the cylinder head cover sub-assembly to the area before the throttle valve increases the air purification performance inside the crankcase by introducing fresh air, and when load is high, the passage circulates the blowby gas together with the PCV valve side passage due to the intake manifold vacuum.

      W101548E01


      Text in Illustration 
      *1
      Cylinder Head Cover
      *2
      To Air Cleaner Hose
      *3
      Cylinder Block
      *4
      Oil Separator
      *5
      Oil Separator Cover
      (No.1 Ventilation Case)
      *6
      To Intake Manifold
      *7
      PCV Valve
      -
      -

      W101536E01


      Text in Illustration 
      *1
      No.2 Ventilation Hose
      *2
      Air Cleaner Case
      *3
      Throttle Body
      *4
      No.1 Ventilation Hose
      *5
      PCV Valve
      *6
      Crankcase
      *7
      Fresh Air
      *8
      Blowby Gas


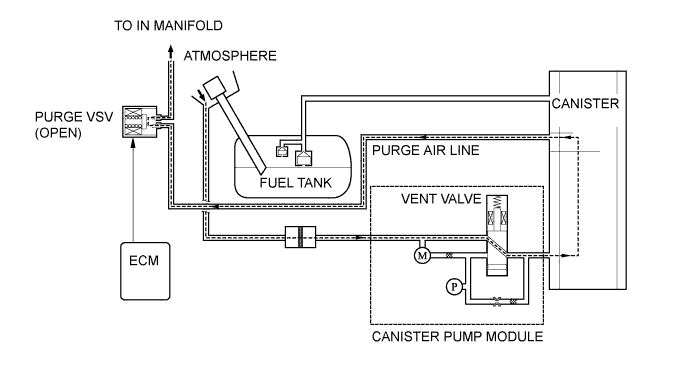
  3. Purge Flow Control

    1. The canister stores the fuel vapors that have been created in the fuel tank.

    2. When the engine has reached predetermined parameters (closed loop, engine coolant temp. above 80 °C (176 °F), etc), stored fuel vapors are purged from the canister whenever the purge VSV is opened by the ECM.


    3. The ECM will change the duty ratio cycle of the purge VSV, thus controlling purge flow volume. Purge flow volume is determined by intake manifold pressure and the duty ratio cycle of the purge VSV. Atmospheric pressure is allowed into the canister to ensure that purge flow is constantly maintained whenever purge vacuum is applied to the canister.

      W101549E01


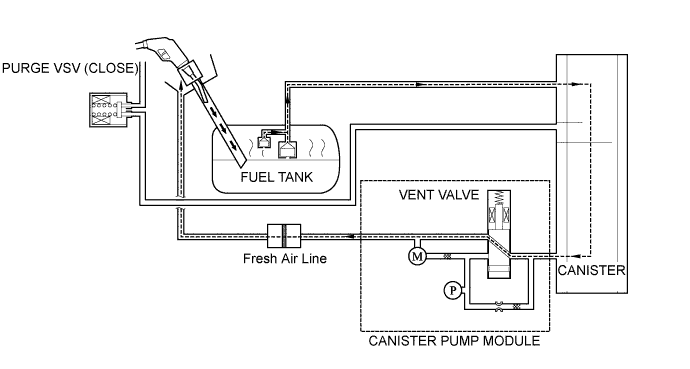
  4. ORVR (On-Board Refueling Vapor Recovery)

    1. When the internal pressure of the fuel tank increases during refueling, fuel vapors are fed to the canister. The air that has had the fuel vapors removed from it will be discharged through the fresh air line.


    2. The vent valve is used to open and close the fresh air line, and it is always open (even when the engine is stopped) except when the vehicle is in monitoring mode (the valve will be open as long as the vehicle is not in monitoring mode). If the vehicle is refueled in system monitoring mode, the ECM will recognize the refueling by way of the canister pressure sensor, which detects the sudden pressure increase in the fuel tank, and the ECM will open the vent valve.

      W101550E01


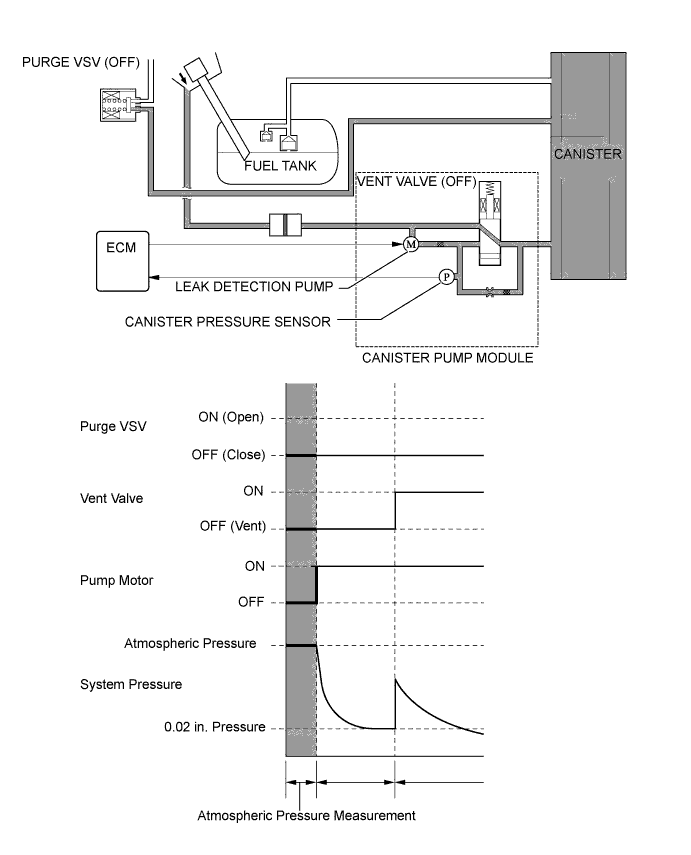
  5. EVAP Leak Check

    1. In evaporative emission control system, the ECM checks for evaporative emission leaks and outputs DTC (Diagnostic Trouble Code) in the event of a malfunction. An evaporative emission leak check consists of an application of vacuum to the evaporative emissions system and monitoring the system for changes in pressure in order to detect a leakage.


    2. The EVAP leak check operates in accordance with the following timing chart.
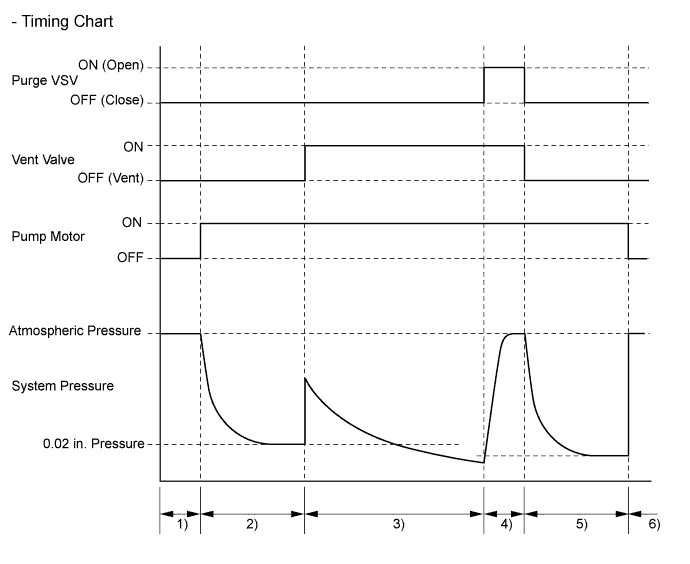

      W101551E01


      Order
      Operation
      Description
      Time
      1)
      Atmospheric Pressure Measurement
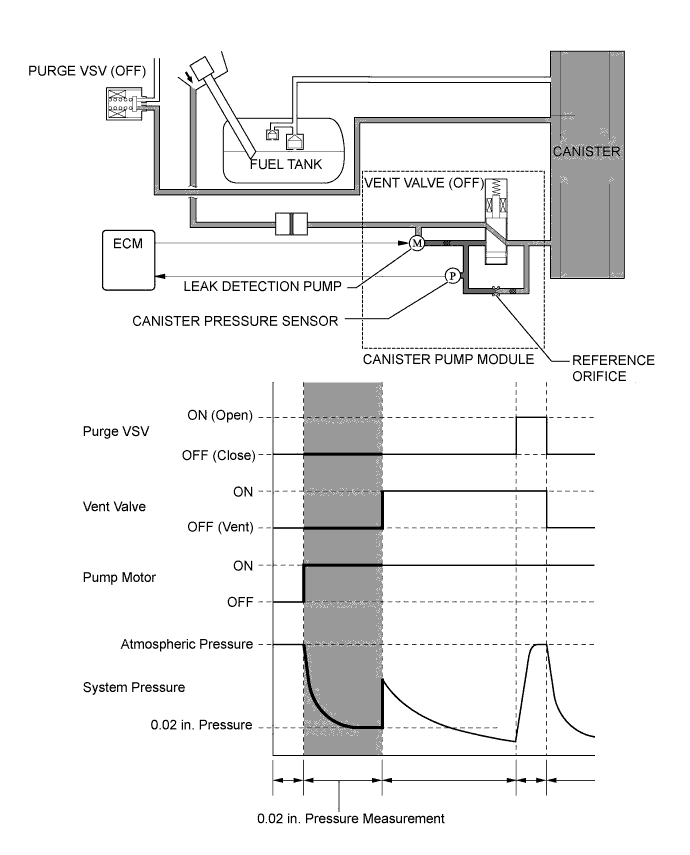
      The ECM turns the vent valve OFF (vent) and measures EVAP system pressure to memorize the atmospheric pressure.
      60 sec.
      2)
      0.02 in. Leak Pressure Measurement
      The leak detection pump creates negative pressure (vacuum) through a 0.02 in. orifice and the pressure is measured. The ECM determines this as the 0.02 in. leak pressure.
      The purpose of this measurement is to confirm vacuum pump operation, and to provide a baseline measurement value that will be used for comparison in subsequent leak test steps.
      360 sec.
      3)
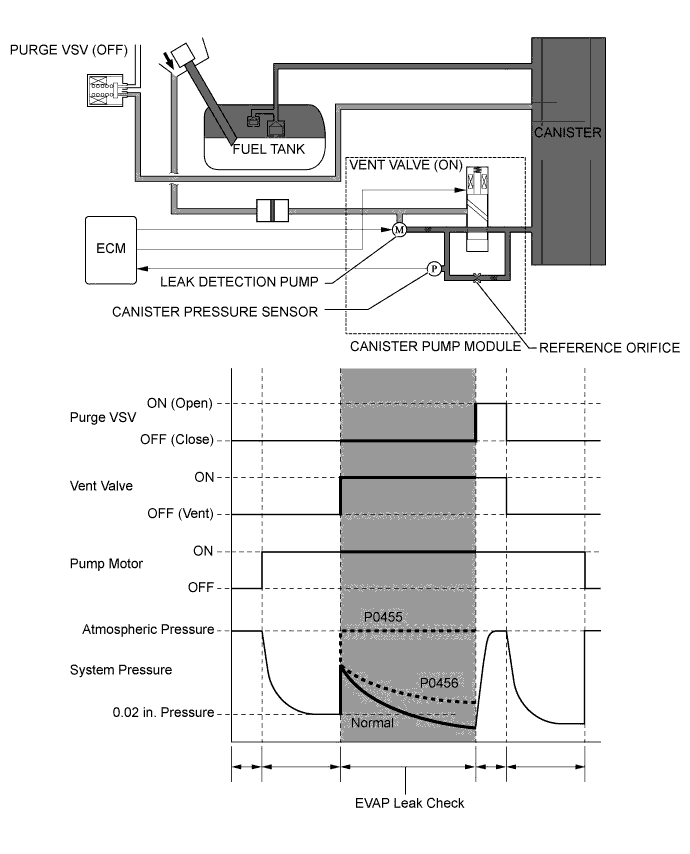
      EVAP Leak Check
      The leak detection pump creates negative pressure (vacuum) in the EVAP system and the EVAP system pressure is measured.
      If the stabilized pressure is larger than the 0.02 in. leak pressure, ECM determines that the EVAP system has a leak.
      If the EVAP pressure does not stabilize within 15 minutes, the ECM cancels EVAP monitor.
      Within 15 min.
      4)
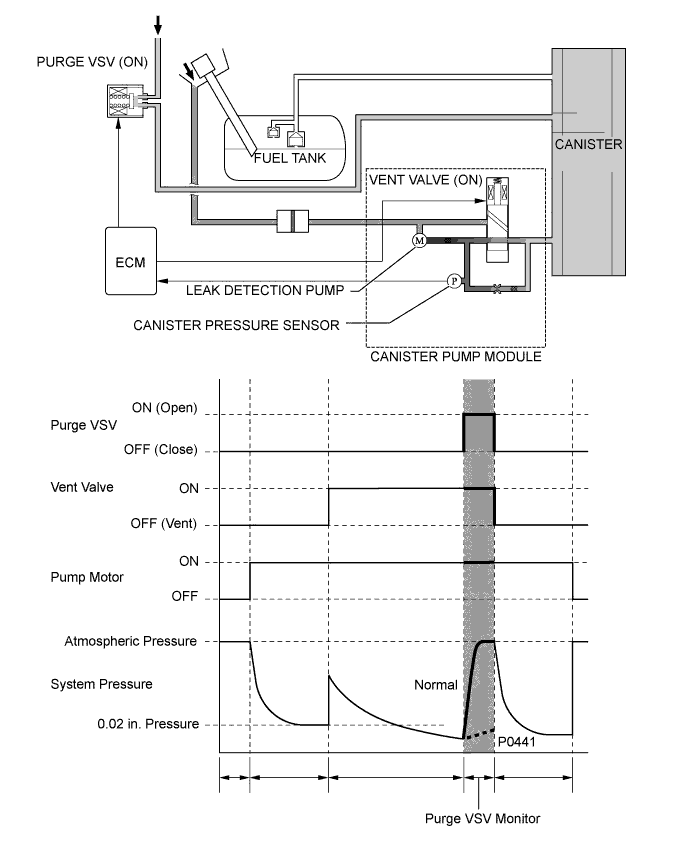
      Purge VSV Monitor
      The ECM opens the purge VSV and measures the EVAP pressure increase. If the increase is large, the ECM interprets this as normal.
      10 sec.
      5)
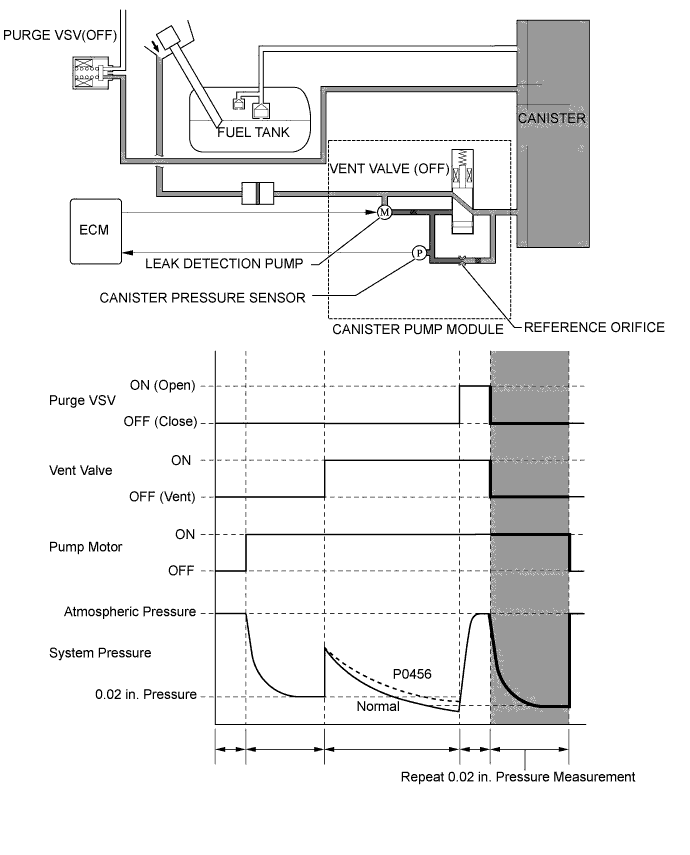
      Repeat 0.02 in. Leak Pressure Measurement
      The leak detection pump creates negative pressure (vacuum) through the 0.02 in. orifice and the pressure is measured. The ECM determines this as the 0.02 in. leak pressure.
      60 sec.
      6)
      Final Check
      The ECM measures the atmospheric pressure and records the monitor result.
      -

CONSTRUCTION


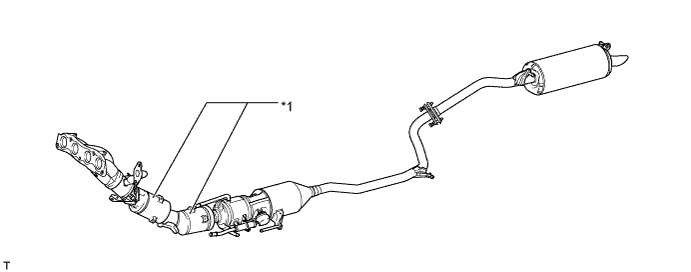
  1. TWC (Three-Way Catalytic converter)

    1. 2 TWCs are provided on the front of the front exhaust pipe.


    2. The TWC improves exhaust emissions due to optimized the cell density and wall thickness.


      W101552E01


      Text in Illustration 
      *1
      TWC
      -
      -


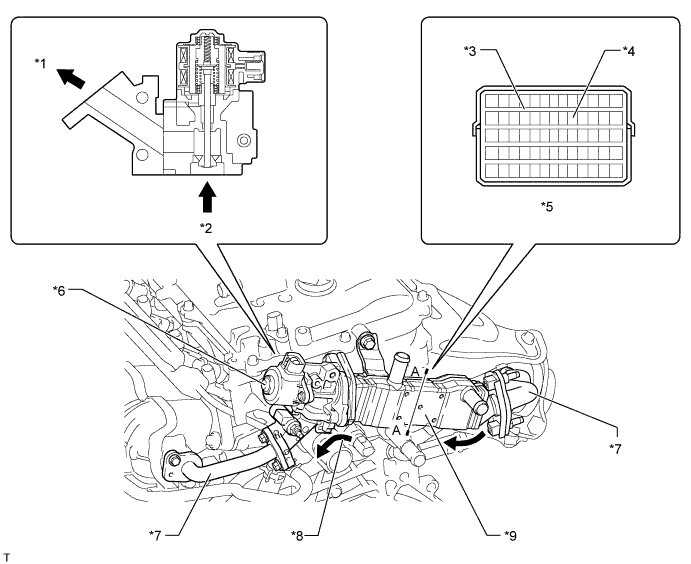
  2. EGR Valve and EGR Cooler

    1. A step motor type EGR valve is used, precisely controlling the EGR gas flow amount.


    2. The EGR cooler cools the exhaust gas temperature to improve the EGR efficiency.


      W101553E01


      Text in Illustration 
      *1
      To Intake Manifold
      *2
      From Exhaust Manifold
      *3
      Water Passage
      *4
      EGR Gas Passage
      *5
      A - A Cross Section
      *6
      EGR Valve Assembly
      *7
      EGR Pipe
      *8
      EGR Gas
      *9
      EGR Cooler
      -
      -


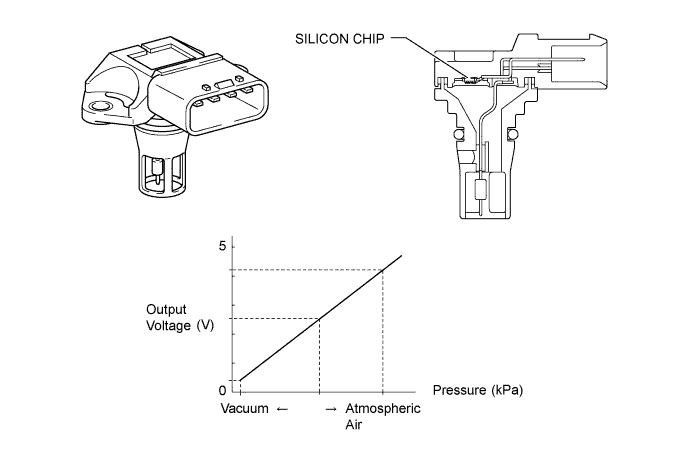
  3. Vacuum Sensor

    1. An E.F.I. vacuum sensor assembly is used to measure the intake manifold pressure for the EGR control.


    2. The E.F.I. vacuum sensor assembly consists of a silicon chip which utilizes the characteristic of a silicon chip that changes its electrical resistance when pressure is applied to it. The sensor converts the pressure into an electrical signal, and sends it to the ECM in an amplified form.


      W101554E02


OPERATION


  1. Atmospheric Pressure Measurement

    1. When the power switch is turned OFF, the purge VSV and the vent valve are turned OFF. Therefore, atmospheric pressure is introduced into the canister.

    2. The ECM measures the atmospheric pressure based on the signals provided by the canister pressure sensor.


    3. If the measurement value is out of standards, the ECM actuates the leak detection pump in order to monitor the changes in the pressure.


      W101555E01


  2. 0.02 in. Leak Pressure Measurement

    1. The vent valve remains off, and the ECM introduces atmospheric pressure into the canister and actuates the leak detection pump in order to create a negative pressure.

    2. At this time, the pressure will not decrease beyond a 0.02 in. pressure due to the atmospheric pressure that enters through a 0.02 in. diameter reference orifice.

    3. The ECM compares the logic value and this pressure, and stores it as a 0.02 in. leak pressure in its memory.

    4. If the measurement value is below the standard, the ECM will determine that the reference orifice is clogged and store DTC (Diagnostic Trouble Code) P043E in its memory.


    5. If the measurement value is above the standard, the ECM will determine that a high flow rate pressure is passing through the reference orifice and store DTC (Diagnostic Trouble Code) P043F, P2401 and P2402 in its memory.


      W101556E01


  3. EVAP Leak Check

    1. While actuating the leak detection pump, the ECM turns ON the vent valve in order to introduce a vacuum into the canister.

    2. When the pressure in the system stabilizes, the ECM compares this pressure and the 0.02 in. pressure in order to check for a leakage.

    3. If the detection value is below the 0.02 in. pressure, the ECM determines that there is no leakage.

    4. If the detection value is above the 0.02 in. pressure and near atmospheric pressure, the ECM determines that there is a gross leakage (large hole) and stores DTC P0455 in its memory.


    5. If the detection value is above the 0.02 in. pressure, the ECM determines that there is a small leakage and stores DTC P0456 in its memory.


      W101557E01


  4. Purge VSV Monitor

    1. After completing an EVAP leak check, the ECM turns ON (open) the purge VSV with the leak detection pump actuated, and introduces the atmospheric pressure from the intake manifold to the canister.

    2. If the pressure change at this time is within the normal range, the ECM determines the condition to be normal.


    3. If the pressure is out of the normal range, the ECM will stop the purge VSV monitor and store DTC P0441 in its memory.


      W101558E01


  5. Repeat 0.02 in. Leak Pressure Measurement

    1. While the ECM operates the leak detection pump, the purge VSV and vent valve turns off and a repeat 0.02 in. leak pressure measurement is performed.

    2. The ECM compares the measured pressure with the pressure during EVAP leak check.

    3. If the pressure during the EVAP leak check is below the measured value, the ECM determines that there is no leakage.


    4. If the pressure during the EVAP leak check is above the measured value, the ECM determines that there is a small leak and stores DTC P0456 in its memory.


      W101559E01