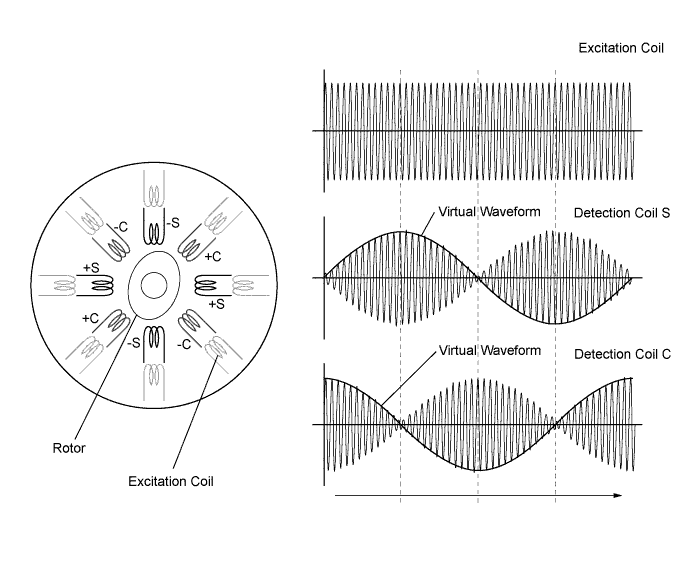
DTC P0A3F-243 Drive Motor "A" Position Sensor Circuit |
DTC P0A40-500 Drive Motor "A" Position Sensor Circuit Range / Performance |
DTC P0A41-245 Drive Motor "A" Position Sensor Circuit Low |
| DTC No. | INF Code | DTC Detection Condition | Trouble Area |
| P0A3F | 243 | Interphase short in the motor resolver circuit. Short circuit between signal lines of motor resolver phases is electrically detected. (1 trip detection logic) |
|
| P0A40 | 500 | Motor resolver output signal is out of the normal range (amplitude is too large or too small). (1 trip detection logic) | |
| P0A41 | 245 | Open or short in the motor resolver circuit. Motor resolver signal is out of the normal range (signal output amplitude is extremely small). (1 trip detection logic) |
| Related DTCs | P0A3F (INF 243): Short circuit between phases P0A40 (INF 500): Range check P0A41 (INF245): Circuit discontinuity / short circuit |
| Required sensors / components | Motor resolver |
| Frequency of operation | Continuous |
| Duration | TMC's intellectual property |
| MIL operation | 1 driving cycle |
| Sequence of operation | None |
| The monitor will run whenever the following DTCs are not present | TMC's intellectual property |
| Other conditions belong to TMC's intellectual property | - |
| TMC's intellectual property | - |
| Motor resolver | DTC P0A3F (INF 243) is not detected DTC P0A40 (INF 500) is not detected DTC P0A41 (INF 245) is not detected |
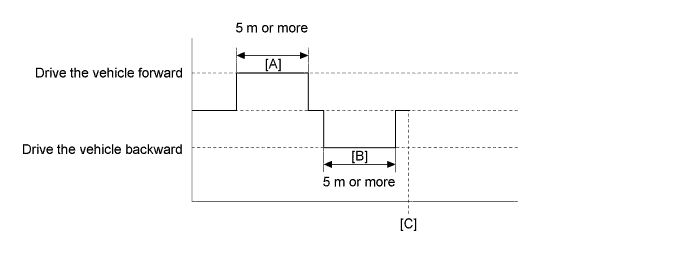
| 1.CHECK CONNECTOR CONNECTION CONDITION (INVERTER WITH CONVERTER ASSEMBLY CONNECTOR) |
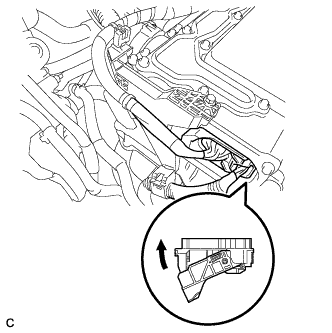 |
Check that the service plug grip is not installed.
Check the connection of the low voltage connector of the inverter with converter assembly.
|
| ||||
| OK | |
 |
| 2.CHECK HARNESS AND CONNECTOR (INVERTER WITH CONVERTER ASSEMBLY - GENERATOR RESOLVER) |
Disconnect the low voltage connector D29 from the inverter with converter assembly.
Turn the power switch on (IG).
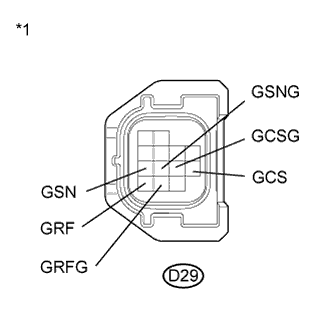 |
Measure the voltage according to the value(s) in the table below.
| Tester Connection | Switch Condition | Specified Condition |
| D29-11 (GRF) - Body ground | Power switch on (IG) | Below 1 V |
| D29-12 (GRFG) - Body ground | Power switch on (IG) | Below 1 V |
| D29-7 (GSN) - Body ground | Power switch on (IG) | Below 1 V |
| D29-8 (GSNG) - Body ground | Power switch on (IG) | Below 1 V |
| D29-10 (GCS) - Body ground | Power switch on (IG) | Below 1 V |
| D29-9 (GCSG) - Body ground | Power switch on (IG) | Below 1 V |
| *1 | Front view of wire harness connector (to Inverter with Converter Assembly) |
Turn the power switch off.
Connect the low voltage connector from the inverter with converter assembly.
|
| ||||
| OK | |
|
| 3.CHECK GENERATOR RESOLVER |
Disconnect the low voltage connector D29 from the inverter with converter assembly.
|
Measure the resistance according to the value(s) in the table below.
| Tester Connection | Switch Condition | Specified Condition |
| D29-11 (GRF) - D29-12 (GRFG) | Power switch off | 7.1 to 21.6 Ω |
| D29-7 (GSN) - D29-8 (GSNG) | Power switch off | 13.7 to 34.5 Ω |
| D29-10 (GCS) - D29-9 (GCSG) | Power switch off | 12.8 to 32.4 Ω |
| Tester Connection | Switch Condition | Specified Condition |
| D29-11 (GRF) or D29-12 (GRFG) - Body ground and other terminals | Power switch off | 1 MΩ or higher |
| D29-7 (GSN) or D29-8 (GSNG) - Body ground and other terminals | Power switch off | 1 MΩ or higher |
| D29-10 (GCS) or D29-9 (GCSG) - Body ground and other terminals | Power switch off | 1 MΩ or higher |
| *1 | Front view of wire harness connector (to Inverter with Converter Assembly) |
Connect the inverter with converter assembly connector.
|
| ||||
| OK | |
|
| 4.CHECK HARNESS AND CONNECTOR (INVERTER WITH CONVERTER ASSEMBLY - MOTOR RESOLVER) |
Disconnect the low voltage connector D29 from the inverter with converter assembly.
Turn the power switch on (IG).
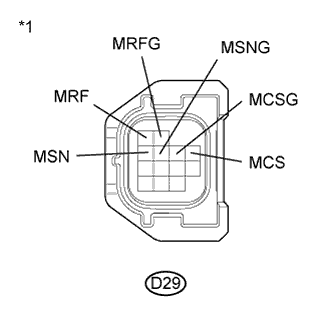 |
Measure the voltage according to the value(s) in the table below.
| Tester Connection | Switch Condition | Specified Condition |
| D29-1 (MRF) - Body ground | Power switch on (IG) | Below 1 V |
| D29-2 (MRFG) - Body ground | Power switch on (IG) | Below 1 V |
| D29-3 (MSN) - Body ground | Power switch on (IG) | Below 1 V |
| D29-4 (MSNG) - Body ground | Power switch on (IG) | Below 1 V |
| D29-6 (MCS) - Body ground | Power switch on (IG) | Below 1 V |
| D29-5 (MCSG) - Body ground | Power switch on (IG) | Below 1 V |
| *1 | Front view of wire harness connector (to Inverter with Converter Assembly) |
Turn the power switch off.
Connect the inverter with converter assembly connector.
|
| ||||
| OK | |
|
| 5.CHECK MOTOR RESOLVER |
Disconnect the low voltage connector D29 from the inverter with converter assembly.
|
Measure the resistance according to the value(s) in the table below.
| Tester Connection | Switch Condition | Specified Condition |
| D29-1 (MRF) - D29-2 (MRFG) | Power switch off | 7.1 to 21.6 Ω |
| D29-3 (MSN) - D29-4 (MSNG) | Power switch off | 13.7 to 34.5 Ω |
| D29-6 (MCS) - D29-5 (MCSG) | Power switch off | 12.8 to 32.4 Ω |
| Tester Connection | Switch Condition | Specified Condition |
| D29-1 (MRF) or D29-2 (MRFG) - Body ground and other terminals | Power switch off | 1 MΩ or higher |
| D29-3 (MSN) or D29-4 (MSNG) - Body ground and other terminals | Power switch off | 1 MΩ or higher |
| D29-6 (MCS) or D29-5 (MCSG) - Body ground and other terminals | Power switch off | 1 MΩ or higher |
| *1 | Front view of wire harness connector (to Inverter with Converter Assembly) |
Connect the inverter with converter assembly connector.
|
| ||||
| OK | |
|
| 6.CHECK CONNECTOR CONNECTION CONDITION (GENERATOR RESOLVER CONNECTOR) |
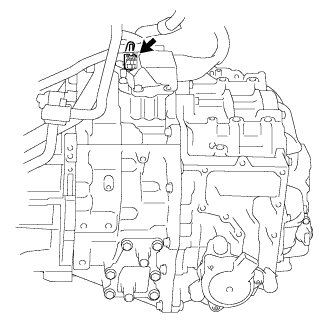 |
Check the connection of the generator resolver connector.
|
| ||||
| OK | |
|
| 7.CHECK CONNECTOR CONNECTION CONDITION (MOTOR RESOLVER CONNECTOR) |
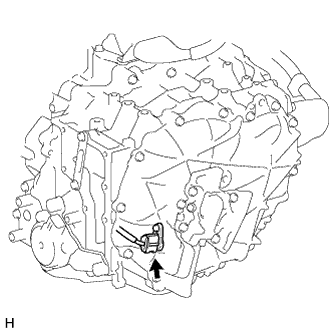 |
Check the connection of the motor resolver connector.
|
| ||||
| OK | ||
 | ||
| ||
| 8.CHECK CONNECTOR CONNECTION CONDITION (GENERATOR RESOLVER CONNECTOR) |
|
Check the connection of the generator resolver connector.
|
| ||||
| OK | |
|
| 9.CHECK HARNESS AND CONNECTOR (INVERTER WITH CONVERTER ASSEMBLY - GENERATOR RESOLVER) |
Disconnect the low voltage connector D29 from the inverter with converter assembly.
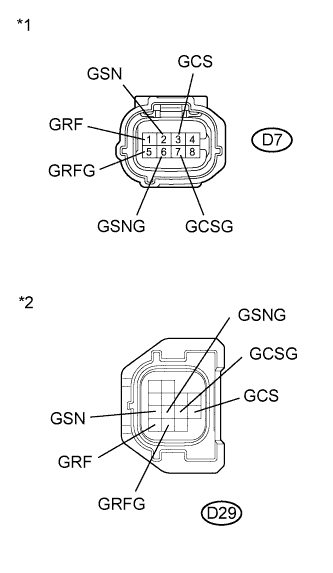 |
Disconnect the generator resolver connector.
Measure the resistance according to the value(s) in the table below.
| Tester Connection | Switch Condition | Specified Condition |
| D7-1 (GRF) - D29-11 (GRF) | Power switch off | Below 1 Ω |
| D7-5 (GRFG) - D29-12 (GRFG) | Power switch off | Below 1 Ω |
| D7-2 (GSN) - D29-7 (GSN) | Power switch off | Below 1 Ω |
| D7-6 (GSNG) - D29-8 (GSNG) | Power switch off | Below 1 Ω |
| D7-3 (GCS) - D29-10 (GCS) | Power switch off | Below 1 Ω |
| D7-7 (GCSG) - D29-9 (GCSG) | Power switch off | Below 1 Ω |
| Tester Connection | Switch Condition | Specified Condition |
| D7-1 (GRF) or D29-11 (GRF) - Body ground and other terminals | Power switch off | 1 MΩ or higher |
| D7-5 (GRFG) or D29-12 (GRFG) - Body ground and other terminals | Power switch off | 1 MΩ or higher |
| D7-2 (GSN) or D29-7 (GSN) - Body ground and other terminals | Power switch off | 1 MΩ or higher |
| D7-6 (GSNG) or D29-8 (GSNG) - Body ground and other terminals | Power switch off | 1 MΩ or higher |
| D7-3 (GCS) or D29-10 (GCS) - Body ground and other terminals | Power switch off | 1 MΩ or higher |
| D7-7 (GCSG) or D29-9 (GCSG) - Body ground and other terminals | Power switch off | 1 MΩ or higher |
| *1 | Front view of wire harness connector (to Generator Resolver) |
| *2 | Front view of wire harness connector (to Inverter with Converter Assembly) |
Connect the generator resolver connector.
Connect the inverter with converter assembly connector.
|
| ||||
| OK | ||
| ||
| ||
| 10.CHECK CONNECTOR CONNECTION CONDITION (MOTOR RESOLVER CONNECTOR) |
|
Check the connection of the motor resolver connector.
|
| ||||
| OK | |
|
| 11.CHECK HARNESS AND CONNECTOR (INVERTER WITH CONVERTER ASSEMBLY - MOTOR RESOLVER) |
Disconnect the low voltage connector D29 from the inverter with converter assembly.
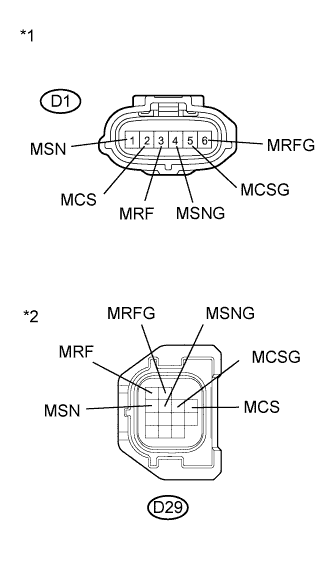 |
Disconnect the motor resolver connector.
Measure the resistance according to the value(s) in the table below.
| Tester Connection | Switch Condition | Specified Condition |
| D1-3 (MRF) - D29-1 (MRF) | Power switch off | Below 1 Ω |
| D1-6 (MRFG) - D29-2 (MRFG) | Power switch off | Below 1 Ω |
| D1-1 (MSN) - D29-3 (MSN) | Power switch off | Below 1 Ω |
| D1-4 (MSNG) - D29-4 (MSNG) | Power switch off | Below 1 Ω |
| D1-2 (MCS) - D29-6 (MCS) | Power switch off | Below 1 Ω |
| D1-5 (MCSG) - D29-5 (MCSG) | Power switch off | Below 1 Ω |
| Tester Connection | Switch Condition | Specified Condition |
| D1-3 (MRF) or D29-1 (MRF) - Body ground and other terminals | Power switch off | 1 MΩ or higher |
| D1-6 (MRFG) or D29-2 (MRFG) - Body ground and other terminals | Power switch off | 1 MΩ or higher |
| D1-1 (MSN) or D29-3 (MSN) - Body ground and other terminals | Power switch off | 1 MΩ or higher |
| D1-4 (MSNG) or D29-4 (MSNG) - Body ground and other terminals | Power switch off | 1 MΩ or higher |
| D1-2 (MCS) or D29-6 (MCS) - Body ground and other terminals | Power switch off | 1 MΩ or higher |
| D1-5 (MCSG) or D29-5 (MCSG) - Body ground and other terminals | Power switch off | 1 MΩ or higher |
| *1 | Front view of wire harness connector (to Motor Resolver) |
| *2 | Front view of wire harness connector (to Inverter with Converter Assembly) |
Connect the motor resolver connector.
Connect the inverter with converter assembly connector.
|
| ||||
| OK | ||
| ||
| ||

