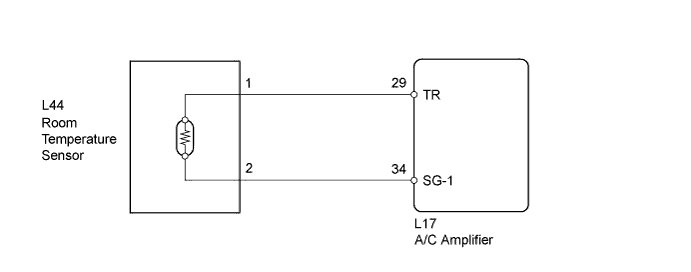
DTC B1411/11 Room Temperature Sensor Circuit |
| DTC No. | DTC Detection Condition | Trouble Area |
| B1411/11 | Open or short in room temperature sensor circuit |
|
| 1.READ VALUE USING TECHSTREAM |
Connect the Techstream to the DLC3.
Turn the power switch on (IG).
Turn the Techstream on.
Enter the following menus: Body Electrical / Air Conditioner / Data List.
Check the value(s) by referring to the table below.
| Tester Display | Measurement Item/Range | Normal Condition | Diagnostic Note |
| Room Temperature Sensor | Room temperature sensor / Min.: -6.5°C (20.3°F) Max.: 57.25°C (135.05°F) | Actual cabin temperature displayed | - |
| Result | Proceed to |
| NG | A |
| OK (When troubleshooting according to Problem Symptoms Table) | B |
| OK (When troubleshooting according to the DTC) | C |
|
| ||||
|
| ||||
| A | |
 |
| 2.INSPECT ROOM TEMPERATURE SENSOR |
Remove the room temperature sensor.
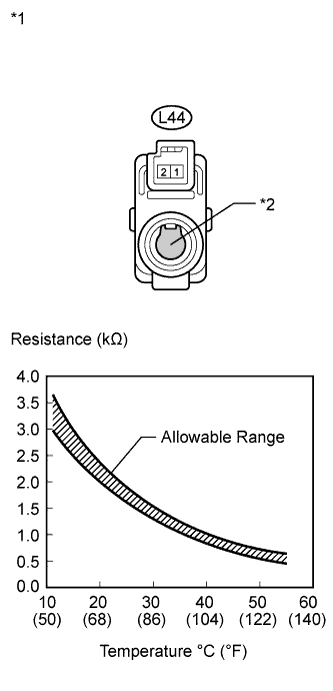 |
Disconnect the room temperature sensor connector.
Measure the resistance according to the value(s) in the table below.
| Tester Connection | Condition | Specified Condition |
| L44-1 - L44-2 | 10°C (50°F) | 3.00 to 3.73 kΩ |
| L44-1 - L44-2 | 15°C (59°F) | 2.45 to 2.88 kΩ |
| L44-1 - L44-2 | 20°C (68°F) | 1.95 to 2.30 kΩ |
| L44-1 - L44-2 | 25°C (77°F) | 1.60 to 1.80 kΩ |
| L44-1 - L44-2 | 30°C (86°F) | 1.28 to 1.47 kΩ |
| L44-1 - L44-2 | 35°C (95°F) | 1.00 to 1.22 kΩ |
| L44-1 - L44-2 | 40°C (104°F) | 0.80 to 1.00 kΩ |
| L44-1 - L44-2 | 45°C (113°F) | 0.65 to 0.85 kΩ |
| L44-1 - L44-2 | 50°C (122°F) | 0.50 to 0.70 kΩ |
| L44-1 - L44-2 | 55°C (131°F) | 0.44 to 0.60 kΩ |
| L44-1 - L44-2 | 60°C (140°F) | 0.36 to 0.50 kΩ |
| *1 | Component without harness connected (Room Temperature Sensor) |
| *2 | Sensing Portion |
|
| ||||
| OK | |
|
| 3.CHECK HARNESS AND CONNECTOR (ROOM TEMPERATURE SENSOR - A/C AMPLIFIER) |
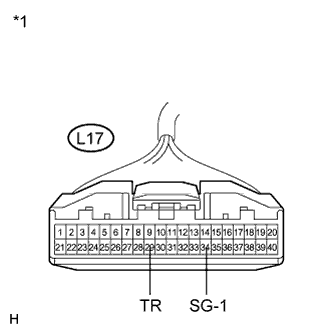 |
Disconnect the A/C amplifier connector.
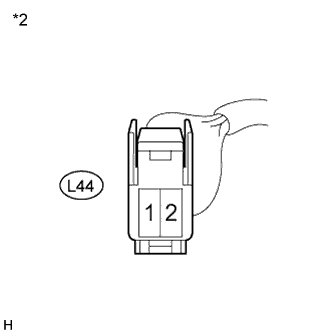 |
Measure the resistance according to the value(s) in the table below.
| Tester Connection | Condition | Specified Condition |
| L17-29 (TR) - L44-1 | Always | Below 1 Ω |
| L17-34 (SG-1) - L44-2 | Always | Below 1 Ω |
| L17-29 (TR) - Body ground | Always | 10 kΩ or higher |
| L17-34 (SG-1) - Body ground | Always | 10 kΩ or higher |
| *1 | Front view of wire harness connector (to A/C Amplifier) |
| *2 | Front view of wire harness connector (to Room Temperature Sensor) |
|
| ||||
| OK | ||
 | ||
| ||
