Home › Engine / Hybrid System › HYBRID / BATTERY CONTROL › HYBRID CONTROL SYSTEM

DTC    P0A60-288    Drive Motor "A" Phase V Current

DTC    P0A60-290    Drive Motor "A" Phase V Current

DTC    P0A60-294    Drive Motor "A" Phase V Current

DTC    P0A60-501    Drive Motor "A" Phase V Current

DTC    P0A63-296    Drive Motor "A" Phase W Current

DTC    P0A63-298    Drive Motor "A" Phase W Current

DTC    P0A63-302    Drive Motor "A" Phase W Current

DTC    P0A63-502    Drive Motor "A" Phase W Current

for Preparation Click here


DESCRIPTION

The MG ECU located in the inverter with converter assembly monitors the motor inverter current sensors. P0A60 and P0A63 indicate malfunctions in current sensors, and they do not indicate malfunctions in the high-voltage system.

HINT:
The term "drive motor A" indicates motor.


DTC No.
INF Code
DTC Detection Condition
Trouble Area
P0A60
288
Malfunction in motor inverter current sensor (phase V sub sensor)*
(1 trip detection logic)
Inverter with converter assembly
P0A60
290
Malfunction in motor inverter current sensor (phase V main sensor)*
(1 trip detection logic)
P0A60
294
Malfunction in motor inverter current sensor (performance problem or open of phase V sensors)*
Detects an abnormal condition when the difference between the output of the phase V main sensor and phase V sub sensor is larger than the standard.
(1 trip detection logic)
P0A60
501
Malfunction in motor inverter current sensor (phase V main and sub sensors offset)*
(1 trip detection logic)
P0A63
296
Malfunction in motor inverter current sensor (phase W sub sensor)*
(1 trip detection logic)
P0A63
298
Malfunction in motor inverter current sensor (phase W main sensor)*
(1 trip detection logic)
P0A63
302
Malfunction in motor inverter current sensor (performance problem or open of phase W sensors)*
Detects an abnormal condition when the difference between the output of the phase W main sensor and phase W sub sensor is larger than the standard.
(1 trip detection logic)
P0A63
502
Malfunction in motor inverter current sensor (phase W main and sub sensors offset)*
(1 trip detection logic)
  1. *: Stores a DTC when the current sensor signal is out of the normal range.

MONITOR DESCRIPTION

The power management control ECU (HV CPU) monitors the motor inverter current sensor. If the power management control ECU (HV CPU) detects a current sensor fault, it will illuminate the MIL and set a DTC.

MONITOR STRATEGY


Related DTCs
P0A60 (INF 288/290/294/501): Drive Motor "A" Phase V Current
P0A63 (INF 296/298/302/502): Drive Motor "A" Phase W Current
Required sensors / components
Motor inverter current sensor, motor resolver
Frequency of operation
Continuous
Duration
TMC's intellectual property
MIL operation
1 driving cycle
Sequence of operation
None

TYPICAL ENABLING CONDITIONS


The monitor will run whenever the following DTCs are not present
TMC's intellectual property
Other conditions belong to TMC's intellectual property
-

TYPICAL MALFUNCTION THRESHOLDS


TMC's intellectual property
-

COMPONENT OPERATING RANGE


Power management control ECU (HV CPU)
DTC P0A60 (INF 288/ 290/ 294/ 501) is not detected
DTC P0A63 (INF 296/ 298/ 302/ 502) is not detected

CONFIRMATION DRIVING PATTERN


A308309E01

  1. Connect the Techstream to the DLC3.
  2. Turn the power switch on (IG) and turn the Techstream on.
  3. Clear the DTCs (even if no DTCs are stored, perform the clear DTC procedure).
  4. Turn the power switch off and wait for 30 seconds or more.
  5. Turn the power switch on (IG) and wait for 5 seconds or more.
  6. Turn the Techstream on.
  7. Turn the power switch on (READY) with park (P) selected and wait for 5 seconds or more.
  8. Move the shift lever to N and wait for 5 seconds or more.
  9. Depress the accelerator pedal of the vehicle with the engine stopped and park (P) selected to start the engine.
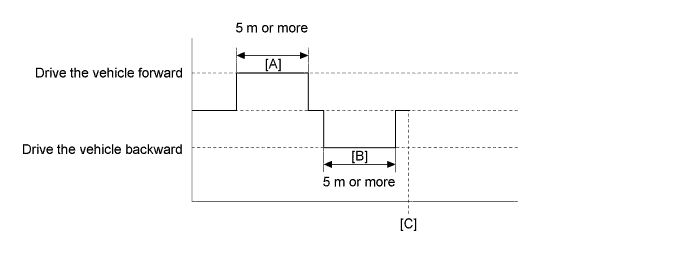
  10. Drive the vehicle forward with drive (D) selected for 5 m or more.[A]
  11. Drive the vehicle backward with reverse (R) selected for 5 m or more.[B]
  12. Enter the following menus: Powertrain / Hybrid Control / Trouble Codes.[C]
  13. Read the current DTCs.

    HINT:
    1. If a current DTC is output, the system is malfunctioning.
    2. If a current DTC is not output and want to confirm permanent DTC, perform the following procedure.

  14. Check that permanent DTCs are cleared.
  15. If the permanent DTCs are not cleared, perform the universal trip, and then check for permanent DTCs again.

INSPECTION PROCEDURE

HINT:
After the repair, clear the DTCs and perform the following procedure to check that DTCs are not output.
  1. Turn the power switch on (IG) and wait for 5 seconds or more.
  2. Turn the power switch on (READY) with park (P) selected and wait for 5 seconds or more.
  3. Move the shift lever to N and wait for 5 seconds or more.
  4. Depress the accelerator pedal of the vehicle with the engine stopped and park (P) selected to start the engine.
  5. Drive the vehicle forward with drive (D) selected for 5 m or more.
  6. Drive the vehicle backward with reverse (R) selected for 5 m or more.

1.CHECK DTC OUTPUT (HV)
  1. Connect the Techstream to the DLC3.

  1. Turn the power switch on (IG).

  1. Enter the following menus: Powertrain / Hybrid Control / Trouble Codes.

  1. Check if DTCs are output.

    Result:
    Result
    Proceed to
    P0A60 or P0A63 only is output.
    A
    P0A78-202 is output.
    B

  1. Turn the power switch off.


B
GO TO DTC CHART (Click here)
A


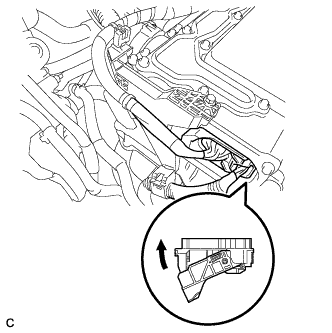
2.CHECK CONNECTOR CONNECTION CONDITION (INVERTER WITH CONVERTER ASSEMBLY CONNECTOR)
A214648

CAUTION:
Be sure to wear insulated gloves.

  1. Check that the service plug grip is not installed.

    NOTICE:
    After removing the service plug grip, do not turn the power switch on (READY), unless instructed by the repair manual because this may cause a malfunction.

NOTICE:
Before disconnecting the connector, confirm that it is properly connected by checking that the locking claws are engaged and that the connector does not pull out.

  1. Check the connection of the low voltage connector of the inverter with converter assembly.

    OK:
    The connector is connected securely and there are no contact problems.

    HINT:
    When connecting the connector, insert it with the locking lever in the raised position. Rotate the lever downward and make sure that the connector is pulled into its socket. When the locking lever is in its fully closed position, a click will be heard as its locking claws engage. After the click is heard, pull up on the connector to confirm that it is properly connected.


NG
CONNECT SECURELY
OK

REPLACE INVERTER WITH CONVERTER ASSEMBLY (Click here)