Home › Engine / Hybrid System › HYBRID / BATTERY CONTROL › HYBRID CONTROL SYSTEM

DTC    P0A90-251    Drive Motor "A" Performance

for Preparation Click here


DESCRIPTION

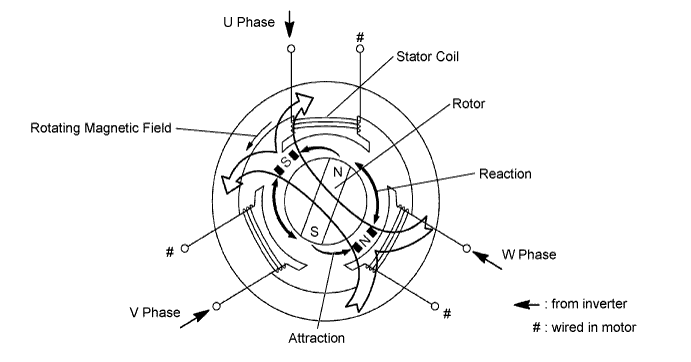
When three-phase alternating current flows through the three-phase windings of the stator coil, a rotating magnetic field is generated in motor. The system controls the rotation of the magnetic field in accordance with the rotating position and speed of the rotor. As a result, the permanent magnets provided in the rotor are pulled in the direction of rotation, generating torque. The generated torque is almost proportional to the amount of current. The system controls motor speed by regulating the frequency of the alternating current. Furthermore, the system properly controls the rotating magnetic field and the angle of the rotor magnets in order to generate high torque in an efficient manner, even at high speeds.

A093725E11


DTC No.
INF Code
DTC Detection Condition
Trouble Area
P0A90
251
Motor magnetic force deterioration or same phase short circuit
Magnetic force of the motor decreases or a coil circuit in one of the 3 phases remains shorted for a certain period of time.
(1 trip detection logic)
  1. Hybrid vehicle motor assembly
  2. Motor cable
  3. Inverter with converter assembly

Related Data List 
DTC No.
Data List
P0A90-251
Mtr-Temp (MG2) Max

MONITOR DESCRIPTION

The MG ECU monitors motor. If the MG ECU detects a reduction in the magnetic force of MG2 or an inphase short, it interprets this as an motor failure. The power management control ECU (HV CPU) will illuminate the MIL and set a DTC.

MONITOR STRATEGY


Related DTCs
P0A90 (INF 251): Magnetic force deterioration / same phase short circuit
Required sensors / components
MG2, inverter, motor resolver
Frequency of operation
Continuous
Duration
TMC's intellectual property
MIL operation
1 driving cycle
Sequence of operation
None

TYPICAL ENABLING CONDITIONS


The monitor will run whenever the following DTCs are not present
TMC's intellectual property
Other conditions belong to TMC's intellectual property
-

TYPICAL MALFUNCTION THRESHOLDS


TMC's intellectual property
-

COMPONENT OPERATING RANGE


Power management control ECU (HV CPU)
DTC P0A90 (INF 251) is not detected

CONFIRMATION DRIVING PATTERN


A218445E07

  1. Connect the Techstream to the DLC3.
  2. Turn the power switch on (IG) and turn the Techstream on.
  3. Clear the DTCs (even if no DTCs are stored, perform the clear DTC procedure).
  4. Turn the power switch off and wait for 30 seconds or more.
  5. Turn the power switch on (IG) and turn the Techstream on.
  6. Turn the power switch on (READY).
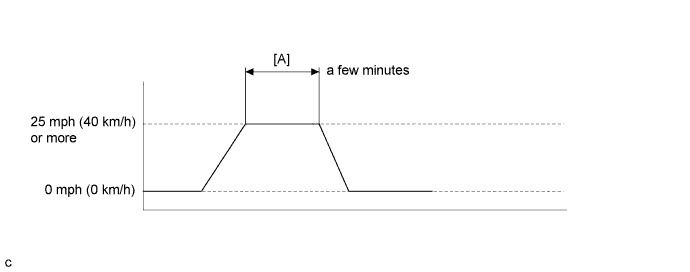
  7. Drive the vehicle until the cumulative traveling time driving a vehicle speed of 25 mph (40 km/h) or more in a few minutes. (It is not required to keep driving at 25 mph (40 km/h) or more)[A]
  8. Enter the following menus: Powertrain / Hybrid Control / Trouble Codes.
  9. Read the current DTCs.

    HINT:
    1. If a current DTC is output, the system is malfunctioning.
    2. If a current DTC is not output and want to confirm permanent DTC, perform the following procedure.

  10. Check that permanent DTCs are cleared.
  11. If the permanent DTCs are not cleared, perform the universal trip, and then check for permanent DTCs again.

INSPECTION PROCEDURE

CAUTION:
  1. Before inspecting the high-voltage system, take safety precautions such as wearing insulated gloves and removing the service plug grip to prevent electrical shocks. After removing the service plug grip, put it in your pocket to prevent other technicians from accidentally reconnecting it while you are working on the high-voltage system.
  2. After disconnecting the service plug grip, wait for at least 10 minutes before touching any of the high-voltage connectors or terminals. After waiting for 10 minutes, check the voltage at the terminals in the inspection point in the inverter with converter assembly. The voltage should be 0 V before beginning work.

    HINT:
    Waiting for at least 10 minutes is required to discharge the high-voltage capacitor inside the inverter with converter assembly.

HINT:
After the repair, clear the DTCs and perform the following procedure to check that DTCs are not output.
  1. Drive the vehicle until the cumulative traveling time driving a vehicle speed of 25 mph (40 km/h) or more is a few minutes. (It is not required to keep driving at 25 mph (40 km/h) or more.)

1.CHECK DTC OUTPUT (HV)
  1. Connect the Techstream to the DLC3.

  1. Turn the power switch on (IG).

  1. Enter the following menus: Powertrain / Hybrid Control / Trouble Codes.

  1. Check if DTCs are output.

    Result:
    Result
    Proceed to
    P0A90-251 only is output or DTCs except the ones in the following table are also output.
    A
    Any of the following DTCs are also output.
    B


    DTC No.
    Relevant Diagnosis
    P0A1A (all INF codes)*1
    Generator Control Module
    P0A1B (all INF codes)*1
    Drive Motor "A" Control Module
    P0A1D (all INF codes)*1
    Hybrid Powertrain Control Module
    P0A60 (all INF codes)*1
    Drive Motor "A" Phase V Current
    P0A63 (all INF codes)*1
    Drive Motor "A" Phase W Current
    P0A72 (all INF codes)*1
    Generator Phase V Current
    P0A75 (all INF codes)*1
    Generator Phase W Current
    P0A3F-243
    Drive Motor "A" Position Sensor Circuit
    P0A40-500
    Drive Motor "A" Position Sensor Circuit Range/Performance
    P0A41-245
    Drive Motor "A" Position Sensor Circuit Low
    P0A4B-253
    Generator Position Sensor Circuit
    P0A4C-513
    Generator Position Sensor Circuit Range/Performance
    P0A4D-255
    Generator Position Sensor Circuit Low
    P0A51-174
    Drive Motor "A" Current Sensor Circuit
    P0A78-202, 266, 267, 306, 510, 586
    Drive Motor "A" Inverter Performance
    P0A7A-344, 522
    Generator Inverter Performance
    P0A90-509
    Drive Motor "A" Performance
    P0A92-521
    Hybrid Generator Performance
    P0A94-585, 587, 589, 590
    DC / DC Converter Performance
    P0AA6 (all INF codes)*1
    Hybrid Battery Voltage System Isolation Fault
    P0C76-523
    Hybrid Battery System Discharge Time Too Long
    P3004-132
    High Voltage Power Resource
    P3233-750
    Open or Short to B+ in Blocking of HV Gate Connection

    HINT:
    1. *1: If any INF codes are output for this DTC, refer to the corresponding diagnostic procedure.
    2. P0A90-251 may be output due to a malfunction which causes the DTCs in the table above to be output. In this case, first troubleshoot the output DTCs in the table above. Then, perform a reproduction test to check that no DTCs are output.

  1. Turn the power switch off.


B
GO TO DTC CHART (Click here)
A


2.SIMULATION TEST
  1. Connect the Techstream to the DLC3.

  1. Turn the power switch on (IG).

  1. Clear the DTCs.

  1. Test-drive the vehicle at a speed of 25 mph (40 km/h) for approximately 1 minute.

    CAUTION:
    When performing the confirmation driving pattern, obey all speed limits and traffic laws.

  1. Enter the following menus: Powertrain / Hybrid Control / Trouble Codes.

  1. Check if DTCs are output.

    Result:
    Result
    Proceed to
    P0A90-251 is output or no DTC is output.
    A
    P0A78-306 or P0A90-509 is output.
    B

  1. Turn the power switch off.


B
GO TO DTC CHART (Click here)
A


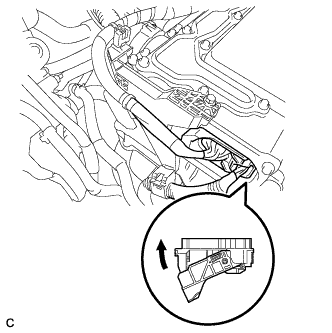
3.CHECK CONNECTOR CONNECTION CONDITION (INVERTER WITH CONVERTER ASSEMBLY CONNECTOR)
A214648

CAUTION:
Be sure to wear insulated gloves.

  1. Check that the service plug grip is not installed.
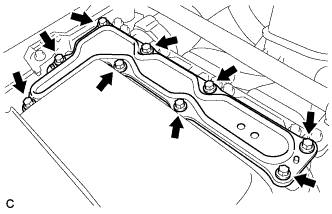
    NOTICE:
    After removing the service plug grip, do not turn the power switch on (READY), unless instructed by the repair manual because this may cause a malfunction.

NOTICE:
Before disconnecting the connector, confirm that it is properly connected by checking that the locking claws are engaged and that the connector does not pull out.

  1. Check the connection of the low voltage connector of the inverter with converter assembly.

    OK:
    The connector is connected securely and there are no contact problems.

    HINT:
    When connecting the connector, insert it with the locking lever in the raised position. Rotate the lever downward and make sure that the connector is pulled into its socket. When the locking lever is in its fully closed position, a click will be heard as its locking claws engage. After the click is heard, pull up on the connector to confirm that it is properly connected.


NG
CONNECT SECURELY
OK


4.CHECK INVERTER WITH CONVERTER ASSEMBLY (MOTOR CABLE CONNECTION CONDITION)

CAUTION:
Be sure to wear insulated gloves.

  1. Check that the service plug grip is not installed.

    NOTICE:
    After removing the service plug grip, do not turn the power switch on (READY), unless instructed by the repair manual because this may cause a malfunction.


    A209686
  1. Remove the inverter terminal cover from the inverter with converter assembly.
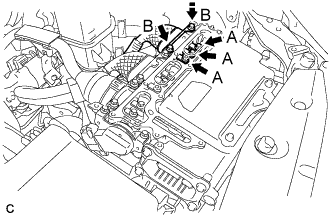


    A215644E02
  1. Check that the bolts for the motor cable are tightened to the specified torque, the motor cable is connected securely, and there are no contact problems.

    Specified Condition:
    Bolt A:
    8.0 N*m (82 kgf*cm, 71 in.*lbf)
    Bolt B:
    9.2 N*m (94 kgf*cm, 81 ft.*lbf)

    NOTICE:
    Make sure that the tightening torque of the bolt A is between 6.4 and 9.6 N*m (65 and 98 kgf*cm, 57 and 85 in.*lbf).

  1. Disconnect the motor cable from the inverter with converter assembly.

  1. Check for arc marks at the bolts for the motor cable.

    Result:
    Result
    Proceed to
    The terminals are connected securely and there are no contact problems.
    There are no arc marks.
    A
    The terminals are not connected securely and there is a contact problem.
    There are arc marks.
    B
    The terminals are not connected securely and there is a contact problem.
    There are no arc marks.
    C
    The terminals are connected securely and there are no contact problems.
    There are arc marks.
    B

  1. Connect the motor cable to the inverter with converter assembly.

  1. Install the inverter terminal cover.


B
REPLACE MALFUNCTIONING PARTS

C
CONNECT SECURELY
A


5.CHECK HYBRID VEHICLE TRANSAXLE ASSEMBLY (MOTOR CABLE CONNECTION CONDITION)

CAUTION:
Be sure to wear insulated gloves.

  1. Check that the service plug grip is not installed.
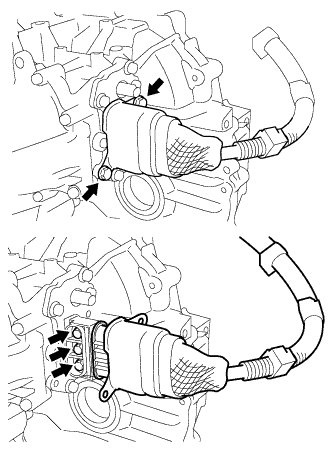
    NOTICE:
    After removing the service plug grip, do not turn the power switch on (READY), unless instructed by the repair manual because this may cause a malfunction.


    A217463
  1. Check that the bolts for the motor cable are tightened to the specified torque, the motor cable is connected securely, and there are no contact problems.

    Specified Condition:
    T=10 N*m {102 kgf*cm, 7 ft.*lbf}

    NOTICE:
    Make sure that the tightening torque of the bolts is between 8 and 12 N*m (82 and 122 kgf*cm, 71 and 106 in.*lbf).

  1. Disconnect the motor cable from the hybrid vehicle transaxle assembly.

  1. Check for arc marks at the bolts for the motor cable.

    Result:
    Result
    Proceed to
    The terminals are connected securely and there are no contact problems.
    There are no arc marks.
    A
    The terminals are not connected securely and there is a contact problem.
    There are arc marks.
    B
    The terminals are not connected securely and there is a contact problem.
    There are no arc marks.
    C
    The terminals are connected securely and there are no contact problems.
    There are arc marks.
    B

  1. Connect the motor cable to the hybrid vehicle transaxle assembly.


B
REPLACE MALFUNCTIONING PARTS

C
CONNECT SECURELY
A


6.CHECK MOTOR CABLE

CAUTION:
Be sure to wear insulated gloves.

  1. Check that the service plug grip is not installed.

    NOTICE:
    After removing the service plug grip, do not turn the power switch on (READY), unless instructed by the repair manual because this may cause a malfunction.

  1. Remove the motor cable.


    A217728E01
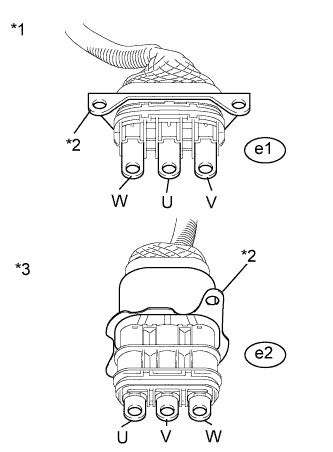
  1. Using a megohmmeter set to 500 V, measure the resistance according to the value(s) in the table below.

    NOTICE:
    Be sure to set the megohmmeter to 500 V when performing this test. Using a setting higher than 500 V can result in damage to the component being inspected.

    Standard Resistance:
    Tester Connection
    Switch Condition
    Specified Condition
    e1-1 (W) - Body ground and shield ground
    Power switch off
    100 MΩ or higher
    e1-2 (U) - Body ground and shield ground
    Power switch off
    100 MΩ or higher
    e1-3 (V) - Body ground and shield ground
    Power switch off
    100 MΩ or higher

    Text in Illustration 
    *1
    Motor Cable
    (Inverter with Converter Assembly Side)
    *2
    Shield ground
    *3
    Motor Cable
    (Hybrid Vehicle Transaxle Assembly Side)

    NOTICE:
    Wrap the terminal of the three-phase AC cable with insulating tape to prevent them from coming into contact with body ground

  1. Measure the resistance according to the value(s) in the table below.

    Standard Resistance:
    Tester Connection
    Switch Condition
    Specified Condition
    e1-1 (W) - e2-1 (W)
    Power switch off
    Below 1 Ω
    e1-2 (U) - e2-3 (U)
    Power switch off
    Below 1 Ω
    e1-3 (V) - e2-2 (V)
    Power switch off
    Below 1 Ω
    e1-1 (W) - e2-3 (U)
    Power switch off
    100 MΩ or higher
    e1-2 (U) - e2-2 (V)
    Power switch off
    100 MΩ or higher
    e1-3 (V) - e2-1 (W)
    Power switch off
    100 MΩ or higher

  1. Install the motor cable.


NG
REPLACE MOTOR CABLE (Click here)
OK

REPLACE HYBRID VEHICLE MOTOR ASSEMBLY (Click here)