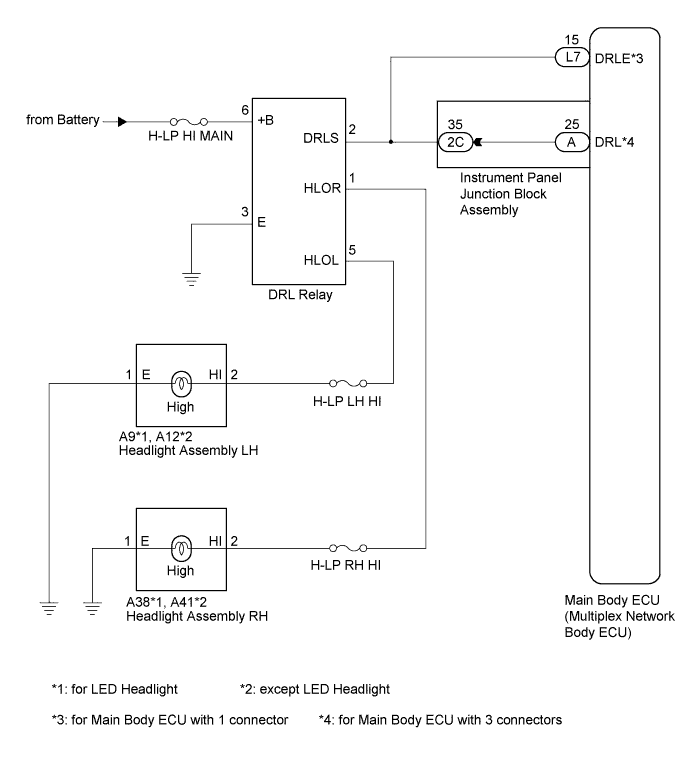
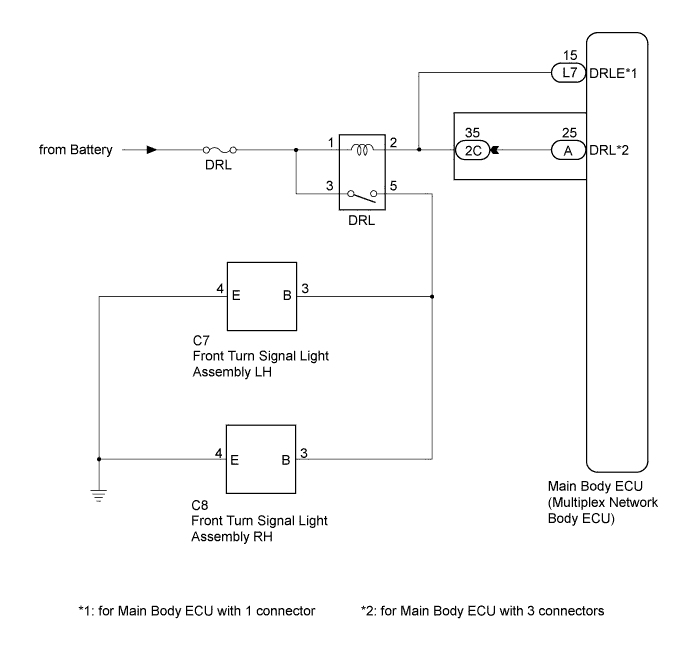
LIGHTING SYSTEM > Daytime Running Light Relay Circuit |
| for Canada |
| except Canada |
| 1.PERFORM ACTIVE TEST USING TECHSTREAM |
Connect the Techstream to the DLC3.
Turn the power switch on (IG).
Turn the Techstream on.
Enter the following menus: Body Electrical / Main Body / Active Test.
Check that the daytime running lights operate.
| Tester Display | Test Part | Control Range | Diagnostic Note |
| Daytime Running Light | Daytime running lights | ON/OFF | - |
|
| ||||
| OK | ||
 | ||
| ||
| 2.CHECK MODEL |
Choose the model to be inspected.
| Result | Proceed to |
| for Canada | A |
| except Canada | B |
|
| ||||
| A | |
 |
| 3.CHECK OPERATION (HIGH BEAM HEADLIGHTS) |
Check the operation of the high beam headlights.
|
| ||||
| OK | |
|
| 4.INSPECT RUNNING LIGHT RELAY |
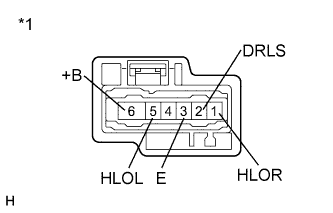 |
Remove the running light relay.
Connect a positive (+) lead from the battery to terminal 6 (+B).
Connect a negative (-) lead from the battery to terminals 2 (DRLS) and 3 (E).
Check for pulses according to the value(s) in the table below.
| Tester Connection | Condition | Specified Condition |
| 1 (HLOR) - Battery negative | Always | Pulse generation |
| 5 (HLOL) - Battery negative | Always | Pulse generation |
| *1 | Component without harness connected (Running Light Relay) |
|
| ||||
| OK | |
|
| 5.CHECK MODEL |
Choose the model to be inspected.
| Result | Proceed to |
| for Main body ECU (multiplex network body ECU) with 1 connector | A |
| for Main body ECU (multiplex network body ECU) with 3 connectors | B |
|
| ||||
| A | |
|
| 6.CHECK HARNESS AND CONNECTOR (RUNNING LIGHT RELAY - MAIN BODY ECU (MULTIPLEX NETWORK BODY ECU)) |
Disconnect the L7 main body ECU (multiplex network body ECU) connector.
Measure the resistance according to the value(s) in the table below.
| Tester Connection | Condition | Specified Condition |
| Relay terminal 2 (DRLS) - L7-15 (DRLE) | Always | Below 1 Ω |
| L7-15 (DRLE) - Body ground | Always | 10 kΩ or higher |
|
| ||||
| OK | ||
| ||
| ||
| 7.CHECK HARNESS AND CONNECTOR (RUNNING LIGHT RELAY - INSTRUMENT PANEL JUNCTION BLOCK AND BODY GROUND) |
Disconnect the 2C instrument panel junction block assembly connector.
Measure the resistance according to the value(s) in the table below.
| Tester Connection | Condition | Specified Condition |
| Relay terminal 2 (DRLS) - 2C-35 | Always | Below 1 Ω |
| 2C-35 - Body ground | Always | 10 kΩ or higher |
| Relay terminal 3 (E) - Body ground | Always | Below 1 Ω |
|
| ||||
| OK | |
|
| 8.INSPECT INSTRUMENT PANEL JUNCTION BLOCK ASSEMBLY |
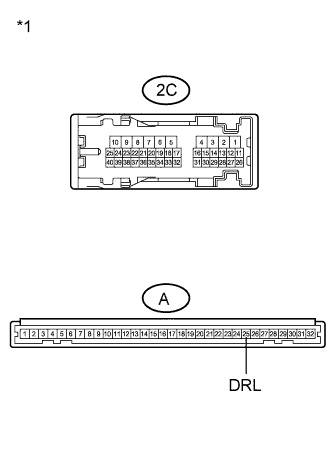 |
Remove the instrument panel junction block assembly.
Measure the resistance according to the value(s) in the table below.
| Tester Connection | Condition | Specified Condition |
| 2C-35 - A-25 (DRL) | Always | Below 1 Ω |
| 2C-35 - Body ground | Always | 10 kΩ or higher |
| *1 | Component without harness connected (Instrument Panel Junction Block Assembly) |
|
| ||||
| OK | ||
| ||
| ||
| 9.INSPECT RUNNING LIGHT RELAY (DRL) |
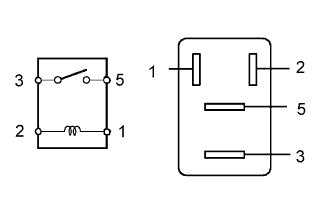 |
Remove the running light relay.
Measure the resistance according to the value(s) in the table below.
| Tester Connection | Condition | Specified Condition |
| 3 - 5 | Voltage is not applied between terminals 1 and 2 | 10 kΩ or higher |
| 3 - 5 | Voltage is applied between terminals 1 and 2 | Below 1 Ω |
|
| ||||
| OK | |
|
| 10.CHECK HARNESS AND CONNECTOR (BATTERY - RUNNING LIGHT RELAY) |
Measure the voltage according to the value(s) in the table below.
| Tester Connection | Condition | Specified Condition |
| Relay terminal 1 - Body ground | Always | 11 to 14 V |
| Relay terminal 3 - Body ground | Always | 11 to 14 V |
|
| ||||
| OK | |
|
| 11.CHECK MODEL |
Choose the model to be inspected.
| Result | Proceed to |
| for Main body ECU (multiplex network body ECU) with 1 connector | A |
| for Main body ECU (multiplex network body ECU) with 3 connector | B |
|
| ||||
| A | |
|
| 12.CHECK HARNESS AND CONNECTOR (RUNNING LIGHT RELAY - MAIN BODY ECU (MULTIPLEX NETWORK BODY ECU)) |
Disconnect the L7 main body ECU (multiplex network body ECU) connector.
Measure the resistance according to the value(s) in the table below.
| Tester Connection | Condition | Specified Condition |
| Relay terminal 2 - L7-15 (DRLE) | Always | Below 1 Ω |
| L7-15 (DRLE) - Body ground | Always | 10 kΩ or higher |
|
| ||||
| OK | ||
| ||
| ||
| 13.CHECK HARNESS AND CONNECTOR (RUNNING LIGHT RELAY - INSTRUMENT PANEL JUNCTION BLOCK AND BODY GROUND) |
Disconnect the 2C instrument panel junction block assembly connector.
Measure the resistance according to the value(s) in the table below.
| Tester Connection | Condition | Specified Condition |
| Running light relay terminal 2 - 2C-35 | Always | Below 1 Ω |
| 2C-35 - Body ground | Always | 10 kΩ or higher |
|
| ||||
| OK | |
|
| 14.INSPECT INSTRUMENT PANEL JUNCTION BLOCK ASSEMBLY |
|
Remove the instrument panel junction block assembly.
Measure the resistance according to the value(s) in the table below.
| Tester Connection | Condition | Specified Condition |
| 2C-35 - A-25 (DRL) | Always | Below 1 Ω |
| 2C-35 - Body ground | Always | 10 kΩ or higher |
| *1 | Component without harness connected (Instrument Panel Junction Block Assembly) |
|
| ||||
| OK | ||
| ||
| ||

