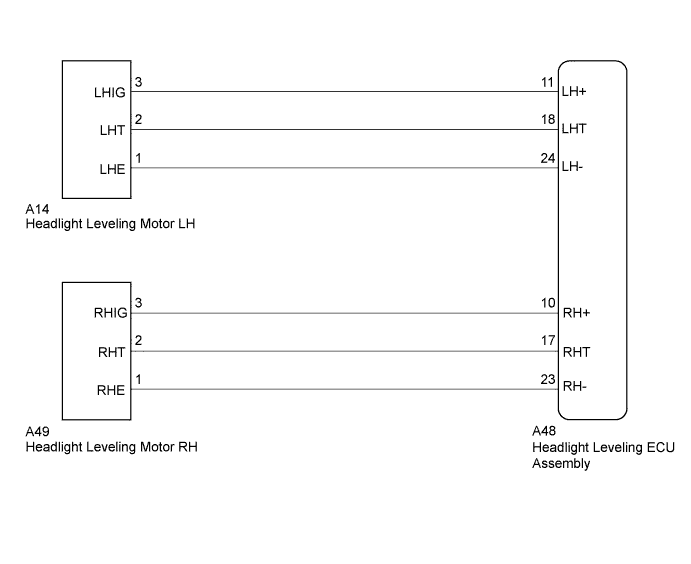
LIGHTING SYSTEM > Headlight Beam Level Control Actuator Circuit |
| 1.PERFORM ACTIVE TEST USING TECHSTREAM |
Connect the Techstream to the DLC3.
Turn the power switch on (READY).
Turn the Techstream on.
Enter the following menus: Body Electrical / HL Auto Leveling / Active Test.
Check that the leveling motors operate.
| Tester Display | Test Part | Control Range | Diagnostic Note |
| Drive The Leveling Motor UP | Leveling motor upward operation | ON/OFF | ON: Move up OFF: Stop |
| Drive The Leveling Motor DOWN | Leveling motor downward operation | ON/OFF | ON: Move down OFF: Stop |
|
| ||||
| OK | ||
 | ||
| ||
| 2.CHECK HARNESS AND CONNECTOR (HEADLIGHT LEVELING MOTOR - HEADLIGHT LEVELING ECU ASSEMBLY) |
Disconnect the A48 headlight leveling ECU assembly connector.
Disconnect the A14 or A49 headlight leveling motor connector.
Measure the resistance according to the value(s) in the table below.
| Tester Connection | Condition | Specified Condition |
| A48-18 (LHT) - A14-2 (LHT) | Always | Below 1 Ω |
| A48-11 (LH+) - A14-3 (LHIG) | Always | Below 1 Ω |
| A48-24 (LH-) - A14-1 (LHE) | Always | Below 1 Ω |
| A48-18 (LHT) - Body ground | Always | 10 kΩ or higher |
| A48-11 (LH+) - Body ground | Always | 10 kΩ or higher |
| A48-24 (LH-) - Body ground | Always | 10 kΩ or higher |
| Tester Connection | Condition | Specified Condition |
| A48-17 (RHT) - A49-2 (RHT) | Always | Below 1 Ω |
| A48-10 (RH+) - A49-3 (RHIG) | Always | Below 1 Ω |
| A48-23 (RH-) - A49-1 (RHE) | Always | Below 1 Ω |
| A48-17 (RHT) - Body ground | Always | 10 kΩ or higher |
| A48-10 (RH+) - Body ground | Always | 10 kΩ or higher |
| A48-23 (RH-) - Body ground | Always | 10 kΩ or higher |
|
| ||||
| OK | |
 |
| 3.REPLACE HEADLIGHT LEVELING MOTOR |
Temporarily replace the headlight leveling motor with a new or normally functioning one (Click here).
Perform the Active Test of the leveling motors.
|
| ||||
| OK | ||
| ||
| ||

