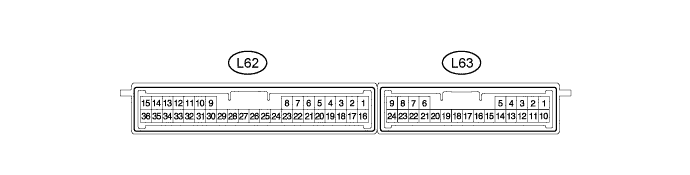
Disconnect the L8 main body ECU (multiplex network body ECU) connectors.
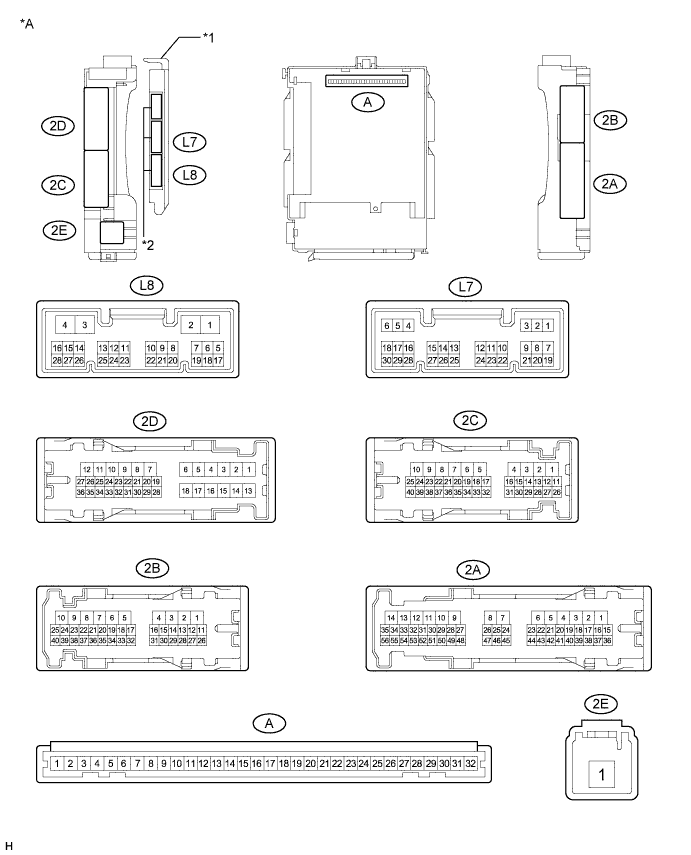
| *A | Main body ECU (multiplex network body ECU) with 3 connectors | - | - |
| *1 | Main body ECU (multiplex network body ECU) | *2 | 3 connectors |
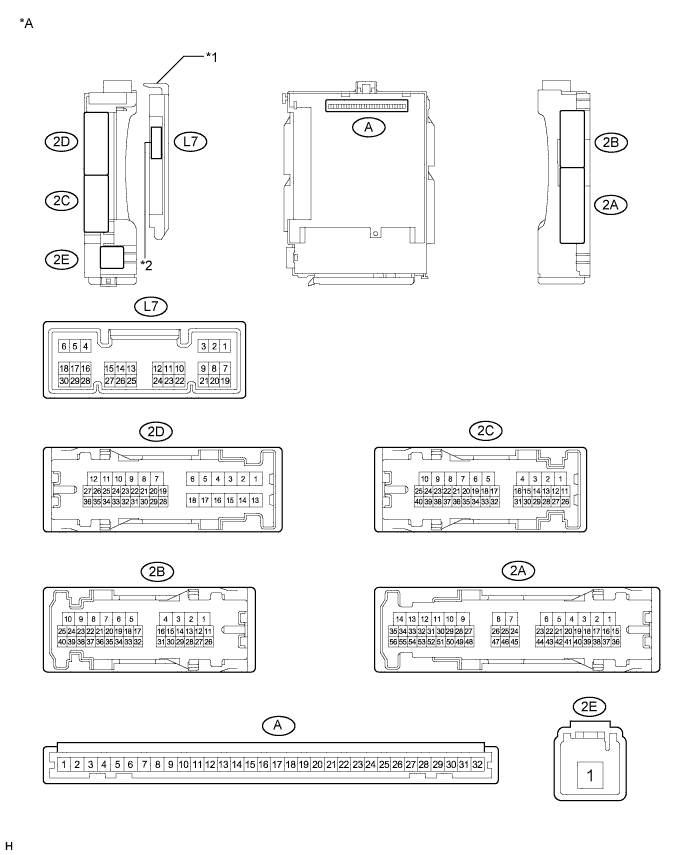
| *A | Main body ECU (multiplex network body ECU) with 1 connector | - | - |
| *1 | Main body ECU (multiplex network body ECU) | *2 | 1 connector |
Disconnect the A, 2B and 2C instrument panel junction block assembly connectors.
Measure the voltage and resistance according to the value(s) in the table below.
- HINT:
- Measure the values on the wire harness side with the connectors disconnected.
| Tester Connection | Wiring Color | Terminal Description | Condition | Specified Condition |
| 2C-18 (BECU) - Body ground | Y - Body ground | Auxiliary battery power supply | Power switch off | 11 to 14 V |
| A-31 (ALTB) - Body ground | - | Auxiliary battery power supply | Power switch off | 11 to 14 V |
| A-32 (IG) - Body ground | - | Power switch power supply | Power switch on (IG) | 11 to 14 V |
| A-32 (IG) - Body ground | - | Power switch power supply | Power switch off | Below 1 V |
| A-29 (ACC) - Body ground | - | ACC power supply | Power switch on (ACC) | 11 to 14 V |
| A-29 (ACC) - Body ground | - | ACC power supply | Power switch off | Below 1 V |
| L8-3 (GND2) - Body ground | W-B - Body ground | Ground | Always | Below 1 Ω |
| 2B-6 (GND1) - Body ground | W-B - Body ground | Ground | Always | Below 1 Ω |
Reconnect the L8 main body ECU (multiplex network body ECU) connectors.
Reconnect the A, 2B and 2C instrument panel junction block assembly connectors.
Measure the voltage according to the value(s) in the table below.
| Tester Connection | Wiring Color | Terminal Description | Condition | Specified Condition |
| 2D-35 (FLCY) - Body ground | V - Body ground | Driver side door courtesy switch input | Driver side door open | Below 1 V |
| 2D-35 (FLCY) - Body ground | V - Body ground | Driver side door courtesy switch input | Driver side door closed | 11 to 14 V |
| 2D-36 (FRCY) - Body ground | BR - Body ground | Front passenger side door courtesy switch input | Front passenger side door open | Below 1 V |
| 2D-36 (FRCY) - Body ground | BR - Body ground | Front passenger side door courtesy switch input | Front passenger side door closed | 11 to 14 V |
| L7-6 (LRCY) - Body ground | G - Body ground | Rear door LH and RH courtesy light switch input | Rear door LH or RH open | Below 1 V |
| L7-6 (LRCY) - Body ground | G - Body ground | Rear door LH and RH courtesy light switch input | Rear door LH or RH closed | 11 to 14 V |
| L7-19 (BCTY) - Body ground | L - Body ground | Back door courtesy light switch input | Back door open | Below 1 V |
| L7-19 (BCTY) - Body ground | L - Body ground | Back door courtesy light switch input | Back door closed | 11 to 14 V |
| L7-11 (L2) - Body ground | G - Body ground | Driver side door key-linked lock input | Driver side door key cylinder turned to lock | Below 1 V |
| L7-11 (L2) - Body ground | G - Body ground | Driver side door key-linked lock input | Driver side door key cylinder off | 11 to 14 V |
| L7-24 (UL3) - Body ground | V - Body ground | Driver side door key-linked unlock input | Driver side door key cylinder turned to unlock | Below 1 V |
| L7-24 (UL3) - Body ground | V - Body ground | Driver side door key-linked unlock input | Driver side door key cylinder off | 11 to 14 V |
| L7-9 (L1) - Body ground | LG - Body ground | Front passenger side door control switch input | Front passenger side door control switch locked | Below 1 V |
| L7-9 (L1) - Body ground | LG - Body ground | Front passenger side door control switch input | Front passenger side door control switch off | 11 to 14 V |
| L7-10 (UL1) - Body ground | BR - Body ground | Front passenger side door control switch input | Front passenger side door control switch unlocked | Below 1 V |
| L7-10 (UL1) - Body ground | BR - Body ground | Front passenger side door control switch input | Front passenger side door control switch off | 11 to 14 V |
| 2B-9 (ACT+) - Body ground | R - Body ground | Door lock motor lock drive output (all doors) | Multiplex network master switch (door control switch) or driver side door key cylinder off | Below 1 V |
| 2B-9 (ACT+) - Body ground | R - Body ground | Door lock motor lock drive output (all doors) | Multiplex network master switch (door control switch) or driver side door key cylinder locked | 11 to 14 V |
| 2B-5 (ACTD) - Body ground | B - Body ground | Driver side door lock motor unlock drive output | Multiplex network master switch (door control switch) or driver side door key cylinder off | Below 1 V |
| 2B-5 (ACTD) - Body ground | B - Body ground | Driver side door lock motor unlock drive output | Multiplex network master switch (door control switch) or driver side door key cylinder unlocked | 11 to 14 V |
| 2B-1 (ACT-) - Body ground | B - Body ground | Door lock motor unlock drive output (except driver side) | Multiplex network master switch (door control switch) or driver side door key cylinder off | Below 1 V |
| 2B-1 (ACT-) - Body ground | B - Body ground | Door lock motor unlock drive output (except driver side) | Multiplex network master switch (door control switch) or driver side door key cylinder unlocked | 11 to 14 V |
| L7-18 (LSFR) - Body ground | LG - Body ground | Front passenger side door lock position switch input | Front passenger side door unlocked | Below 1 V |
| L7-18 (LSFR) - Body ground | LG - Body ground | Front passenger side door lock position switch input | Power switch off, all doors closed and front passenger side door locked | 11 to 14 V |
| 2D-25 (LSR) - Body ground | GR - Body ground | Rear door LH lock position switch input | Rear door LH unlocked | Below 1 V |
| 2D-25 (LSR) - Body ground | GR - Body ground | Rear door LH lock position switch input | Power switch off, all doors closed and rear door LH locked | 11 to 14 V |
| 2B-29 (LSR) - Body ground | GR - Body ground | Rear door RH lock position switch input | Rear door RH unlocked | Below 1 V |
| 2B-29 (LSR) - Body ground | GR - Body ground | Rear door RH lock position switch input | Power switch off, all doors closed and rear door RH locked | 11 to 14 V |
| L7-7 (LSFL) - Body ground | GR - Body ground | Driver door lock position switch input | Driver door unlocked | Below 1 V |
| L7-7 (LSFL) - Body ground | GR - Body ground | Driver door lock position switch input | Power switch off, all doors closed and driver door locked | 11 to 14 V |
| 2C-23 (BZR) - Body ground | R - Body ground | Wireless door lock buzzer signal | Wireless door lock buzzer off | Below 1 V |
| 2C-23 (BZR) - Body ground | R - Body ground | Wireless door lock buzzer signal | Wireless door lock buzzer on | Pulse generation |
| L7-3 (HAZ) - Body ground | Y - Body ground | Turn signal flasher relay signal | Any transmitter switch not pressed | 11 to 14 V |
| L7-3 (HAZ) - Body ground | Y - Body ground | Turn signal flasher relay signal | Any transmitter switch pressed | Below 1 V |