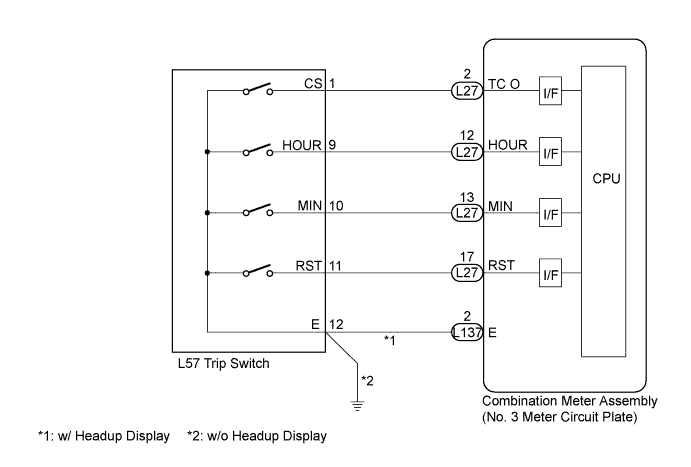
METER / GAUGE SYSTEM > Odo/Trip Switch Malfunction |
| 1.READ VALUE USING TECHSTREAM |
Connect the Techstream to the DLC3.
Turn the power switch on (IG).
Turn the Techstream on.
Enter the following menus: Body Electrical / Combination Meter / Data List.
Check the values by referring to the table below.
| Tester Display | Measurement Item/Range | Normal Condition | Diagnostic Note |
| Timer Switch H on Combination Meter | Timer switch H on combination meter/OFF or ON | OFF: Hour adjust switch not pressed | - |
| ON: Hour adjust switch pressed | |||
| Timer Switch M on Combination Meter | Timer switch M on combination meter/OFF or ON | OFF: Minute adjust switch not pressed | - |
| ON: Minute adjust switch pressed | |||
| Timer Switch 00 on Combination Meter | Timer switch 00 on combination meter/OFF or ON | OFF: Reset switch not pressed | - |
| ON: Reset switch pressed |
|
| ||||
| OK | ||
 | ||
| ||
| 2.INSPECT TRIP SWITCH |
w/o Headup Display
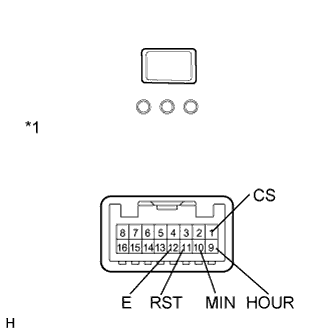 |
Remove the trip switch.
w/ Headup Display
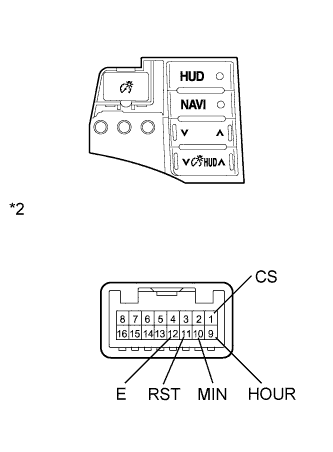 |
Remove the trip switch.
Measure the resistance according to the value(s) in the table below.
| Tester Connection | Condition | Specified Condition |
| 1 (CS) - 12 (E) | Unit change switch pressed | Below 1 Ω |
| 1 (CS) - 12 (E) | Unit change switch not pressed | 10 kΩ or higher |
| 9 (HOUR) - 12 (E) | Hour adjust switch pressed | Below 1 Ω |
| 9 (HOUR) - 12 (E) | Hour adjust switch not pressed | 10 kΩ or higher |
| 10 (MIN) - 12 (E) | Minute adjust switch pressed | Below 1 Ω |
| 10 (MIN) - 12 (E) | Minute adjust switch not pressed | 10 kΩ or higher |
| 11 (RST) - 12 (E) | Set switch pressed | Below 1 Ω |
| 11 (RST) - 12 (E) | Set switch not pressed | 10 kΩ or higher |
| *1 | Component without harness connected (Trip Switch) |
| *2 | Component without harness connected (Trip Switch) |
|
| ||||
| OK | |
 |
| 3.CHECK HARNESS AND CONNECTOR (NO. 3 METER CIRCUIT PLATE - TRIP SWITCH) |
Disconnect the L27 and L57 connectors.
Measure the resistance according to the value(s) in the table below.
| Tester Connection | Condition | Specified Condition |
| L27-2 (TC O) - L57-1 (CS) | Always | Below 1 Ω |
| L27-2 (TC O) - Body ground | Always | 10 kΩ or higher |
| L27-12 (HOUR) - L57-9 (HOUR) | Always | Below 1 Ω |
| L27-12 (HOUR) - Body ground | Always | 10 kΩ or higher |
| L27-13 (MIN) - L57-10 (MIN) | Always | Below 1 Ω |
| L27-13 (MIN) - Body ground | Always | 10 kΩ or higher |
| L27-17 (RST) - L57-11 (RST) | Always | Below 1 Ω |
| L27-17 (RST) - Body ground | Always | 10 kΩ or higher |
|
| ||||
| OK | ||
| ||
| ||

