DTC P0441 Evaporative Emission Control System Incorrect Purge Flow |
| DTC No. | Monitoring Item | Malfunction Detection Condition | Trouble Area | Detection Timing | Detection Logic |
| P0441 | Purge VSV stuck open | Leak detection pump creates negative pressure (vacuum) in EVAP system and EVAP system pressure is measured. Reference pressure is measured at start and end of leak check. If stabilized pressure is higher than [second reference pressure x 0.2], ECM determines that purge VSV is stuck open. |
| While power switch off | 2 trip |
| P0441 | Purge VSV stuck closed | After EVAP leak check is performed, purge VSV is turned on (open), and atmospheric air is introduced into EVAP system. Reference pressure is measured at the start and end of leak check. If pressure does not return to near atmospheric pressure, ECM determines that purge valve is stuck closed. |
| While power switch off | 2 trip |
| P0441 | Purge flow | While engine running, the following conditions are successively met:
|
| While engine running | 2 trip |
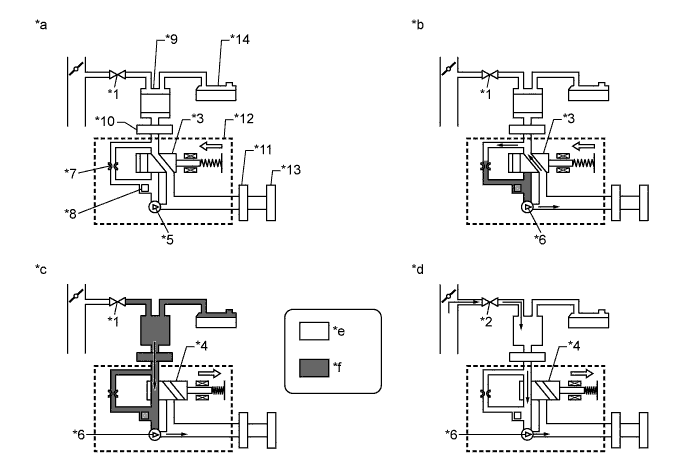
| KEY-OFF MONITOR |
| Sequence | Operation | Description | Duration |
| - | ECM activation | Activated by soak timer, 5, 7 or 9.5 hours after power switch turned off. | - |
| A | Atmospheric pressure measurement | Vent valve is turned off (vent) and EVAP system pressure is measured by ECM in order to register atmospheric pressure. If pressure in EVAP system is not between 70 kPa(abs) and 111 kPa(abs) [525 mmHg(abs) and 833 mmHg(abs)], ECM cancels EVAP system monitor. | 60 seconds |
| B | First reference pressure measurement | In order to determine reference pressure, leak detection pump creates negative pressure (vacuum) through reference orifice and then ECM checks if leak detection pump and vent valve operate normally. | 360 seconds |
| C | EVAP system pressure measurement | Vent valve is turned on (closed) to shut EVAP system. Negative pressure (vacuum) is created in EVAP system, and EVAP system pressure is then measured. Write down measured value as it will be used in leak check If EVAP pressure does not stabilize within 15 minutes, ECM cancels EVAP system monitor. | 15 minutes* |
| D | Purge VSV monitor | Purge VSV is opened and then EVAP system pressure is measured by ECM. Large increase indicates normal. | 10 seconds |
| E | Second reference pressure measurement | After second reference pressure measurement, leak check is performed by comparing first and second reference pressure measurements. If stabilized system pressure is higher than second reference pressure, ECM determines that EVAP system is leaking. | 60 seconds |
| - | Final check | Atmospheric pressure is measured and then monitoring result is recorded by ECM. | - |
| *1 | Purge VSV: Off (Closed) | *2 | Purge VSV: On (Open) |
| *3 | Vent Valve: Off (Vent) | *4 | Vent Valve: On (Closed) |
| *5 | Leak Detection Pump: Off | *6 | Leak Detection Pump: On |
| *7 | Reference Orifice (0.02 inch) | *8 | Canister Pressure Sensor |
| *9 | Canister | *10 | No. 1 Canister |
| *11 | No. 2 Canister | *12 | Canister Pump Module |
| *13 | Canister Air Filter | *14 | Fuel Tank |
| *a | Operation A: Atmospheric Pressure Measurement | *b | Operation B, E: Reference Pressure Measurement |
| *c | Operation C: EVAP System Pressure Measurement | *d | Operation D: Purge VSV Monitor |
| *e | Atmospheric Pressure | *f | Negative Pressure |
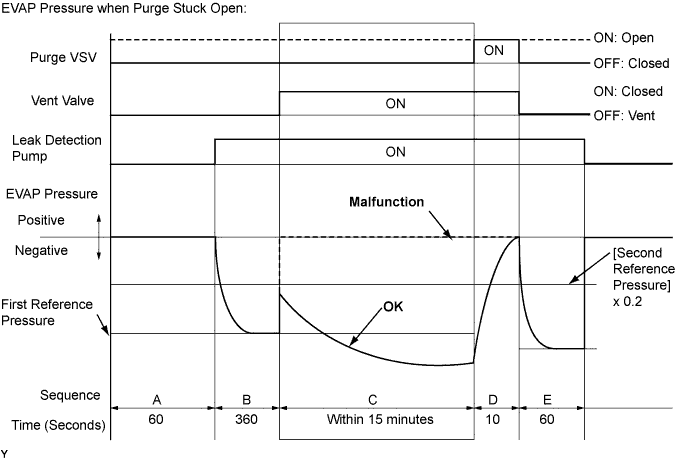
Purge VSV stuck open
In operation C, the leak detection pump creates negative pressure (vacuum) in the EVAP (Evaporative Emission) system. The EVAP system pressure is then measured by the ECM using the canister pressure sensor. If the stabilized system pressure is higher than [second reference pressure x 0.2], the ECM interprets this as the purge VSV being stuck open. The ECM illuminates the MIL and stores the DTC (2 trip detection logic).
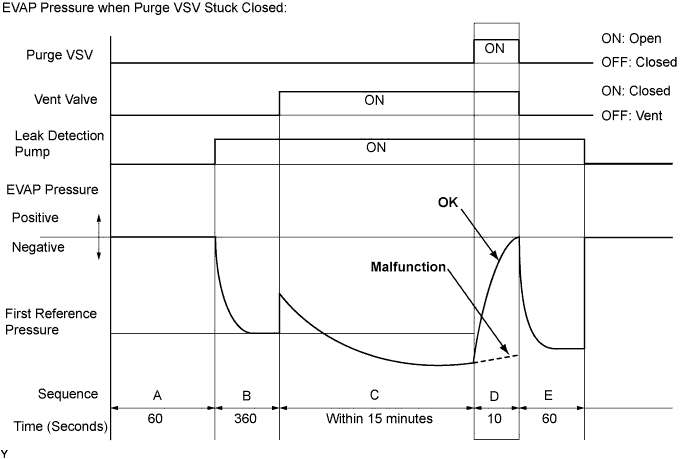
Purge VSV stuck closed
In operation D, the canister pressure sensor measures the EVAP (Evaporative Emission) system pressure. The pressure measurement for purge VSV monitor begins when the purge VSV is turned on (open) after the EVAP leak check. When the measured pressure indicates an increase of 0.3 kPa(gauge) [2.25 mmHg(gauge)] or more, the purge VSV is functioning normally. If the pressure does not increase, the ECM interprets this as the purge VSV being stuck closed. The ECM illuminates the MIL and stores the DTC (2 trip detection logic).
| PURGE FLOW MONITOR |
| Required Sensors/Components | Purge VSV Canister pump module |
| Frequency of Operation | Once per driving cycle |
| Duration | Within 30 seconds: Purge flow Within 20 minutes: Purge VSV stuck open, Purge VSV stuck closed |
| MIL Operation | 2 driving cycles |
| Sequence of Operation | None |
| Monitor runs whenever following DTCs are not present | None |
| Monitor runs whenever following DTCs are not present | None |
| Atmospheric pressure | 70 kPa(abs) [525 mmHg(abs)] or more, and less than 111 kPa(abs) [833 mmHg(abs)] |
| Auxiliary battery voltage | 10.5 V or more |
| Vehicle speed | Below 2.5 mph (4 km/h) |
| Power switch | Off |
| Time after key off | 5, 7 or 9.5 hours |
| Canister pressure sensor malfunction (P0452 and P0453) | Not detected |
| Purge VSV | Not operated by scan tool |
| Vent valve | Not operated by scan tool |
| Leak detection pump | Not operated by scan tool |
| Both of the following conditions are met before key off: | Conditions 1 and 2 |
| 1. Duration that vehicle has been driven | 5 minutes or more |
| 2. EVAP purge operation | Performed |
| Engine coolant temperature | 4.4°C (40°F) or more, and less than 35°C (95°F) |
| Intake air temperature | 4.4°C (40°F) or more, and less than 35°C (95°F) |
| Engine | Running |
| Engine coolant temperature | 4.4°C (40°F) or more |
| Intake air temperature | 4.4°C (40°F) or more |
| Canister pressure sensor malfunction | Not detected |
| Purge VSV | Not operated by scan tool |
| EVAP system check | Not operated by scan tool |
| Atmospheric pressure | 70 kPa(abs) [525 mmHg(abs)] or more, and less than 111 kPa(abs) [833 mmHg(abs)] |
| Auxiliary battery voltage | 10 V or more when intake air temperature is less than 50°C (122°F), or 12 V or more when intake air temperature is 50°C (122°F) or more |
| Purge duty cycle | 8% or more |
| EVAP pressure when vacuum introduction is complete | Higher than [reference pressure x 0.2] |
| EVAP pressure change after purge VSV is open | Less than 0.3 kPa(gauge) [2.25 mmHg(gauge)] |
| Both of the following conditions are met: | Conditions 1 and 2 |
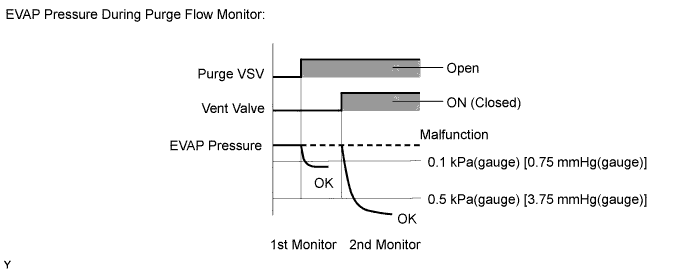
| 1. EVAP pressure change when purge flow is started | Less than 0.1 kPa(gauge) [0.75 mmHg(gauge)] |
| 2. EVAP pressure change during purge flow operation when vent valve closed | Less than 0.5 kPa(gauge) [3.75 mmHg(gauge)] |
| Techstream Display | Description |
| NORMAL |
|
| ABNORMAL |
|
| INCOMPLETE |
|
| N/A |
|
| Techstream Display | Description |
| NORMAL |
|
| ABNORMAL |
|
| INCOMPLETE |
|
| N/A |
|
| 1.CHECK ANY OTHER DTCS OUTPUT (IN ADDITION TO DTC P0441) |
Connect the Techstream to the DLC3.
Turn the power switch on (IG).
Turn the Techstream on.
Enter the following menus: Powertrain / Engine and ECT / Trouble Codes.
Read the DTC.
| Result | Proceed to |
| DTC P0441 is output | A |
| DTC P0441 and other DTCs are output | B |
|
| ||||
| A | |
 |
| 2.PERFORM ACTIVE TEST USING TECHSTREAM (CONTROL THE EGR STEP POSITION) |
Connect the Techstream to the DLC3.
Turn the power switch on (IG).
Turn the Techstream on.
Put the engine in inspection mode (maintenance mode) (Click here).
Start the engine and warm it up until the engine coolant temperature reaches 75°C (167°F) or more.
Enter the following menus: Powertrain / Engine and ECT / Active Test / Control the EGR Step Position / Throttle Idle Position and MAP.
Check that the Throttle Idle Position in ON and check the engine idling condition and MAP values in the Data List while performing the Active Test.
| - | EGR Step Position (Active Test) | |
| 0 Steps | 0 to 30 Steps | |
| Idling condition (Throttle Idle Position: ON) | Steady idling | Idling changes from steady to rough idling or engine stalls |
| MAP (Data List) | MAP value is 20 to 40 kPa (150 to 300 mmHg) (EGR valve is fully closed) | MAP value is at least +10 kPa (75 mmHg) higher than when EGR valve is fully closed |
| Result | Proceed to |
| Outside of standard range | A |
| Within standard range | B |
|
| ||||
| A | |
|
| 3.INSPECT EGR VALVE ASSEMBLY |
Remove the EGR valve assembly (Click here).
Check if the EGR valve is stuck open.
|
| ||||
| OK | ||
 | ||
| ||
