Home › Engine / Hybrid System › 2ZR-FXE FUEL › FUEL PUMP

FUEL PUMP > REMOVAL

for Preparation Click here


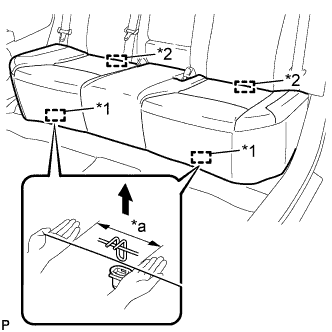
1. REMOVE REAR SEAT CUSHION ASSEMBLY


    B229992E02
  1. Disengage the 2 front hooks of the seat cushion from the vehicle body as shown in the illustration.
    Text in Illustration 
    *1
    Hook
    *2
    Guide
    *a
    100 mm (3.94 in.) or less

    NOTICE:
    Follow the instructions below carefully as the cushion frame deforms easily.


    1. Choose a hook to detach first. Place your hands near the hook as shown in the illustration. Then lift the seat cushion to detach the hook.

    2. Repeat the above procedure for the other hook.
  1. Disengage the 2 guides of the seat cushion from the seatback.

  1. Remove the rear seat cushion assembly.


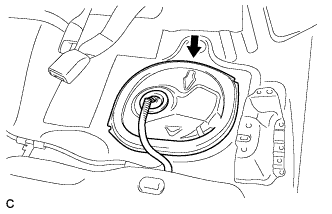
2. REMOVE REAR FLOOR SERVICE HOLE COVER


    A216406
  1. Remove the rear floor service hole cover.


    A216407
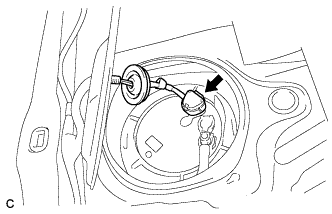
  1. Disconnect the fuel pump connector.


3. DISCHARGE FUEL SYSTEM PRESSURE
(Click here)


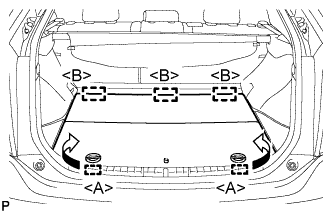
4. REMOVE REAR NO. 2 FLOOR BOARD (for Separate Type)


    B227787E01
  1. Disengage the 2 guides <A> as shown in the illustration.

  1. Disengage the 3 guides <B> and remove the rear No. 2 floor board.


5. REMOVE REAR DECK FLOOR BOX
  1. Remove the rear deck floor box.


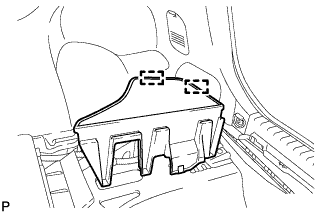
6. REMOVE REAR NO. 3 FLOOR BOARD


    B227791
  1. Disengage the 2 guides and remove the rear No. 3 floor board.


7. DISCONNECT CABLE FROM NEGATIVE BATTERY TERMINAL


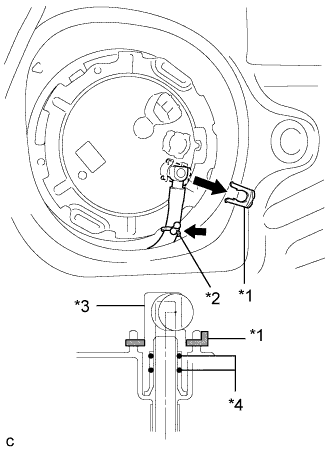
8. REMOVE FUEL TANK MAIN TUBE SUB-ASSEMBLY


    A216410E01
  1. Remove the tube joint clip and disengage the fuel tank main tube clamp, then pull the fuel tube joint out of the plug of the fuel suction tube assembly.
    Text in Illustration 
    *1
    Tube Joint Clip
    *2
    Fuel Tank Main Tube Clamp
    *3
    Fuel Tube Joint
    *4
    O-ring

    NOTICE:
    1. Check that there is no dirt or other foreign matter around the fuel tube joint before disconnecting it. Clean the joint if necessary.
    2. It is necessary to prevent dirt or foreign matter from entering the joint. If dirt or foreign matter gets in the joint, the O-rings may not seal properly.
    3. Only disconnect the joint by hand.
    4. Do not bend, kink or twist the nylon tubes.
    5. Protect the contact surfaces by covering them with plastic bags.


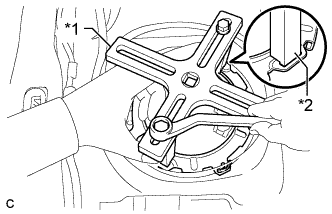
9. REMOVE FUEL PUMP GAUGE RETAINER


    A245567E01
  1. Temporarily install the SST plate and claws to the fuel pump gauge retainer.
    Text in Illustration 
    *1
    SST
    (Plate)
    *2
    SST
    (Claw)

    SST
    09808-14030   (09808-01030, 09808-01040, 09808-01050)

    HINT:
    1. Engage the SST claws securely with the fuel pump gauge retainer holes to secure SST.
    2. Make sure that only 2 claws are used with SST.

  1. While pressing the claws of SST to the fuel pump gauge retainer holes securely, tighten the bolts.

    HINT:
    Install SST while pressing the SST claws toward the fuel pump gauge retainer (towards the center of SST).

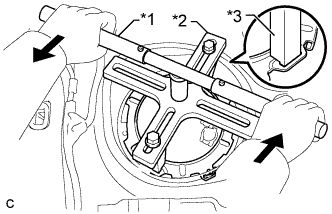
  1. Install the SST handle.


    A245568E01
  1. Lightly press down on SST to prevent it from separating from the retainer. While pressing SST, rotate the handle slowly to loosen the retainer.
    Text in Illustration 
    *1
    SST
    (Handle)
    *2
    SST
    (Plate)
    *3
    SST
    (Claw)

    SST
    09808-14030   (09808-01010, 09808-01020, 09808-01030, 09808-01040, 09808-01050)

    NOTICE:
    1. Do not use any tools other than specified in this operation. Damage to the fuel pump gauge retainer or the fuel tank may result.
    2. Loosen the retainer by turning it counterclockwise while holding SST down. Do not allow the claw of the tank suction tube support to slip out of its groove on the fuel tank.
    3. Make sure to rotate the SST handle horizontally. If the SST handle is rotated at an angle, SST may come off.
    4. Do not spin SST too fast or use an impact wrench as this may result in damage to components.
    5. If SST comes off of the retainer, loosen the SST bolts and reinstall SST.

    HINT:
    The holes on the fuel pump gauge retainer can be fitted into the tips of SST.

  1. Remove the fuel pump gauge retainer while holding the fuel suction tube assembly by hand.


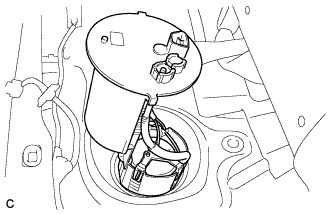
10. REMOVE FUEL SUCTION TUBE ASSEMBLY WITH PUMP AND GAUGE


    A216411
  1. Remove the fuel suction tube assembly with pump and gauge from the fuel tank.

    NOTICE:
    Make sure that the fuel sender gauge arm does not bend.


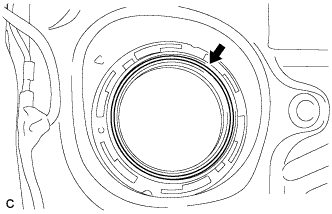
    A216414
  1. Remove the fuel suction tube set gasket from the fuel tank.