| B |  |
| GO TO DTC CHART (Click here) |
DTC P0B3D-123 Hybrid Battery Voltage Sensor "A" Circuit Low |
DTC P0B42-123 Hybrid Battery Voltage Sensor "B" Circuit Low |
DTC P0B47-123 Hybrid Battery Voltage Sensor "C" Circuit Low |
DTC P0B4C-123 Hybrid Battery Voltage Sensor "D" Circuit Low |
DTC P0B51-123 Hybrid Battery Voltage Sensor "E" Circuit Low |
DTC P0B56-123 Hybrid Battery Voltage Sensor "F" Circuit Low |
DTC P0B5B-123 Hybrid Battery Voltage Sensor "G" Circuit Low |
DTC P0B60-123 Hybrid Battery Voltage Sensor "H" Circuit Low |
DTC P0B65-123 Hybrid Battery Voltage Sensor "I" Circuit Low |
DTC P0B6A-123 Hybrid Battery Voltage Sensor "J" Circuit Low |
DTC P0B6F-123 Hybrid Battery Voltage Sensor "K" Circuit Low |
DTC P0B74-123 Hybrid Battery Voltage Sensor "L" Circuit Low |
DTC P0B79-123 Hybrid Battery Voltage Sensor "M" Circuit Low |
DTC P0B7E-123 Hybrid Battery Voltage Sensor "N" Circuit Low |
DTC P0B83-123 Hybrid Battery Voltage Sensor "O" Circuit Low |
DTC P308A-123 Hybrid Battery Voltage Sensor All Circuits Low |
| DTC No. | DTC Detection Condition | Trouble Area |
| P0B3D-123 P0B42-123 P0B47-123 P0B4C-123 P0B51-123 P0B56-123 P0B5B-123 P0B60-123 P0B65-123 P0B6A-123 P0B6F-123 P0B74-123 P0B79-123 P0B7E-123 P0B83-123 | The battery block voltage detection line has a malfunction and any of the battery block voltages become lower than the specified value (open). (1 trip detection logic) |
|
| P308A-123 | The battery block voltage detection line is open (all blocks) or all battery block voltages become lower than the specified value (possibility of open or loosely connected connector). (1 trip detection logic) |
| DTC No. | Data List |
| P0B3D-123 P0B42-123 P0B47-123 P0B4C-123 P0B51-123 P0B56-123 P0B5B-123 P0B60-123 P0B65-123 P0B6A-123 P0B6F-123 P0B74-123 P0B79-123 P0B7E-123 P0B83-123 | Battery Block Vol -V01 to V14 |
| P308A-123 |
|
| Related DTCs | P0B3D (INF 123) / P0B42 (INF 123) / P0B47 (INF 123) / P0B4C (INF 123) / P0B51 (INF 123) / P0B56 (INF 123) / P0B5B (INF 123) / P0B60 (INF 123) / P0B65 (INF 123) / P0B6A (INF 123) / P0B6F (INF 123) / P0B74 (INF 123) / P0B79 (INF 123) / P0B7E (INF 123) / P0B83 (INF 123) / P308A (INF 123): Battery voltage sensor circuit malfunction (open) |
| Required sensors / components | Battery smart unit |
| Frequency of operation | Continuous |
| Duration | TMC's intellectual property |
| MIL operation | TMC's intellectual property |
| Sequence of operation | None |
| The monitor will run whenever the following DTCs are not present | TMC's intellectual property |
| Other conditions belong to TMC's intellectual property | - |
| TMC's intellectual property | - |
| Battery smart unit | DTC P0B3D (INF 123) / P0B42 (INF 123) / P0B47 (INF 123) / P0B4C (INF 123) / P0B51 (INF 123) / P0B56 (INF 123) / P0B5B (INF 123) / P0B60 (INF 123) / P0B65 (INF 123) / P0B6A (INF 123) / P0B6F (INF 123) / P0B74 (INF 123) / P0B79 (INF 123) / P0B7E (INF 123) / P0B83 (INF 123) / P308A (INF 123) is not detected |
| 1.CHECK DTC OUTPUT (HV) |
Connect the Techstream to the DLC3.
Turn the power switch on (IG).
Enter the following menus: Powertrain / Hybrid Control / Trouble Codes.
Check and record any HV system DTCs, INF codes and freeze frame data.
Read output DTCs (Click here).
| Result | Proceed to |
| P0AFC-123 or P0A95-123 is not output. | A |
| P0AFC-123 or P0A95-123 is also output. | B |
Turn the power switch off.
Disconnect the Techstream from the DLC3.
|
| ||||
| A | |
 |
| 2.CHECK CONNECTOR CONNECTION CONDITION |
Disconnect the cable from the negative (-) battery terminal.
Check that the service plug grip is not installed.
Remove the No. 1 hybrid vehicle battery carrier bracket sub-assembly (Click here).
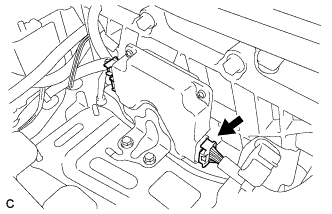 |
Check the connections of the j1 connector of the battery smart unit.
Install the No. 1 hybrid vehicle battery carrier bracket sub-assembly (Click here).
Connect the cable to the negative (-) battery terminal.
|
| ||||
| OK | |
|
| 3.REPLACE BATTERY SMART UNIT |
Replace the battery smart unit (Click here).
| NEXT | |
|
| 4.CLEAR DTC (HV) |
Connect the Techstream to the DLC3.
Turn the power switch on (IG).
Enter the following menus: Powertrain / Hybrid Control / Trouble Codes.
Clear the DTCs and freeze frame data (Click here).
Turn the power switch on (IG) and wait for 10 seconds or more.
Disconnect the Techstream from the DLC3.
| NEXT | |
|
| 5.RECONFIRM DTC OUTPUT (HV) |
Connect the Techstream to the DLC3.
Turn the power switch on (IG).
Enter the following menus: Powertrain / Hybrid Control / Trouble Codes.
Read output DTCs (Click here).
| Result | Proceed to |
| Battery block voltage DTCs for this diagnostic procedure are not output | A |
| Battery block voltage DTCs for this diagnostic procedure are output | B |
Disconnect the Techstream from the DLC3.
|
| ||||
| A | ||
 | ||
| ||