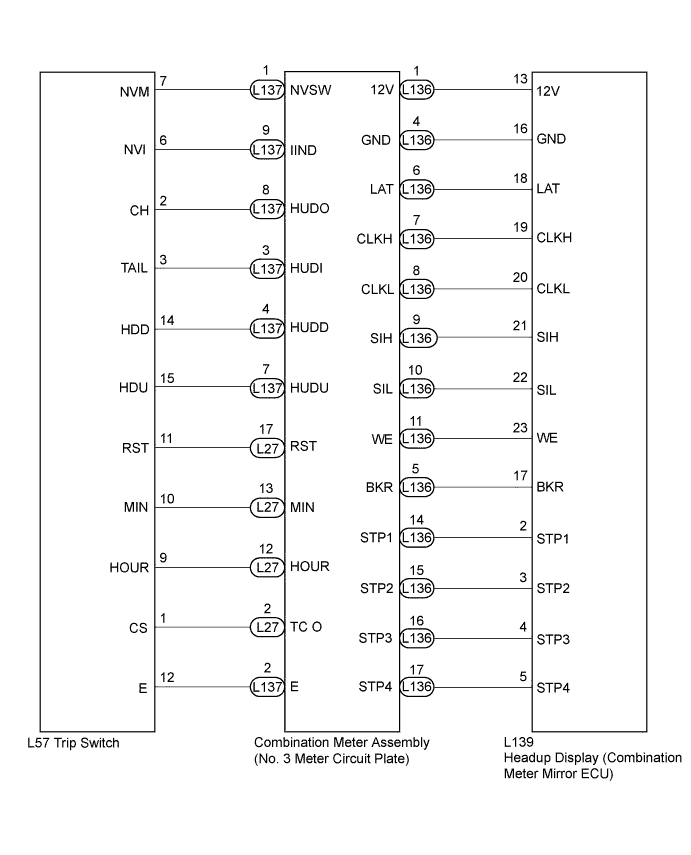
METER / GAUGE SYSTEM > Headup Display Malfunction |
| 1.SYSTEM CHECK |
Check the symptom of the headup display (combination meter mirror ECU).
| Result | Proceed to |
| Headup display (combination meter mirror ECU) does not operate at all. | A |
| Cruise information display does not change. | B |
|
| ||||
| A | |
 |
| 2.CHECK HARNESS AND CONNECTOR (HEADUP DISPLAY CIRCUIT) |
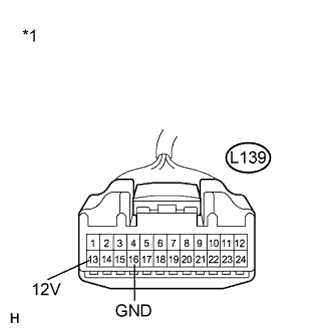 |
Disconnect the L139 connector.
Measure the voltage according to the value(s) in the table below.
| Tester Connection | Condition | Specified Condition |
| L139-13 (12V) - Body ground | Power switch on (IG) | 11 to 14 V |
Measure the resistance according to the value(s) in the table below
| Tester Connection | Condition | Specified Condition |
| L139-16 (GND) - Body ground | Always | Below 1 Ω |
| *1 | Front view of wire harness connector (to Headup Display (Combination Meter Mirror ECU)) |
|
| ||||
| OK | ||
 | ||
| ||
| 3.READ VALUE USING TECHSTREAM |
Connect the Techstream to the DLC3.
Turn the power switch on (IG).
Turn the Techstream ON.
Enter the following menus: Body Electrical / Combination Meter / Data List.
Check the values by referring to the table below.
| Tester Display | Measurement Item/Range | Normal Condition | Diagnostic Note |
| Head Up Display Switch (Up) | Headup display position up switch condition | OFF: Headup display position up switch not pressed | - |
| ON: Headup display position up switch pressed | - | ||
| Head Up Display Switch (Down) | Headup display position down switch condition | OFF: Headup display position down switch not pressed | - |
| ON: Headup display position down switch pressed | - | ||
| Head Up Display Switch (Main) | Headup display main switch condition | OFF: Headup display main switch not pressed | - |
| ON: Headup display main switch pressed | - |
|
| ||||
| A | ||
| ||
| ||
| 4.CHECK HARNESS AND CONNECTOR (HEADUP DISPLAY - NO. 3 METER CIRCUIT PLATE) |
Disconnect the L139 and L57 connectors.
Measure the resistance according to the value(s) in the table below.
| Tester Connection | Condition | Specified Condition |
| L139-17 (BKR) - L136-5 (BKR) | Always | Below 1 Ω |
| L139-17 (BKR) - Body ground | Always | 10 kΩ or higher |
| L139-18 (LAT) - L136-6 (LAT) | Always | Below 1 Ω |
| L139-18 (LAT) - Body ground | Always | 10 kΩ or higher |
| L139-19 (CLKH) - L136-7 (CLKH) | Always | Below 1 Ω |
| L139-19 (CLKH) - Body ground | Always | 10 kΩ or higher |
| L139-20 (CLKL) - L136-8 (CLKL) | Always | Below 1 Ω |
| L139-20 (CLKL) - Body ground | Always | 10 kΩ or higher |
| L139-21 (SIH) - L136-9 (SIH) | Always | Below 1 Ω |
| L139-21 (SIH) - Body ground | Always | 10 kΩ or higher |
| L139-22 (SIL) - L136-10 (SIL) | Always | Below 1 Ω |
| L139-22 (SIL) - Body ground | Always | 10 kΩ or higher |
| L139-23 (WE) - L136-11 (WE) | Always | Below 1 Ω |
| L139-23 (WE) - Body ground | Always | 10 kΩ or higher |
| L139-2 (STP1) - L136-14 (STP1) | Always | Below 1 Ω |
| L139-2 (STP1) - Body ground | Always | 10 kΩ or higher |
| L139-3 (STP2) - L136-15 (STP2) | Always | Below 1 Ω |
| L139-3 (STP2) - Body ground | Always | 10 kΩ or higher |
| L139-4 (STP3) - L136-16 (STP3) | Always | Below 1 Ω |
| L139-4 (STP3) - Body ground | Always | 10 kΩ or higher |
| L139-5 (STP4) - L136-17 (STP4) | Always | Below 1 Ω |
| L139-5 (STP4) - Body ground | Always | 10 kΩ or higher |
|
| ||||
| OK | |
|
| 5.INSPECT TRIP SWITCH |
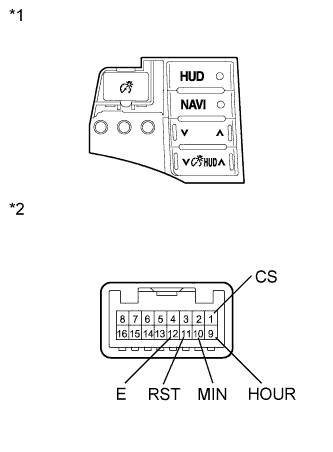 |
Disconnect the L57 connector.
Measure the resistance according to the value(s) in the table below.
| Tester Connection | Switch Condition | Specified Condition |
| 2 (CH) - 12 (E) | HUD/MODE switch pressed | Below 1 Ω |
| 2 (CH) - 12 (E) | Always | 10 kΩ or higher |
| 12 (E) - 14 (HDD) | Down switch pressed | Below 1 Ω |
| 12 (E) - 14 (HDD) | Always | 10 kΩ or higher |
| 12 (E) - 15 (HDU) | Up switch pressed | Below 1 Ω |
| 12 (E) - 15 (HDU) | Always | 10 kΩ or higher |
| *1 | Trip Switch |
| *2 | Component without harness connected (Trip Switch) |
|
| ||||
| OK | |
|
| 6.CHECK HARNESS AND CONNECTOR (TRIP SWITCH - NO. 3 METER CIRCUIT PLATE) |
Disconnect the L27, L57, and L137 connectors.
Measure the resistance according to the value(s) in the table below.
| Tester Connection | Condition | Specified Condition |
| L57-1 (CS) - L27-2 (TC O) | Always | Below 1 Ω |
| L57-1 (CS) - Body ground | Always | 10 kΩ or higher |
| L57-9 (HOUR) - L27-12 (HOUR) | Always | Below 1 Ω |
| L57-9 (HOUR) - Body ground | Always | 10 kΩ or higher |
| L57-10 (MIN) - L27-13 (MIN) | Always | Below 1 Ω |
| L57-10 (MIN) - Body ground | Always | 10 kΩ or higher |
| L57-11 (RST) - L27-17 (RST) | Always | Below 1 Ω |
| L57-11 (RST) - Body ground | Always | 10 kΩ or higher |
| L57-12 (E) - L137-2 (E) | Always | Below 1 Ω |
| L57-12 (E) - Body ground | Always | 10 kΩ or higher |
| L57-15 (HDU) - L137-7 (HUDU) | Always | Below 1 Ω |
| L57-15 (HDU) - Body ground | Always | 10 kΩ or higher |
| L57-14 (HDD) - L137-4 (HUDD) | Always | Below 1 Ω |
| L57-14 (HDD) - Body ground | Always | 10 kΩ or higher |
| L57-3 (TAIL) - L137-3 (HUDI) | Always | Below 1 Ω |
| L57-3 (TAIL) - Body ground | Always | 10 kΩ or higher |
| L57-2 (CH) - L137-8 (HUDO) | Always | Below 1 Ω |
| L57-2 (CH) - Body ground | Always | 10 kΩ or higher |
| L57-6 (NVI) - L137-9 (IIND) | Always | Below 1 Ω |
| L57-6 (NVI) - Body ground | Always | 10 kΩ or higher |
| L57-7 (NVM) - L137-1 (NVSW) | Always | Below 1 Ω |
| L57-7 (NVM) - Body ground | Always | 10 kΩ or higher |
|
| ||||
| OK | |
|
| 7.REPLACE HEADUP DISPLAY (COMBINATION METER MIRROR ECU) |
Replace the headup display (combination meter mirror ECU) with a new or a known good one .
|
| ||||
| OK | ||
| ||
| ||

