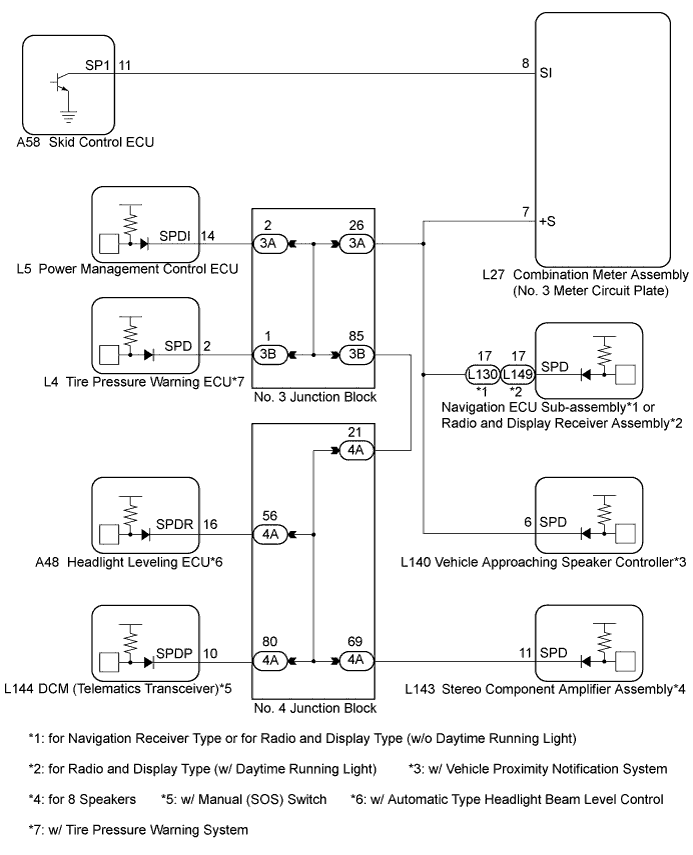
AUDIO AND VISUAL SYSTEM (w/o Daytime Running Light) > Vehicle Speed Signal Circuit between Stereo Component Amplifier and Combination Meter |
| 1.INSPECT NO. 3 METER CIRCUIT PLATE (OUTPUT WAVEFORM) |
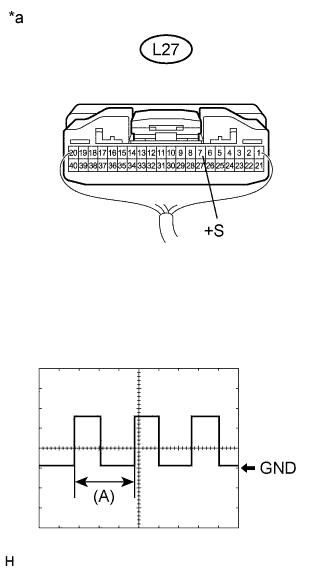 |
Check the output waveform.
Remove the No. 3 meter circuit plate with the connector(s) still connected.
Connect an oscilloscope to terminal L27-7 (+S) and body ground.
Turn the power switch on (IG).
Turn a wheel slowly.
Check the signal waveform according to the condition(s) in the table below.
| Item | Condition |
| Measurement terminal | L27-7 (+S) - Body ground |
| Tool setting | 5 V/DIV., 20 ms./DIV. |
| Vehicle condition | Wheel being rotated |
| *a | Component with harness connected (No. 3 Meter Circuit Plate) |
|
| ||||
| OK | |
 |
| 2.INSPECT STEREO COMPONENT AMPLIFIER ASSEMBLY (INPUT WAVEFORM) |
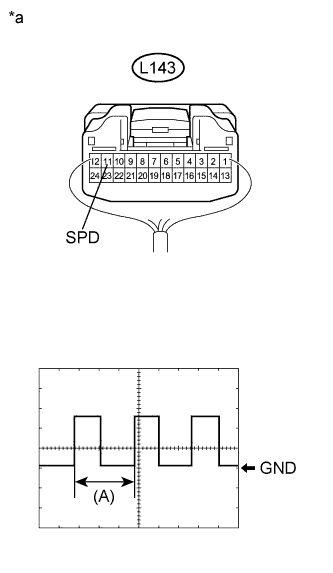 |
Check the input waveform.
Remove the stereo component amplifier assembly with the connector(s) still connected.
Connect an oscilloscope to terminal L143-11 (SPD) and body ground.
Turn the power switch on (IG).
Turn a wheel slowly.
Check the signal waveform according to the condition(s) in the table below.
| Item | Condition |
| Measurement terminal | L143-11 (SPD) - Body ground |
| Tool setting | 5 V/DIV., 20 ms./DIV. |
| Vehicle condition | Wheel being rotated |
| *a | Component with harness connected (Stereo Component Amplifier Assembly) |
|
| ||||
| OK | ||
 | ||
| ||
| 3.CHECK HARNESS AND CONNECTOR (STEREO COMPONENT AMPLIFIER ASSEMBLY - NO. 3 METER CIRCUIT PLATE) |
Disconnect the stereo component amplifier assembly connector.
Disconnect the No. 3 meter circuit plate connector.
Measure the resistance according to the value(s) in the table below.
| Tester Connection | Condition | Specified Condition |
| L143-11 (SPD) - L27-7 (+S) | Always | Below 1 Ω |
|
| ||||
| OK | ||
| ||
| ||
| 4.CHECK HARNESS AND CONNECTOR (STEREO COMPONENT AMPLIFIER ASSEMBLY - NO. 4 JUNCTION BLOCK) |
Disconnect the stereo component amplifier assembly connector.
Disconnect the No. 4 junction block connector.
Measure the resistance according to the value(s) in the table below.
| Tester Connection | Condition | Specified Condition |
| L143-11 (SPD) - 4A-69 | Always | Below 1 Ω |
|
| ||||
| OK | |
|
| 5.CHECK HARNESS AND CONNECTOR (NO. 3 JUNCTION BLOCK - NO. 4 JUNCTION BLOCK) |
Disconnect the No. 3 junction block connector.
Disconnect the No. 4 junction block connector.
Measure the resistance according to the value(s) in the table below.
| Tester Connection | Condition | Specified Condition |
| 3B-85 - 4A-21 | Always | Below 1 Ω |
|
| ||||
| OK | |
|
| 6.CHECK NO. 4 JUNCTION BLOCK |
Disconnect the No. 4 junction block connector.
Measure the resistance according to the value(s) in the table below.
| Tester Connection | Condition | Specified Condition |
| 4A-69 - 4A-21 | Always | Below 1 Ω |
|
| ||||
| OK | |
|
| 7.CHECK NO. 3 JUNCTION BLOCK |
Disconnect the No. 3 junction block connector.
Measure the resistance according to the value(s) in the table below.
| Tester Connection | Condition | Specified Condition |
| 3B-85 - 3A-26 | Always | Below 1 Ω |
|
| ||||
| OK | ||
| ||
| ||

