Home › Engine / Hybrid System › 2ZR-FXE COOLING › EXHAUST PIPE GAS CONTROL ACTUATOR

EXHAUST PIPE GAS CONTROL ACTUATOR > INSTALLATION

for Preparation Click here


1. INSTALL EXHAUST PIPE GAS CONTROL ACTUATOR

NOTICE:
When installing the water hose, ensure that the exhaust heat recirculation system is filled with coolant. Otherwise, the engine water pump assembly may be damaged.


    A216836E01
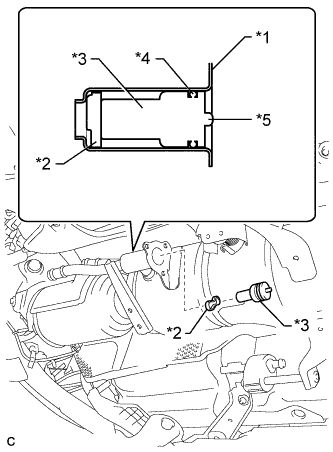
  1. Apply engine coolant to the O-ring.
    Text in Illustration 
    *1
    Exhaust Pipe Gas Control Actuator Case
    *2
    Exhaust Pipe Gas Control Stopper
    *3
    Exhaust Pipe Gas Control Actuator
    *4
    O-ring
    *5
    Piston

  1. Install the exhaust pipe gas control actuator and exhaust pipe gas control stopper.
    NOTICE:
    1. Be sure to install the exhaust pipe gas control stopper in the correct direction.
    1. Check that the O-ring is not deformed, cracked or swollen.
    1. Be sure to install the exhaust pipe gas control actuator until it touches the exhaust pipe gas control stopper.
    1. When installing the exhaust pipe gas control actuator, do not push on the piston.
    1. Make sure that the exhaust pipe gas control actuator and the exhaust pipe gas control stopper are free of oil.


    A216835E01
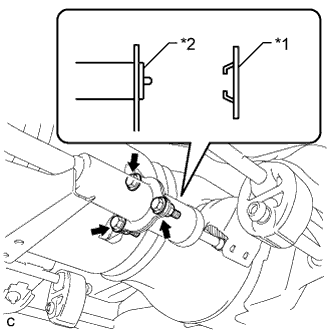
  1. Install a new gasket and the exhaust pipe gas control actuator case with the 3 bolts and 3 nuts.
    Text in Illustration 
    *1
    Gasket
    *2
    Exhaust Pipe Gas Control Actuator

    Torque:
    5.0 N*m{ 51 kgf*cm , 44 in.*lbf }

    NOTICE:
    1. Be sure to install a new gasket in the correct direction.
    1. Make sure that the exhaust pipe gas control actuator case and the new gasket are free of oil.


    A216068E01
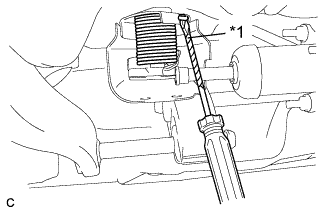
  1. Using a screwdriver with the tip taped, pry the portion indicated in the illustration to engage the spring.
    Text in Illustration 
    *1
    Protective Tape


    A216063
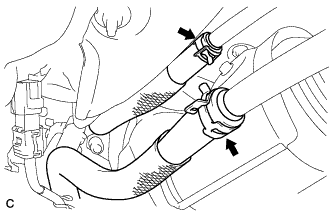
  1. Connect the 2 water hoses.


2. ADD ENGINE COOLANT (for Engine)
  1. Tighten the radiator drain cock plug.

  1. Remove the reservoir tank cap.


    A213418E01
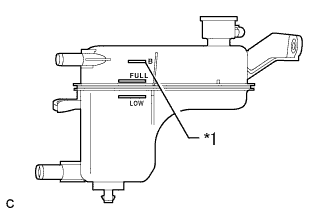
  1. Add coolant to B line of the reservoir tank.
    Text in Illustration 
    *1
    B Line

    Standard Capacity:
    Item
    Capacity
    Engine coolant
    w/ Exhaust Heat Recirculation System:
    7.2 liters (7.6 US qts, 6.3 lmp. qts)
    w/o Exhaust Heat Recirculation System:
    6.5 liters (6.8 US qts, 5.7 lmp. qts)

    HINT:
    TOYOTA vehicles are filled with TOYOTA SLLC at the factory. In order to avoid damage to the engine cooling system and other technical problems, only use TOYOTA SLLC or similar high quality ethylene glycol based non-silicate, non-amine, non-nitrite, non-borate coolant with long-life hybrid organic acid technology (coolant with long-life hybrid organic acid technology is a combination of low phosphates and organic acids).

    NOTICE:
    Never use water as a substitute for engine coolant.

  1. Squeeze the inlet and outlet radiator hoses several times by hand, and then check the level of the coolant.
    If the coolant level is low, add coolant.

  1. Install the reservoir tank cap.

  1. Put the engine in inspection mode (Click here).

  1. Bleed air from the cooling system.

    NOTICE:
    1. Before starting the engine, turn the A/C switch off.
    2. Adjust the heater control to the maximum hot setting.
    3. Adjust the blower speed to low setting.


    1. Warm up the engine until the thermostat opens. While the thermostat is open, allow the coolant to circulate for several minutes.

      HINT:
      The thermostat opening timing can be confirmed by squeezing the inlet radiator hose by hand, and sensing vibrations when the engine coolant starts to flow inside the hose.

      CAUTION:
      When squeezing the radiator hose:
      1. Wear protective gloves.
      2. Be careful as the radiator hoses are hot.
      3. Keep your hands away from the radiator fan.

    2. Squeeze the inlet and outlet radiator hoses several times by hand to bleed air from the system.
      CAUTION:
      When squeezing the radiator hose:
      1. Wear protective gloves.
      2. Be careful as the radiator hoses are hot.
      3. Keep your hands away from the radiator fan.


    A213418E02
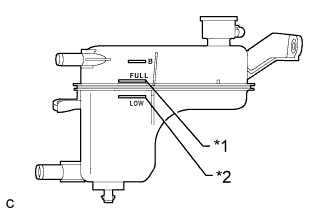
  1. After the engine has cooled down, check that the coolant level is between full and low.
    Text in Illustration 
    *1
    Full Line
    *2
    Low Line
    If the coolant level is low, add coolant to the full line on the reservoir tank.


3. INSPECT FOR COOLANT LEAK

CAUTION:
Do not remove the reservoir tank cap while the engine and radiator are still hot. Pressurized, hot engine coolant and steam may be released and cause serious burns.

NOTICE:
Before performing each inspection, turn the A/C switch off.

  1. Remove the reservoir tank cap.


    A213419
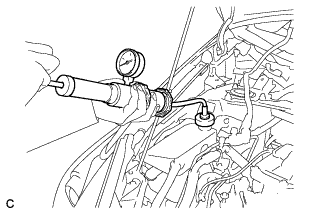
  1. Fill the radiator and reservoir with coolant, and then attach a radiator cap tester.

  1. Put the engine in inspection mode (Click here).

  1. Warm up the engine.

  1. Using the reservoir cap tester, increase the pressure inside the radiator to 108 kPa (1.1 kgf/cm2, 16 psi), and check that the pressure does not drop. If the pressure drops, check the hoses, radiator, front exhaust pipe assembly and the heater hose around and engine water pump for leaks. If no external leaks are found, check the heater core, cylinder block and cylinder head.

  1. Remove the radiator cap tester.

  1. Install the reservoir tank cap.


4. INSTALL NO. 1 ENGINE UNDER COVER