 |
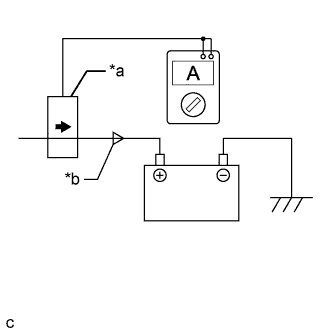
Connect an AC/DC 400 A probe to the positive (+) auxiliary battery cable.
| *a | Probe Direction |
| *b | Current Flowing into Auxiliary Battery |
CHARGING SYSTEM > ON-VEHICLE INSPECTION |
| 1. CHECK AUXILIARY BATTERY |
Check that the auxiliary battery cables are connected to the correct terminals.
If they are not, connect them properly.
Check the auxiliary battery for damage and deformation. If severe damage, deformation or leakage is found, replace the auxiliary battery.
| 2. CHECK AUXILIARY BATTERY VOLTAGE |
Turn the power switch off and turn on the high beam headlights for 30 seconds. This will remove the surface charge from the auxiliary battery.
Measure the auxiliary battery voltage according to the value(s) in the table below.
| Tester Connection | Condition | Specified Condition | Result |
| Positive (+) auxiliary battery terminal - Negative (-) auxiliary battery terminal | 20°C (68°F), Power switch off | 12.5 V or higher | Auxiliary battery is OK |
| 11.0 to 12.5 V | Recharge auxiliary battery | ||
| Below 11.0 V | Replace auxiliary battery |
| 3. RECHARGE AUXILIARY BATTERY |
Recharge the auxiliary battery.
| Auxiliary Battery Type | Charging Current |
| S46B24R | 4 to 5 A |
Turn the power switch off and turn on the high beam headlights for 30 seconds. This will remove the surface charge from the auxiliary battery.
Measure the auxiliary battery voltage according to the value(s) in the table below.
| Tester Connection | Condition | Specified Condition | Result |
| Positive (+) auxiliary battery terminal - Negative (-) auxiliary battery terminal | 20°C (68°F), Power switch off | 12.5 V or higher | Auxiliary battery is OK |
| 11.0 to 12.5 V | Recharge auxiliary battery | ||
| Below 11.5 V | Replace auxiliary battery |
| 4. CHECK AUXILIARY BATTERY TERMINAL, FUSIBLE LINK AND FUSE |
Check that the auxiliary battery terminals are not loose or corroded.
Measure the resistance of each fusible link and fuse for the auxiliary battery charging system.
| 5. CHECK AMD TERMINAL |
Remove the service plug grip (Click here).
Check that the AMD terminal is connected securely, and there is no contact problem.
If there are any arc marks, replace the affected parts.
Check that the nut for the AMD terminal is tightened to the specified torque.
If there are no arc marks and the AMD terminal connection is faulty, connect the AMD terminal securely.
Install the service plug grip (Click here).
| 6. CHECK DC/DC CONVERTER FUNCTION |
|
Connect an AC/DC 400 A probe to the positive (+) auxiliary battery cable.
| *a | Probe Direction |
| *b | Current Flowing into Auxiliary Battery |
Turn the power switch on (READY) and leave the vehicle as it is until the electric current flowing into the auxiliary battery becomes 10 A or more.
Turn on the high beam headlights, and turn the blower motor switch to the HI position and the rear window defogger on.
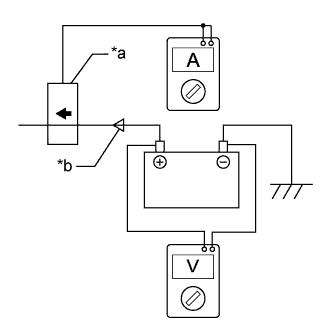 |
Measure the current and voltage according to the value(s) in the table below.
| *a | Probe Direction |
| *b | Current Flowing from Auxiliary Battery |
| Item | Tester Connection | Condition | Specified Condition |
| Current flowing from auxiliary battery | Positive (+) auxiliary battery cable | Power switch on (READY) (The high beam headlights are on, the blower motor switch is in the HI position, and the rear window defogger is turned on.) | 0 A or less (no current from auxiliary battery) |
| Auxiliary battery voltage | Positive (+) auxiliary battery terminal - Negative (-) auxiliary battery terminal | 13 to 15 V |