WHEN REMOVING,INSTALLING,REPAIRING OR REPLACING PARTS > WHEEL ALIGNMENT STANDARD |
| PRECAUTION |
|
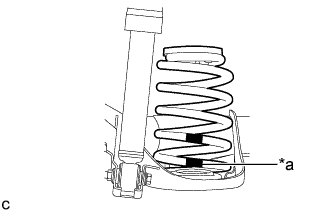
| *a | Colored identification mark on the bottom of the rear coil spring |
| MEASURE VEHICLE HEIGHT |
Bounce the vehicle up and down at the corners to stabilize the suspension.
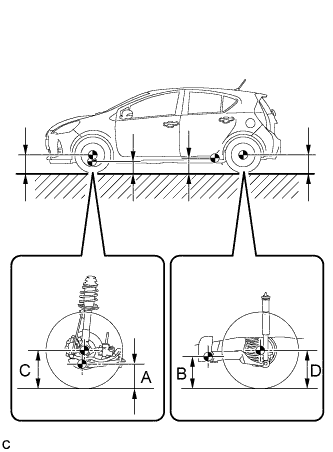 |
Measure the vehicle height.
| Tire Size | Front C - A | Rear D - B |
| 175/65R15 | 92 mm (3.62 in.) | 29 mm (1.14 in.) |
| 185/60R15 | 93 mm (3.66 in.) 79 mm (3.11 in.) *1 69 mm (2.72 in.) *2 | 32 mm (1.26 in.) 14 mm (0.55 in.) *1 4 mm (0.16 in.) *2 |
| 195/50R16 | 93 mm (3.66 in.) | 30 mm (1.18 in.) |
| INSPECT CAMBER, CASTER AND STEERING AXIS INCLINATION |
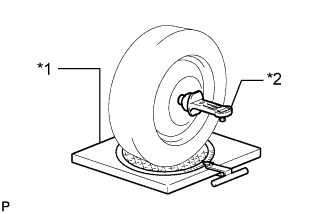 |
Install a camber-caster-kingpin gauge and place the front wheels on the center of a turning radius gauge.
| *1 | Turning Radius Gauge |
| *2 | Camber-caster-kingpin Gauge |
Inspect the camber, caster and steering axis inclination.
| Tire Size | Camber Inclination | Right-left Difference |
| 185/60R15 | -0°13' +/- 0°45' (-0.22° +/- 0.75°) -0°04' +/- 0°45' (-0.07° +/- 0.75°) *1 0°05' +/- 0°45' (0.08° +/- 0.75°) *2 | 0°30' (0.50°) or less |
| 175/65R15 195/50R16 | -0°13' +/- 0°45' (-0.22° +/- 0.75°) |
| Tire Size | Caster Inclination | Right-left Difference |
| 175/65R15 | 4°54' +/- 0°45' (4.90° +/- 0.75°) | 0°30' (0.50°) or less |
| 185/60R15 | 4°59' +/- 0°45' (4.98° +/- 0.75°) 4°41' +/- 0°45' (4.68° +/- 0.75°) *1 4°32' +/- 0°45' (4.53° +/- 0.75°) *2 | |
| 195/50R16 | 4°57' +/- 0°45' (4.95° +/- 0.75°) |
| Tire Size | Steering Axis Inclination Reference |
| 175/65R15 | 11°23' (11.38°) |
| 185/60R15 | 11°25' (11.42°) 11°04' (11.07°) *1 10°49' (10.82°) *2 |
| 195/50R16 | 11°25' (11.42°) |
| INSPECT TOE-IN (FRONT) |
Bounce the vehicle up and down at the corners to stabilize the suspension.
Release the parking brake and move the shift lever to N.
Push the vehicle straight ahead approximately 5 m (16.4 ft.). (Step C)
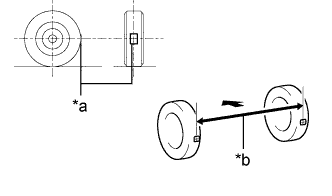 |
Put tread center marks on the rearmost points of the front wheels and measure the distance between the marks (dimension B).
| *a | Tread Center Mark |
| *b | Dimension B |
 | Front of the Vehicle |
Slowly push the vehicle straight ahead to cause the front wheels to rotate 180°. Use the front tire valve as a reference point.
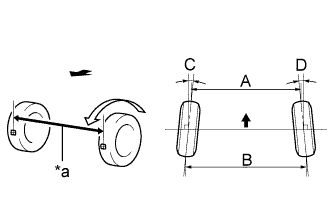 |
Measure the distance between the tread center marks on the front of the wheels (dimension A).
| *a | Dimension A |
| Front of the Vehicle |
| Tire Size | Specified Condition |
| 175/65R15 | C + D: 0°06' +/- 0°12' (0.10° +/- 0.21°) |
| B - A: 1.0 +/- 2.0 mm (0.0394 +/- 0.0787in.) | |
| 185/60R15 | C + D: 0°06' +/- 0°12' (0.09° +/- 0.19°) |
| B - A: 1.0 +/- 2.0 mm (0.0394 +/- 0.0787in.) | |
| 195/50R16 | C + D: 0°06' +/- 0°11' (0.09° +/- 0.19°) |
| B - A: 1.0 +/- 2.0 mm (0.0394 +/- 0.0787in.) |
| INSPECT WHEEL ANGLE |
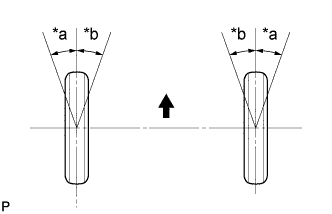 |
Put tread center marks on the rearmost points of a turning radius gauge.
| *a | Inside |
| *b | Outside |
| Front of the Vehicle |
Turn the steering wheel fully to the left and right and measure the turning angle.
| Tire Size | Inside Wheel | Outside Wheel Reference |
| 175/65R15 | 40°50' +/- 2° (40.83° +/- 2°) | 35°11' (35.18°) |
| 185/60R15 | 40°50' +/- 2° (40.83° +/- 2°) 41°09' +/- 2° (41.15° +/- 2°) *1 41°21' +/- 2° (41.35° +/- 2°) *2 | 35°09' (35.15°) 35°30' (35.50°) *1 35°44' (35.73°) *2 |
| 195/50R16 | 32°37' +/- 2° (32.62° +/- 2°) | 29°35' (29.58°) |
| INSPECT CAMBER (REAR) |
Install a camber-caster-kingpin gauge.
Inspect the camber.
| Tire Size | Camber Inclination | Right-left Difference |
| 185/60R15 | -0°58' +/-0°30' (-0.97° +/- 0.50°) -0°55' +/-0°30' (-0.92° +/- 0.50°) *1 -0°54' +/-0°30' (-0.90° +/- 0.50°) *2 | 0°30' (0.50°) or less |
| 175/65R15 195/50R16 | -0°57' +/-0°30' (-0.95° +/- 0.50°) |
| INSPECT TOE-IN (REAR) |
Bounce the vehicle up and down at the corners to stabilize the suspension.
Release the parking brake and move the shift lever to N.
Push the vehicle straight ahead approximately 5 m (16.4 ft.). (Step A)
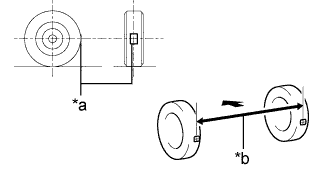 |
Put tread center marks on the rearmost points of the rear wheels and measure the distance between the marks (dimension B).
| *a | Tread Center Mark |
| *b | Dimension B |
| Front of the Vehicle |
Slowly push the vehicle straight ahead to cause the rear wheels to rotate 180°. Use the rear tire valve as a reference point.
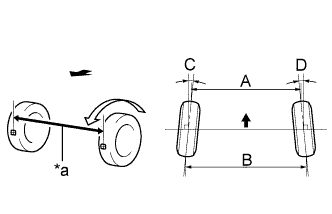 |
Measure the distance between the tread center marks on the front of the wheels (dimension A).
| *a | Dimension A |
| Front of the Vehicle |
| Tire Size | Specified Condition | Right-left Difference |
| 185/60R15 | C + D: 0°21' +/- 15' (0.35° +/- 0.25°) C + D: 0°20' +/- 15' (0.33° +/- 0.25°) *1 C + D: 0°14' +/- 15' (0.23° +/- 0.25°) *2 | 30' (0.50°) or less |
| B - A: 3.9 +/- 3 mm (0.154 +/- 0.118in.) B - A: 3.2 +/- 3 mm (0.126 +/- 0.118in.) *1 B - A: 2.8+/- 3 mm (0.110 +/- 0.118in.) *2 | 6.0 mm (0.236 in.) or less | |
| 175/65R15 195/50R16 | C + D: 0°20' +/- 15' (0.33° +/- 0.25°) | 30' (0.50°) or less |
| B - A: 3.9 +/- 3 mm (0.154 +/- 0.118in.) | 6.0 mm (0.236 in.) or less |