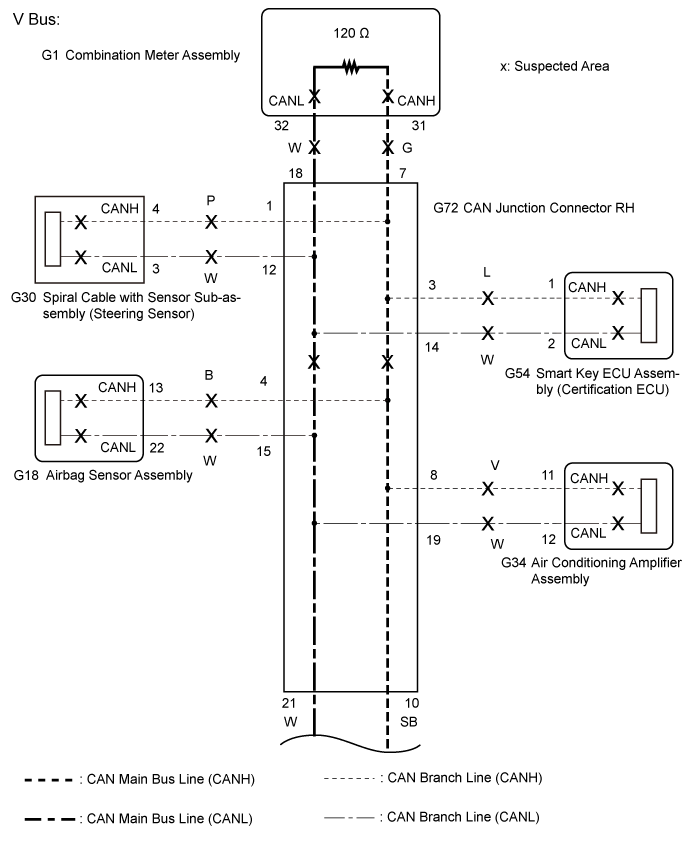
CAN COMMUNICATION SYSTEM > Check CAN Bus Line for Short to GND (LHD Models) |
| Symptom | Trouble Area |
| No resistance exists between terminals 6 (CANH) and 4 (CG) or 14 (CANL) and 4 (CG) of DLC3. |
|
| 1.CHECK FOR SHORT TO GND IN CAN BUS LINE (CAN J/C RH) |
Disconnect the cable from the negative (-) auxiliary battery terminal.
Disconnect the G72 CAN junction connector RH.
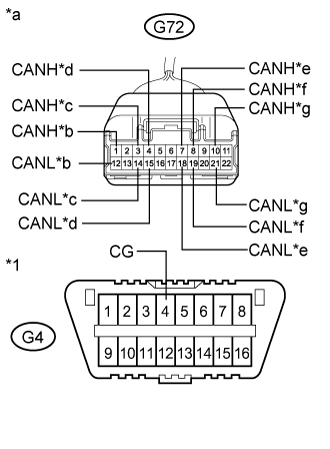 |
Measure the resistance according to the value(s) in the table below.
| Tester Connection | Condition | Specified Condition | Connected to |
| G72-1 (CANH) - G4-4 (CG) | Cable disconnected from negative (-) auxiliary battery terminal | 200 Ω or higher | Spiral cable with sensor sub-assembly (Steering sensor) |
| G72-12 (CANL) - G4-4 (CG) | |||
| G72-3 (CANH) - G4-4 (CG) | Cable disconnected from negative (-) auxiliary battery terminal | 200 Ω or higher | Smart key ECU assembly (Certification ECU) |
| G72-14 (CANL) - G4-4 (CG) | |||
| G72-4 (CANH) - G4-4 (CG) | Cable disconnected from negative (-) auxiliary battery terminal | 200 Ω or higher | Airbag sensor assembly |
| G72-15 (CANL) - G4-4 (CG) | |||
| G72-7 (CANH) - G4-4 (CG) | Cable disconnected from negative (-) auxiliary battery terminal | 200 Ω or higher | Combination meter assembly |
| G72-18 (CANL) - G4-4 (CG) | |||
| G72-8 (CANH) - G4-4 (CG) | Cable disconnected from negative (-) auxiliary battery terminal | 200 Ω or higher | Air conditioning amplifier assembly |
| G72-19 (CANL) - G4-4 (CG) | |||
| G72-10 (CANH) - G4-4 (CG) | Cable disconnected from negative (-) auxiliary battery terminal | 200 Ω or higher | CAN junction connector LH |
| G72-21 (CANL) - G4-4 (CG) |
| *1 | DLC3 |
| *a | Front view of wire harness connector (to CAN Junction Connector RH) |
| *b | to Spiral Cable with Sensor Sub-assembly (Steering Sensor) |
| *c | to Smart Key ECU Assembly (Certification ECU) |
| *d | to Airbag Sensor Assembly |
| *e | to Combination Meter Assembly |
| *f | to Air Conditioning Amplifier Assembly |
| *g | to CAN Junction Connector LH |
| Result | Proceed to |
| OK | A |
| NG (CAN junction connector LH main line) | B |
| NG (ECU or sensor bus line) | C |
|
| ||||
|
| ||||
| A | ||
 | ||
| ||
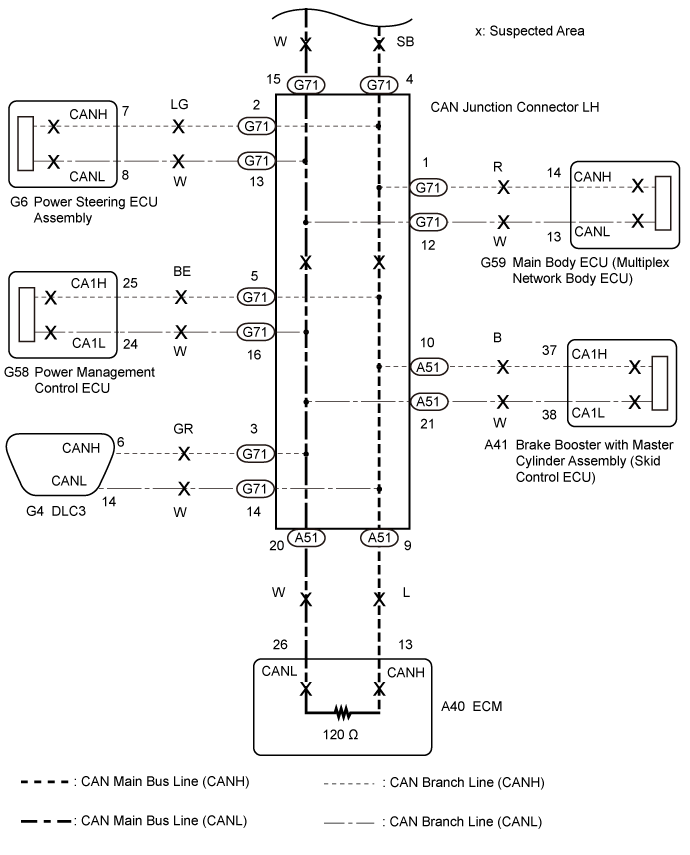
| 2.CHECK FOR SHORT TO GND IN CAN BUS LINE (CAN J/C LH (INSTRUMENT PANEL WIRE SIDE)) |
Disconnect the G71 CAN junction connector LH (instrument panel wire side).
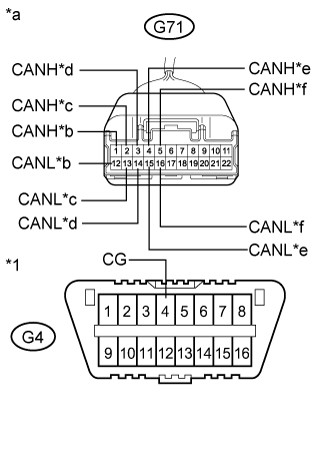 |
Measure the resistance according to the value(s) in the table below.
| Tester Connection | Condition | Specified Condition | Connected to |
| G71-1 (CANH) - G4-4 (CG) | Cable disconnected from negative (-) auxiliary battery terminal | 200 Ω or higher | Main body ECU (Multiplex network body ECU) |
| G71-12 (CANL) - G4-4 (CG) | |||
| G71-2 (CANH) - G4-4 (CG) | Cable disconnected from negative (-) auxiliary battery terminal | 200 Ω or higher | Power steering ECU assembly |
| G71-13 (CANL) - G4-4 (CG) | |||
| G71-3 (CANH) - G4-4 (CG) | Cable disconnected from negative (-) auxiliary battery terminal | 200 Ω or higher | DLC3 |
| G71-14 (CANL) - G4-4 (CG) | |||
| G71-4 (CANH) - G4-4 (CG) | Cable disconnected from negative (-) auxiliary battery terminal | 200 Ω or higher | CAN junction connector RH |
| G71-15 (CANL) - G4-4 (CG) | |||
| G71-5 (CANH) - G4-4 (CG) | Cable disconnected from negative (-) auxiliary battery terminal | 200 Ω or higher | Power management control ECU |
| G71-16 (CANL) - G4-4 (CG) |
| *1 | DLC3 |
| *a | Front view of wire harness connector (to CAN Junction Connector LH (Instrument Panel Wire Side)) |
| *b | to Main Body ECU (Multiplex Network Body ECU) |
| *c | to Power Steering ECU Assembly |
| *d | to DLC3 |
| *e | to CAN Junction Connector RH |
| *f | to Power Management Control ECU |
| Result | Proceed to |
| OK | A |
| NG (CAN junction connector RH main line) | B |
| NG (ECU or sensor bus line) | C |
| NG (DLC3 branch line) | D |
|
| ||||
|
| ||||
|
| ||||
| A | |
 |
| 3.CHECK FOR SHORT TO GND IN CAN BUS LINE (CAN J/C LH (ENGINE ROOM MAIN WIRE SIDE)) |
Disconnect the A51 CAN junction connector LH (engine room main wire side).
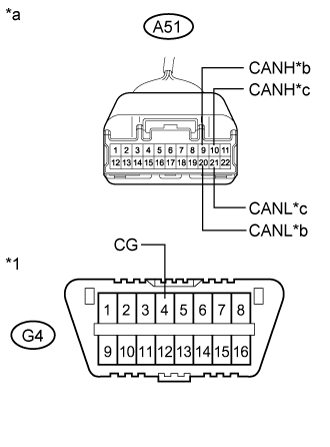 |
Measure the resistance according to the value(s) in the table below.
| Tester Connection | Condition | Specified Condition | Connected to |
| A51-9 (CANH) - G4-4 (CG) | Cable disconnected from negative (-) auxiliary battery terminal | 200 Ω or higher | ECM |
| A51-20 (CANL) - G4-4 (CG) | |||
| A51-10 (CANH) - G4-4 (CG) | Cable disconnected from negative (-) auxiliary battery terminal | 200 Ω or higher | Brake booster with master cylinder assembly (Skid control ECU) |
| A51-21 (CANL) - G4-4 (CG) |
| *1 | DLC3 |
| *a | Front view of wire harness connector (to CAN Junction Connector LH (Engine Room Main Wire Side)) |
| *b | to ECM |
| *c | to Brake Booster with Master Cylinder Assembly (Skid Control ECU) |
| Result | Proceed to |
| OK | A |
| NG (ECU or sensor bus line) | B |
|
| ||||
| A | ||
| ||
| ||
| 4.CHECK FOR SHORT TO GND IN CAN BUS LINE (ECU, SENSOR) |
Reconnect all wire harness connectors (CAN junction connector LH and CAN junction connector RH).
Disconnect the ECU or sensor connected to the CAN bus line that is shorted to ground.
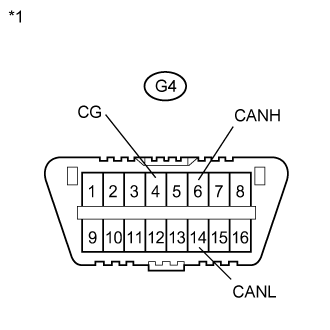 |
Measure the resistance according to the value(s) in the table below.
| Tester Connection | Condition | Specified Condition |
| G4-6 (CANH) - G4-4 (CG) | Cable disconnected from negative (-) auxiliary battery terminal | 200 Ω or higher |
| G4-14 (CANL) - G4-4 (CG) | Cable disconnected from negative (-) auxiliary battery terminal | 200 Ω or higher |
| *1 | DLC3 |
|
| ||||
| OK | ||
| ||
| ||

