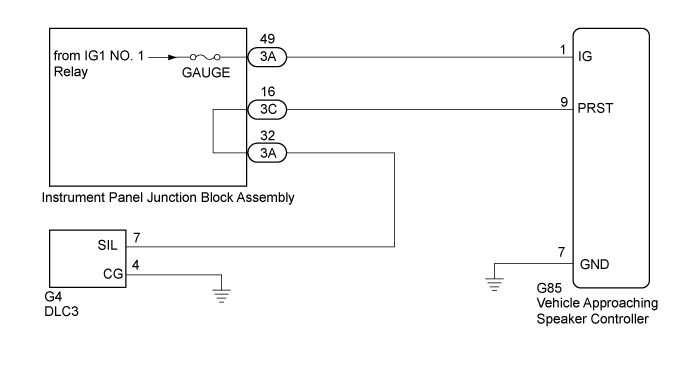
VEHICLE PROXIMITY NOTIFICATION SYSTEM > Communication between Vehicle Proximity Notification System and Diagnostic Tool is not Possible |
| 1.CHECK DTC OUTPUT |
Connect the GTS to the DLC3.
Turn the power switch on (IG).
Turn the GTS on.
Enter the following menus: Health Check.
| Result | Proceed to |
| Communication with the vehicle approaching speaker controller is not possible | A |
| Communication with the vehicle approaching speaker controller is possible | B |
|
| ||||
| A | |
 |
| 2.CHECK HARNESS AND CONNECTOR (VEHICLE APPROACHING SPEAKER CONTROLLER - IG1 NO. 1 RELAY) |
Disconnect the G85 vehicle approaching speaker controller connector.
Measure the voltage according to the value(s) in the table below.
| Tester Connection | Condition | Specified Condition |
| G85-1 (IG) - Body ground | Power switch on (IG) | 11 to 14 V |
|
| ||||
| OK | |
|
| 3.CHECK HARNESS AND CONNECTOR (VEHICLE APPROACHING SPEAKER CONTROLLER - BODY GROUND) |
Measure the resistance according to the value(s) in the table below.
| Tester Connection | Condition | Specified Condition |
| G85-7 (GND) - Body ground | Always | Below 1 Ω |
|
| ||||
| OK | |
|
| 4.CHECK HARNESS AND CONNECTOR (VEHICLE APPROACHING SPEAKER CONTROLLER - DLC3) |
Measure the resistance according to the value (s) in the table below.
| Tester Connection | Condition | Specified Condition |
| G85-9 (PRST) - G4-7 (SIL) | Always | Below 1 Ω |
| G85-9 (PRST) or G4-7 (SIL) - Body ground | Always | 10 kΩ or higher |
|
| ||||
| OK | |
|
| 5.CHECK HARNESS AND CONNECTOR (DLC3 - BODY GROUND) |
Measure the resistance according to the value (s) in the table below.
| Tester Connection | Condition | Specified Condition |
| G4-4 (CG) - Body ground | Always | Below 1 Ω |
|
| ||||
| OK | ||
 | ||
| ||
| 6.CHECK HARNESS AND CONNECTOR (VEHICLE APPROACHING SPEAKER CONTROLLER - INSTRUMENT PANEL JUNCTION BLOCK ASSEMBLY) |
Disconnect the 3A instrument panel junction block assembly connector.
Measure the resistance according to the value (s) in the table below.
| Tester Connection | Condition | Specified Condition |
| G85-1 (IG) - 3A-49 | Always | Below 1 Ω |
| G85-1 (IG) or 3A-49 - Body ground | Always | 10 kΩ or higher |
|
| ||||
| OK | ||
| ||
| ||
| 7.CHECK HARNESS AND CONNECTOR (VEHICLE APPROACHING SPEAKER CONTROLLER - INSTRUMENT PANEL JUNCTION BLOCK ASSEMBLY) |
Disconnect the 3C instrument panel junction block assembly connector.
Measure the resistance according to the value (s) in the table below.
| Tester Connection | Condition | Specified Condition |
| G85-9 (PRST) - 3C-16 | Always | Below 1 Ω |
| G85-9 (PRST) or 3C-16 - Body ground | Always | 10 kΩ or higher |
|
| ||||
| OK | |
|
| 8.CHECK HARNESS AND CONNECTOR (INSTRUMENT PANEL JUNCTION BLOCK ASSEMBLY - DLC3) |
Disconnect the 3A instrument panel junction block assembly connector.
Measure the resistance according to the value (s) in the table below.
| Tester Connection | Condition | Specified Condition |
| 3A-32 - G4-7 (SIL) | Always | Below 1 Ω |
| 3A-32 or G4-7 (SIL) - Body ground | Always | 10 kΩ or higher |
|
| ||||
| OK | ||
| ||
| ||

