 |
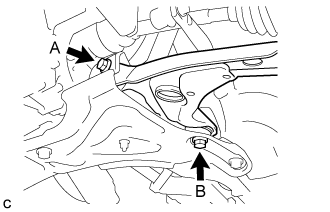
Fully tighten the 2 bolts.
- Torque:
- Bolt A:
- 137 N*m{ 1397 kgf*cm , 101 ft.*lbf }
- Bolt B:
- 151 N*m{ 1540 kgf*cm , 111 ft.*lbf }
FRONT LOWER SUSPENSION ARM > INSTALLATION |
| 1. TEMPORARILY TIGHTEN FRONT LOWER NO. 1 SUSPENSION ARM SUB-ASSEMBLY RH |
| 2. TEMPORARILY TIGHTEN FRONT LOWER NO. 1 SUSPENSION ARM SUB-ASSEMBLY LH |
Temporarily install the front lower No. 1 suspension arm sub-assembly LH to the front suspension crossmember sub-assembly with the 2 bolts.
| 3. CONNECT FRONT LOWER NO. 1 SUSPENSION ARM SUB-ASSEMBLY LH |
Install the front lower No. 1 suspension arm sub-assembly LH to the steering knuckle with a new nut.
Install a new clip.
| 4. INSTALL FRONT WHEEL |
| 5. STABILIZE SUSPENSION |
Lower the vehicle.
Bounce the vehicle up and down several times to stabilize the suspension.
| 6. FULLY TIGHTEN FRONT LOWER NO. 1 SUSPENSION ARM SUB-ASSEMBLY LH |
|
Fully tighten the 2 bolts.
| 7. INSPECT AND ADJUST FRONT WHEEL ALIGNMENT |