Home › Drivetrain › DRIVE SHAFT / PROPELLER SHAFT › FRONT DRIVE SHAFT ASSEMBLY

FRONT DRIVE SHAFT ASSEMBLY > REASSEMBLY

for Preparation Click here


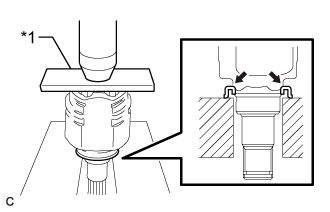
1. INSTALL FRONT DRIVE SHAFT DUST COVER


    C157559E05
  1. Using a steel plate and a press, install a new front drive shaft dust cover into the front drive inboard joint assembly until it is flush with the end.
    Text in Illustration 
    *1
    Steel Plate

    NOTICE:
    1. Install the front drive shaft dust cover in the correct direction.
    2. Do not deform the front drive shaft dust cover.
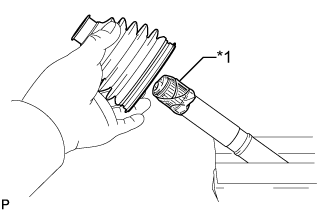


2. INSTALL OUTBOARD JOINT BOOT


    C166359E06
  1. Wrap the splines of the front axle outboard joint shaft assembly with protective tape to prevent the boot from being damaged.
    Text in Illustration 
    *1
    Protective Tape


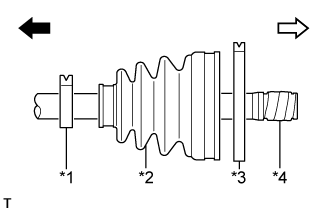
    C104547E13
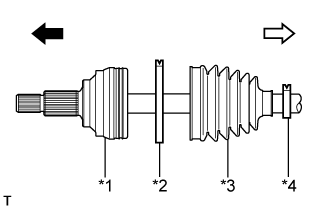
  1. Install new parts onto the front axle outboard joint shaft assembly in the following order:
    Text in Illustration 
    *1
    Front Axle Outboard Joint Shaft Assembly
    *2
    Front No. 2 Axle Outboard Joint Boot Clamp
    *3
    Outboard Joint Boot
    *4
    Front Axle Outboard Joint Boot Clamp
    V100135
    Outboard Joint Side
    V100136
    Inboard Joint Side

    1. Front No. 2 axle outboard joint boot clamp

    2. Outboard joint boot

    3. Front axle outboard joint boot clamp

  1. Pack the joint portion of the front axle outboard joint shaft assembly and outboard joint boot with grease.

    Standard grease capacity:
    116 to 126 g (4.09 to 4.44 oz.)

  1. Install the outboard joint boot onto the front axle outboard joint shaft assembly groove.

    NOTICE:
    1. Do not allow grease to adhere to the boot clamp track of the outboard joint boot.
    2. Keep the inside of the outboard joint boot free of foreign matter.


3. INSTALL FRONT NO. 2 AXLE OUTBOARD JOINT BOOT CLAMP

CAUTION:
Wear protective gloves. Sharp areas on the parts may injure your hands.


    C107943
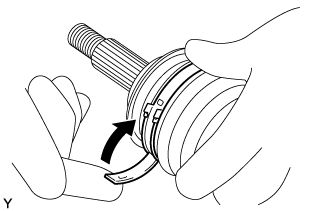
  1. Install the front No. 2 axle outboard joint boot clamp onto the outboard joint boot and temporarily fold back the lever.

    NOTICE:
    1. Set the lever into the guide groove correctly and install the clamp as far as possible to the inside of the vehicle.
    2. Check the band and the lever for any deformation before folding back the lever.


    C236279E01
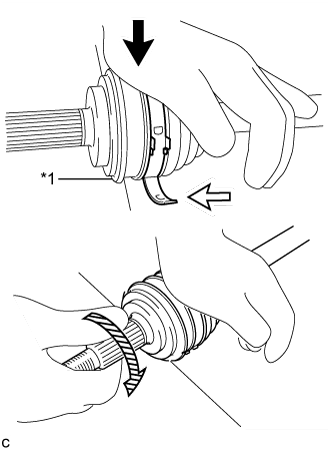
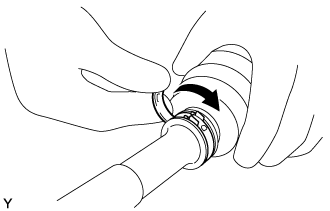
  1. Lean your weight on your hand and roll the outboard joint forward while pressing the outboard joint against the work surface. Roll the outboard joint and fold the lever until a click sound can be heard.
    Text in Illustration 
    *1
    Deflector
    V100135
    Weight
    V100136
    Contact
    V100137
    Roll

    NOTICE:
    1. Do not damage the deflector.
    2. Make sure that the outboard joint is in direct contact with the work surface.


    C233614
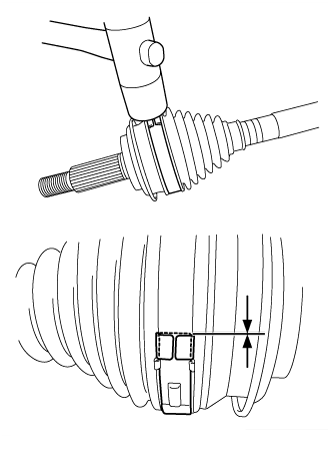
  1. Using a plastic hammer, tap the buckle to secure it while adjusting the clearance between the lever and the groove to make the clearance between the buckle edge and the lever end even.

    NOTICE:
    Do not damage the outboard joint boot.


4. INSTALL FRONT AXLE OUTBOARD JOINT BOOT CLAMP

CAUTION:
Wear protective gloves. Sharp areas on the parts may injure your hands.


    C107948
  1. Install the front axle outboard joint boot clamp onto the outboard joint boot and temporarily fold back the lever.

    NOTICE:
    1. Set the lever into the guide groove correctly.
    2. Check the band and the lever for any deformation before folding back the lever.


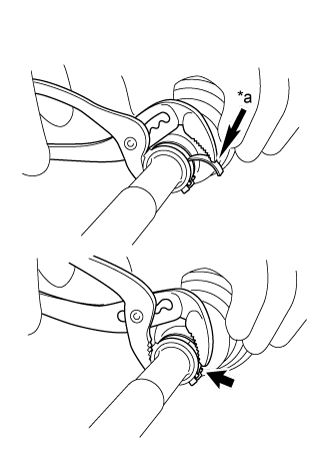
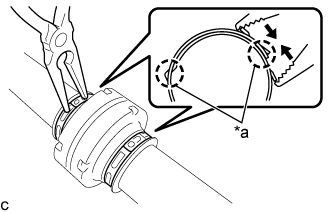
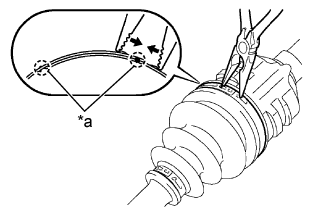
    C158356E08
  1. Using water pump pliers, pinch the front axle outboard joint boot clamp to temporarily secure it.
    Text in Illustration 
    *a
    Place the tip near the center of the lever.


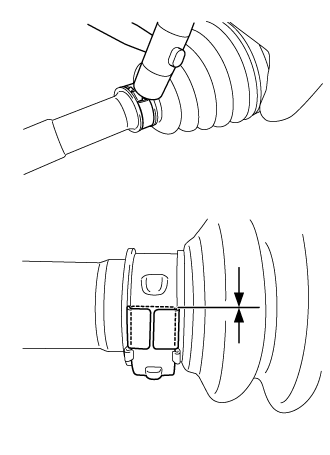
    C112272
  1. Using a plastic hammer, tap the buckle to secure it while adjusting the clearance between the lever and the groove to make the clearance between the buckle edge and the lever end even.

    NOTICE:
    Do not damage the outboard joint boot.


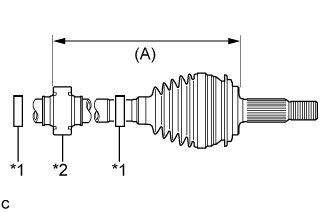
5. INSTALL DRIVE SHAFT DAMPER (w/ 1 Clamp)


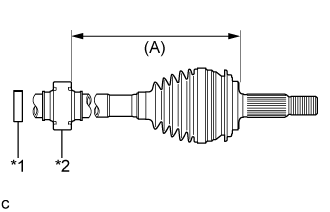
    C249941E01
  1. Install the drive shaft damper onto the front axle outboard joint shaft assembly as shown in the illustration.
    Text in Illustration 
    *1
    Drive Shaft Damper Setting Clamp
    *2
    Drive Shaft Damper

    Dimension (A):
    425.6 to 429.6 mm (1.396 to 1.409 ft.)


6. INSTALL DRIVE SHAFT DAMPER SETTING CLAMP (w/ 1 Clamp)
  1. Secure the front axle outboard joint shaft assembly in a vise using aluminum plates.

    NOTICE:
    Do not overtighten the vise.


  1. for One Touch Type:


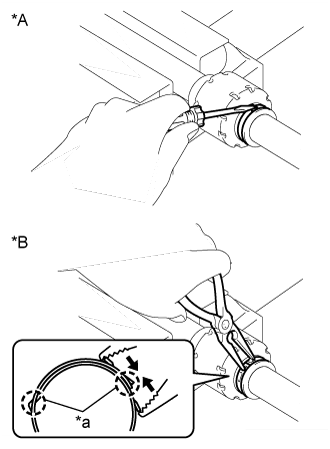
      C225243E03
    1. Using a screwdriver, install a new drive shaft damper setting clamp as shown in the illustration.
      Text in Illustration 
      *A
      for One Touch Type
      *B
      for Claw Engagement Type
      *a
      Claws

  1. for Claw Engagement Type:

    1. Using needle-nose pliers, install a new drive shaft damper setting clamp as shown in the illustration.


7. INSTALL DRIVE SHAFT DAMPER SETTING CLAMP (w/ 2 Clamps)


    C315773E01
  1. Temporarily install the drive shaft damper and 2 new drive shaft damper setting clamps to the front axle outboard joint shaft assembly as shown in the illustration.
    Text in Illustration 
    *1
    Drive Shaft Damper Setting Clamp
    *2
    Drive Shaft Damper

    Dimension (A):
    461.6 to 465.6 mm (1.515 to 1.527 ft.)


8. INSTALL DRIVE SHAFT DAMPER (w/ 2 Clamps)
  1. Secure the front axle outboard joint shaft assembly in a vise using aluminum plates.

    NOTICE:
    Do not overtighten the vise.


    C205160E01
  1. Using needle-nose pliers, install the 2 drive shaft damper setting clamps as shown in the illustration.
    Text in Illustration 
    *a
    Claws


9. INSTALL FRONT DRIVE INBOARD JOINT ASSEMBLY


    C104548E15
  1. Install new parts onto the front axle outboard joint shaft assembly in the following order:
    Text in Illustration 
    *1
    Front Axle Inboard Joint Boot Clamp
    *2
    Inboard Joint Boot
    *3
    Front No. 2 Axle Inboard Joint Boot Clamp
    *4
    Protective Tape
    V100135
    Outboard Joint Side
    V100136
    Inboard Joint Side

    1. Front axle inboard joint boot clamp

    2. Inboard joint boot

    3. Front No. 2 axle inboard joint boot clamp

  1. Secure the front axle outboard joint shaft assembly in a vise using aluminum plates.

    NOTICE:
    Do not overtighten the vise.

  1. Remove the protective tape.


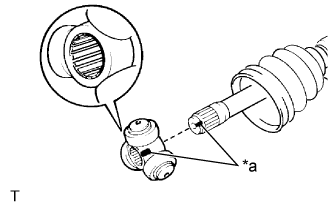
    C157561E01
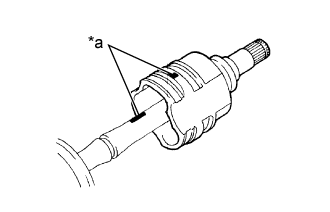
  1. Align the matchmarks and install the tripod joint onto the front axle outboard joint shaft assembly as shown in the illustration.
    Text in Illustration 
    *a
    Matchmark

    NOTICE:
    Face the serrated side of the tripod joint outward and install it onto the outboard joint end.

  1. Using a brass bar and a hammer, install the tripod joint to the front axle outboard joint shaft assembly.

    NOTICE:
    1. Do not tap the rollers.
    2. Keep the tripod joint free of foreign matter.


    C160822
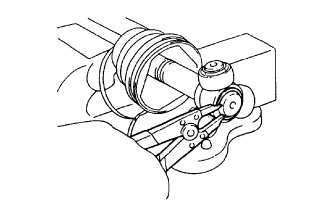
  1. Using a snap ring expander, install a new shaft snap ring to the front axle outboard joint shaft assembly.

  1. Pack the front drive inboard joint assembly and inboard joint boot with grease.

    Standard grease capacity:
    125 to 135 g (4.40 to 4.76 oz.)


    C160821E06
  1. Align the matchmarks and install the front drive inboard joint assembly onto the front axle outboard joint shaft assembly.
    Text in Illustration 
    *a
    Matchmark


10. INSTALL INBOARD JOINT BOOT
  1. Install the inboard joint boot to the front drive inboard joint assembly.

    NOTICE:
    Keep the grooves free of grease.


11. INSTALL FRONT AXLE INBOARD JOINT BOOT CLAMP
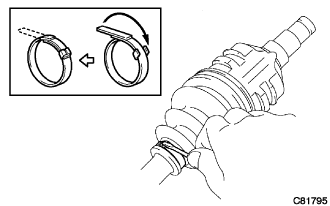
  1. Install the front axle inboard joint boot clamp onto the inboard joint boot.


  1. for One Touch Type:


      C081795
    1. Using a screwdriver, install the front axle inboard joint boot clamp.

      NOTICE:
      1. Be sure to install the front axle inboard joint boot clamp in the correct position.
      2. Be careful not to damage the inboard joint boot.


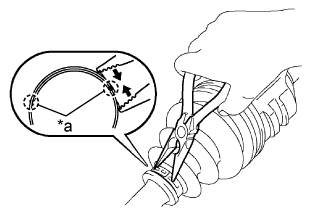
  1. for Claw Engagement Type:


      C157519E02
    1. Using needle nose pliers, install the front axle inboard joint boot clamp.
      Text in Illustration 
      *a
      Claws

      NOTICE:
      1. Be careful not to deform the front axle inboard joint boot clamp.
      2. Be careful not to damage the inboard joint boot.


12. INSTALL FRONT NO. 2 AXLE INBOARD JOINT BOOT CLAMP
  1. Install the boot clamp onto the inboard joint boot.


    C157783E02
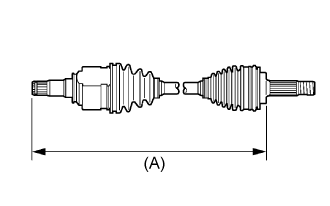
  1. Adjust dimension (A) until it is within the specified length.
    Dimension (A) 
    LH Side
    RH Side
    562.1 mm (1.84 ft.)
    842.1 mm (2.76 ft.)


  1. for One Touch Type:


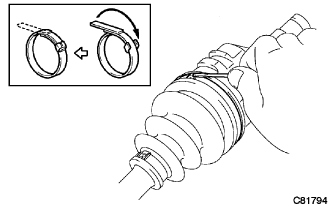
      C081794
    1. Using a screwdriver, install the front No. 2 axle inboard joint boot clamp.

      NOTICE:
      1. Be sure to install the front No. 2 axle inboard joint boot clamp in the correct position.
      2. Be careful not to damage the inboard joint boot.


  1. for Claw Engagement Type:


      C157518E03
    1. Using needle nose pliers, install the front No. 2 axle inboard joint boot clamp.
      Text in Illustration 
      *a
      Claws

      NOTICE:
      1. Be careful not to deform the front No. 2 axle inboard joint boot clamp.
      2. Be careful not to damage the inboard joint boot.


13. INSPECT FRONT DRIVE SHAFT ASSEMBLY


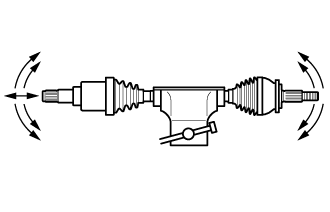
    C211744
  1. Check that there is no excessive play in the outboard joint.

  1. Check that the inboard joint slides smoothly in the thrust direction.

  1. Check that there is no excessive play in the radial directions of the inboard joint.


    C157783E02
  1. Check the boots for damage.

    NOTICE:
    Keep the drive shaft assembly level during inspection.

    HINT:
    For dimension (A), refer to the following values.

    Dimension (A) 
    LH Side
    RH Side
    562.1 mm (1.84 ft.)
    842.1 mm (2.76 ft.)