 |
Disconnect the connector from the stop light switch assembly.
STOP LIGHT SWITCH > ON-VEHICLE INSPECTION |
| 1. INSPECT STOP LIGHT SWITCH ASSEMBLY |
|
Disconnect the connector from the stop light switch assembly.
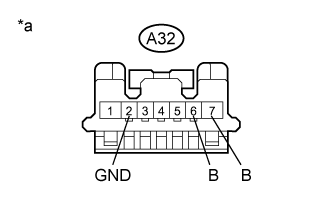
Measure the voltage according to the value (s) in the table below.
| Tester Connection | Condition | Specified Condition |
| A32-7 (B) - A32-2 (GND) | Power switch off | 11 to 14 V |
| A32-6 (B) - A32-2 (GND) | Power switch on (IG) | 11 to 14 V |
| *a | Front view of wire harness connector (to Stop Light Switch Assembly) |
Measure the resistance according to the value(s) in the table below.
| Tester Connection | Condition | Specified Condition |
| A32-2 (GND) - Body ground | Always | Below 1 Ω |
 |
Reconnect the connector to the stop light switch assembly.
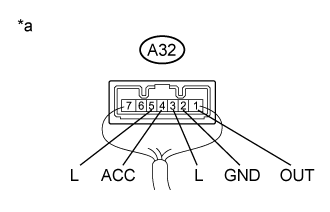
Measure the voltage according to the value (s) in the table below.
| Tester Connection | Condition | Specified Condition |
| A32-1 (OUT) - A32-2 (GND) | Power switch off, brake pedal not depressed | Below 1 V |
| A32-1 (OUT) - A32-2 (GND) | Power switch off, brake pedal depressed | 11 to 14 V |
| A32-3 (L) - A32-2 (GND) | Power switch off, brake pedal not depressed | Below 1 V |
| A32-4 (ACC) - A32-2 (GND) | Power switch off | 11 to 14 V |
| A32-3 (L) - A32-2 (GND) | Power switch off, brake pedal depressed | 11 to 14 V |
| A32-5 (L) - A32-2 (GND) | Power switch on (IG), brake pedal not depressed | 11 to 14 V |
| A32-5 (L) - A32-2 (GND) | Power switch on (IG), brake pedal depressed | Below 1 V |
| *a | Component with harness connected (Stop Light Switch Assembly) |