Home › Vehicle Interior › THEFT DETERRENT / KEYLESS ENTRY › SMART ENTRY AND START SYSTEM (for Start Function)

SMART ENTRY AND START SYSTEM (for Start Function) > Power Source Mode does not Change to ON (ACC)

for Preparation Click here


DESCRIPTION

If the power switch is pressed with the electrical key transmitter sub-assembly in the cabin, the certification ECU (smart key ECU assembly) receives a signal and changes the power source mode.

HINT:
When the cable is disconnected and reconnected to the negative (-) auxiliary battery terminal, the power source mode returns to the state it was in before the cable was disconnected.


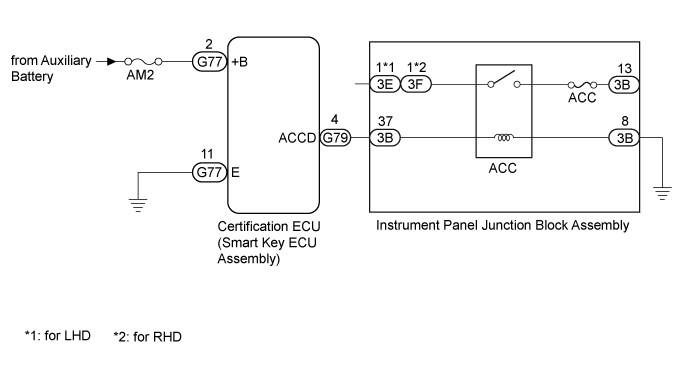
WIRING DIAGRAM


B392457E02


INSPECTION PROCEDURE

NOTICE:
  1. When using the intelligent tester with the power switch off, perform either of the following: 1) Turn a courtesy light switch on and off at intervals of 1.5 seconds or less until communication between the intelligent tester and vehicle begins, or 2) connect the intelligent tester to the vehicle, select the vehicle type under manual mode, and then enter the following menus:
    for Power Source Control: Body / Power Source Control / DTC.
    for Entry&Start: Body / Entry&Start / DTC.
  2. The smart entry and start system (for Start Function) uses a multiplex communication system (LIN communication system) and the CAN communication system. Inspect the communication function by following How to Proceed with Troubleshooting (Click here). Troubleshoot the smart entry and start system (for Start Function) after confirming that the communication systems are functioning properly.
  3. Make sure that no DTCs are output. If any DTCs are output, proceed to the Diagnostic Trouble Code Chart (Click here).
  4. If the smart entry and start system is disabled through the customize function, enable the system before performing troubleshooting (Click here).
  5. Before replacing the certification ECU (smart key ECU assembly), refer to the Service Bulletin.
  6. Inspect the fuses for circuits related to this system before performing the following inspection procedure.
  7. After completing repairs, confirm that the problem does not occur.


HINT:

Related Data List and Active Test Items 
Problem Symptom
Data List Item
Active Test Item
Power source mode does not change to on (ACC) but does change to on (IG)
Power Source Control
  1. Power Supply Condition
  2. ACC Relay Monitor
-

1.CHECK HARNESS AND CONNECTOR (CERTIFICATION ECU - INSTRUMENT PANEL JUNCTION BLOCK ASSEMBLY)
  1. Disconnect the G79 connector from the certification ECU (smart key ECU assembly).

  1. Disconnect the 3B connector from the instrument panel junction block assembly.

  1. Measure the resistance according to the value(s) in the table below.

    Standard Resistance:
    Tester Connection
    Condition
    Specified Condition
    G79-4 (ACCD) - 3B-37
    Always
    Below 1 Ω
    3B-8 - Body ground
    Always
    Below 1 Ω
    G79-4 (ACCD) or 3B-37 - Body ground
    Always
    10 kΩ or higher


NG
REPAIR OR REPLACE HARNESS OR CONNECTOR
OK


2.INSPECT INSTRUMENT PANEL JUNCTION BLOCK ASSEMBLY


  1. Remove the instrument panel junction block assembly (Click here).
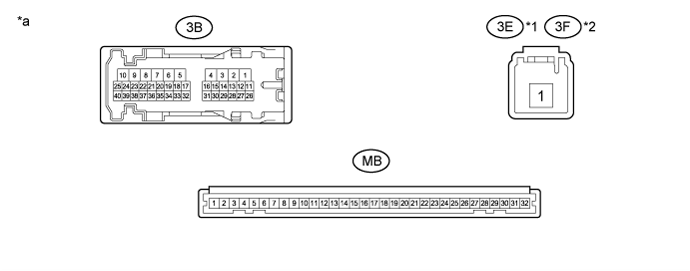

    E219653E02


    Text in Illustration 
    *1
    for LHD
    *2
    for RHD
    *a
    Component without harness connected
    (Instrument Panel Junction Block Assembly)
    -
    -

  1. Remove the main body ECU (multiplex network body ECU) from the instrument panel junction block assembly (Click here).

  1. Measure the resistance according to the value(s) in the table below.

    Standard Resistance:
    Tester Connection
    Condition
    Specified Condition
    3E-1 - 3B-13*1
    3F-1 - 3B-13*2
    Auxiliary battery voltage not applied to terminals 3B-37 and 3B-8
    10 kΩ or higher
    Auxiliary battery voltage applied to terminals 3B-37 and 3B-8
    Below 1 Ω

    1. *1: for LHD
    2. *2: for RHD


NG
REPLACE INSTRUMENT PANEL JUNCTION BLOCK ASSEMBLY (Click here)
OK


3.INSPECT CERTIFICATION ECU (SMART KEY ECU ASSEMBLY)
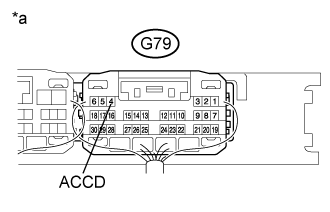
B268626E12
  1. Reconnect the G79 certification ECU (smart key ECU assembly) connector.

  1. Measure the voltage according to the value(s) in the table below.

    Standard Voltage:
    Tester Connection
    Condition
    Specified Condition
    G79-4 (ACCD) - Body ground
    Power switch off → Power switch on (ACC)
    1 V or less → 8.5 V or higher

    Text in Illustration 
    *a
    Component with harness connected
    (Certification ECU (Smart Key ECU Assembly))


NG
REPLACE CERTIFICATION ECU (SMART KEY ECU ASSEMBLY) (Click here)
OK

CHECK RELAY CONTACT SIDE CIRCUIT