Home › Vehicle Exterior › DOOR / HATCH › BACK DOOR

BACK DOOR > ADJUSTMENT

for Preparation Click here


B227910E03
Text in Illustration 
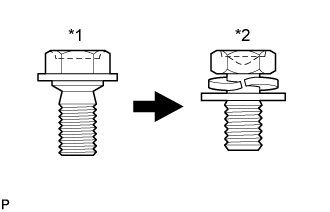
*1
Centering Bolt
*2
Standard Bolt

HINT:
  1. Use the same procedure for the RH side and LH side.
  2. The following procedure is for the LH side.
  3. Centering bolts are used to mount the door hinge to the vehicle body and door. The door cannot be adjusted with the centering bolts installed. Substitute the centering bolts with standard bolts (with washers) when making adjustments.
  4. Specified torque for standard bolts is shown in the standard bolt chart (Click here).


1. INSPECT BACK DOOR


  1. Check that the clearance measurements of areas "a" through "g" are within each standard range.
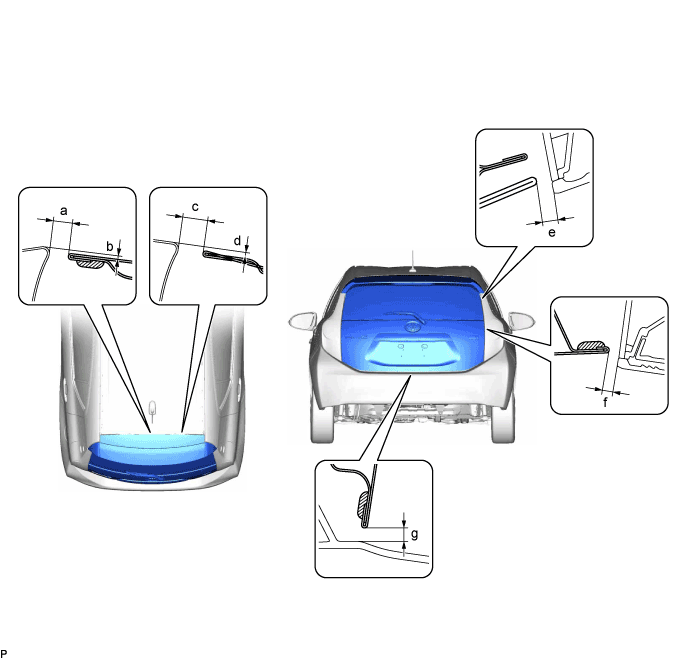

    B301509E02


    Standard Clearance 
    Area
    Measurement
    Area
    Measurement
    a
    5.7 to 8.7 mm (0.244 to 0.343 in.)
    b
    -0.5 to 2.5 mm (-0.0197 to 0.0197 in.)
    c
    5.7 to 8.7 mm (0.244 to 0.343 in.)
    d
    -0.5 to 2.5 mm (-0.0197 to 0.0197 in.)
    e
    (Reference)
    5.35 mm (0.211 in.)
    f
    3.05 to 7.05 mm (0.12 to 0.278 in.)
    g
    4.15 to 8.15 mm (0.163 to 0.321 in.)
    -
    -


2. REMOVE DECK BOARD ASSEMBLY
  1. Remove the deck board assembly.


3. REMOVE DECK FLOOR BOX LH
  1. Remove the deck floor box LH.


4. REMOVE DECK FLOOR BOX RH

HINT:
Use the same procedure as for the LH side.


5. REMOVE PACKAGE TRAY TRIM PANEL ASSEMBLY
  1. Remove the package tray trim panel assembly.


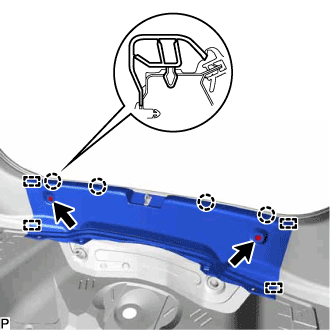
6. REMOVE REAR DECK TRIM COVER


    B297727
  1. Remove the 2 clips.

  1. Disengage the 4 claws and 2 guides, and remove the rear deck trim cover.


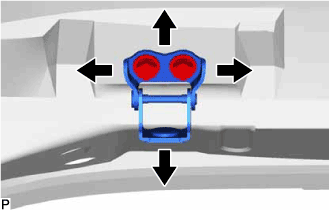
7. ADJUST BACK DOOR


    B300318
  1. Before adjusting the upper end of the back door up and down or left and right, loosen the bolts.

  1. Tighten the body side hinge after adjustment.

    Torque:
    19 N*m{ 194 kgf*cm , 14 ft.*lbf }


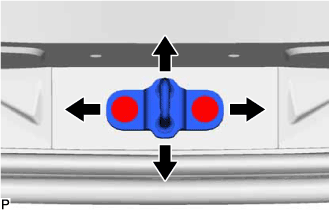
    B300319
  1. Using a T40 "TORX" socket wrench, slightly loosen the striker mounting screws.

  1. Using a brass bar and a hammer, hit the striker to adjust its position.

  1. Using a T40 "TORX" socket wrench, tighten the striker mounting screws after adjustment.

    Torque:
    23 N*m{ 235 kgf*cm , 17 ft.*lbf }


8. INSTALL REAR DECK TRIM COVER
  1. Engage the 2 guides and 4 claws.

  1. Install the rear deck trim cover with the 2 clips.


9. INSTALL PACKAGE TRAY TRIM PANEL ASSEMBLY
  1. Install the package tray trim panel assembly.


10. INSTALL DECK FLOOR BOX LH
  1. Install the deck floor box LH.


11. INSTALL DECK FLOOR BOX RH

HINT:
Use the same procedure as for the LH side.


12. INSTALL DECK BOARD ASSEMBLY
  1. Install the deck board assembly.