Home › Engine / Hybrid System › HYBRID / BATTERY CONTROL › HYBRID BATTERY SYSTEM

DTC    P0AAE-123    Hybrid Battery Pack Air Temperature Sensor "A" Circuit Low

DTC    P0AAF-123    Hybrid Battery Pack Air Temperature Sensor "A" Circuit High

for Preparation Click here


DESCRIPTION

  1. The inlet air temperature sensor (battery) is mounted on the HV battery. The resistance of the sensor varies in accordance with changes in the intake air temperature. The characteristics of the inlet air temperature sensor are the same as those of the battery temperature sensor . The battery smart unit uses signals from the inlet air temperature sensor to control the air volume of the battery cooling blower assembly.

DTC No.
INF Code
DTC Detection Condition
Trouble Area
P0AAE
P0AAF
123
When the temperature indicated by the inlet air temperature sensor is lower than a predetermined limit (open circuit) or is higher than a predetermined limit (short circuit)
  1. HV battery
  2. Battery smart unit
  3. Wire harness or connector

HINT:
After confirming that DTC P0AAE-123 or P0AAF-123 is output, use the intelligent tester to check "Inhaling Air Temp" in the HV ECU data list.


Displayed Temperature
Malfunction
-45 °C (-49 °F) or less
Open or +B short circuit
95 °C (203 °F) or more
GND short

WIRING DIAGRAM

Refer to the wiring diagram for DTC P0A9C-123 .

INSPECTION PROCEDURE

CAUTION:
  1. Before inspecting the high-voltage system, take safety precautions such as wearing insulated gloves and removing the service plug grip to prevent electrical shocks. After removing the service plug grip, put it in your pocket to prevent other technicians from accidentally reconnecting it while you are working on the high-voltage system.
  2. After removing the service plug grip, wait for at least 10 minutes before touching any of the high-voltage connectors or terminals. After waiting for 10 minutes, check the voltage at the terminals in the inspection point in the inverter with converter assembly. The voltage should be 0 V before beginning work (Click here).

    HINT:
    Waiting for at least 10 minutes is required to discharge the high-voltage capacitor inside the inverter with converter assembly.

  3. When disposing of an HV battery, make sure to return it through an authorized collection agent who is capable of handling it safely. If the HV battery is returned via the manufacturer specified route, it will be returned properly and in a safe manner by an authorized collection agent.

NOTICE:
After turning the power switch off, waiting time may be required before disconnecting the cable from the negative (-) auxiliary battery terminal. Therefore, make sure to read the disconnecting the cable from the negative (-) auxiliary battery terminal notices before proceeding with work (Click here).

1.CHECK FOR DTCS (HV)
  1. Connect the intelligent tester to the DLC3.

  1. Turn the power switch on (IG).

  1. Enter the following menus: Powertrain / Hybrid Control / DTC.

  1. Read output DTCs (Click here).

    Result:
    Result
    Proceed to
    P0AFC-123 is not output.
    A
    P0AFC-123 is also output.
    B

  1. Turn the power switch off.

  1. Disconnect the intelligent tester from the DLC3.


B
GO TO DTC CHART (P0AFC-123) (Click here)
A


2.CHECK CONNECTOR CONNECTION CONDITION

CAUTION:
Be sure to wear insulated gloves and protective goggles.

  1. Check that the service plug grip is not installed.

    NOTICE:
    After removing the service plug grip, do not turn the power switch on (READY), unless instructed by the repair manual because this may cause a malfunction.

  1. Remove the No. 1 hybrid battery shield sub-assembly .
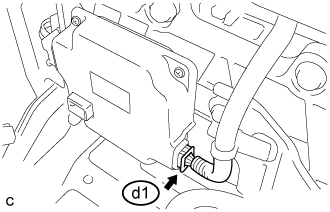


    A266560E02
  1. Check the connections of the d1 connector of the battery smart unit.

    OK:
    The connectors are connected securely and there are no contact problems.

  1. Install the No. 1 hybrid battery shield sub-assembly.


NG
CONNECT SECURELY
OK


3.CHECK INSTALLATION OF INLET AIR TEMPERATURE SENSOR

CAUTION:
Be sure to wear insulated gloves and protective goggles.

  1. Check that the service plug grip is not installed.

    NOTICE:
    After removing the service plug grip, do not turn the power switch on (READY), unless instructed by the repair manual because this may cause a malfunction.

  1. Remove the No. 2 hybrid battery shield sub-assembly .
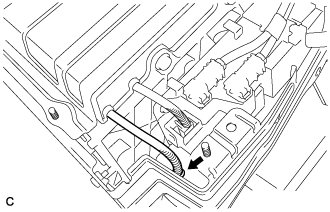


    A267373
  1. Visually check the installation condition of the inlet air temperature sensor.

    OK:
    The inlet air temperature sensor is installed in the correct location and its claws are engaged securely.

    Result:
    Result
    Proceed to
    The inlet air temperature sensor is installed in the correct location and its claws are engaged securely
    A
    Claws are damaged.
    B
    Inlet air temperature sensor is not installed correctly, but claws are not damaged.
    C

  1. Install the No. 2 hybrid battery shield sub-assembly.


B
REPLACE HV BATTERY (Click here)

C
INSTALL PARTS CORRECTLY
A


4.CHECK HV BATTERY (INLET AIR TEMPERATURE SENSOR AND BATTERY TEMPERATURE SENSOR)

CAUTION:
Be sure to wear insulated gloves.

  1. Check that the service plug grip is not installed.

    NOTICE:
    After removing the service plug grip, do not turn the power switch on (READY), unless instructed by the repair manual because this may cause a malfunction.

  1. Remove the No. 1 hybrid battery shield sub-assembly .

  1. Disconnect connectors M39 and d1 from the battery smart unit.
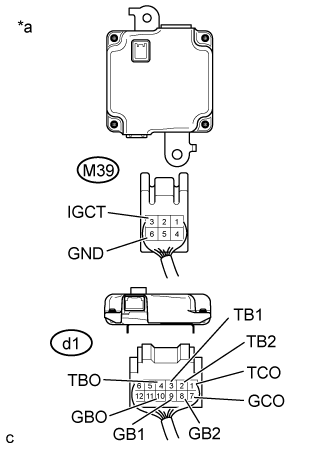


    A244309E06
  1. Measure the resistance according to the value(s) in the table below.

    Standard Resistance:
    Tester Connection
    Condition
    Specified Condition
    d1-1 (TCO) - d1-7 (GCO)
    0°C (32°F)
    26.7 to 27.8 kΩ
    25°C (77°F)
    9.9 to 10.1 kΩ
    40°C (104°F)
    5.73 to 5.92 kΩ

    Text in Illustration 
    *a
    Rear view of wire harness connector
    (to Battery Smart Unit)

  1. Measure the resistance according to the value(s) in the table below.

    Standard Resistance:
    Tester Connection
    Switch Condition
    Specified Condition
    d1-1 (TCO) - M39-3 (IGCT)
    Power switch off
    10 kΩ or higher
    d1-1 (TCO) - M39-6 (GND)
    Power switch off
    10 kΩ or higher
    d1-7 (GCO) - M39-3 (IGCT)
    Power switch off
    10 kΩ or higher
    d1-7 (GCO) - M39-6 (GND)
    Power switch off
    10 kΩ or higher
    d1-4 (TBO) - M39-3 (IGCT)
    Power switch off
    10 kΩ or higher
    d1-4 (TBO) - M39-6 (GND)
    Power switch off
    10 kΩ or higher
    d1-10 (GBO) - M39-3 (IGCT)
    Power switch off
    10 kΩ or higher
    d1-10 (GBO) - M39-6 (GND)
    Power switch off
    10 kΩ or higher
    d1-3 (TB1) - M39-3 (IGCT)
    Power switch off
    10 kΩ or higher
    d1-3 (TB1) - M39-6 (GND)
    Power switch off
    10 kΩ or higher
    d1-9 (GB1) - M39-3 (IGCT)
    Power switch off
    10 kΩ or higher
    d1-9 (GB1) - M39-6 (GND)
    Power switch off
    10 kΩ or higher
    d1-2 (TB2) - M39-3 (IGCT)
    Power switch off
    10 kΩ or higher
    d1-2 (TB2) - M39-6 (GND)
    Power switch off
    10 kΩ or higher
    d1-8 (GB2) - M39-3 (IGCT)
    Power switch off
    10 kΩ or higher
    d1-8 (GB2) - M39-6 (GND)
    Power switch off
    10 kΩ or higher

  1. Connect the battery smart unit connectors.

  1. Install the No. 1 hybrid battery shield sub-assembly.


NG
Go to step 5
OK

REPLACE BATTERY SMART UNIT (Click here)  

5.CHECK HARNESS AND CONNECTOR (INLET AIR TEMPERATURE SENSOR AND BATTERY TEMPERATURE SENSOR)

CAUTION:
Be sure to wear insulated gloves.

  1. Check that the service plug grip is not installed.

    NOTICE:
    After removing the service plug grip, do not turn the power switch on (READY), unless instructed by the repair manual because this may cause a malfunction.

  1. Remove the upper hybrid battery cover sub-assembly .

  1. Check the wire harness and connectors of the battery temperature sensor and inlet air temperature sensor for abnormalities by sight and touch.

    Specified Condition:
    There are no open or short circuits in the wire harness and connectors. There are no short circuits to other wire harnesses.

HINT:
Because the battery harness is not available as a supply part, if the harness cannot be repaired, replace the HV battery assembly.

  1. Install the upper hybrid battery cover sub-assembly.


NG
REPAIR HARNESS OR CONNECTOR (INLET AIR TEMPERATURE SENSOR AND BATTERY TEMPERATURE SENSOR)
OK

REPLACE HV BATTERY (Click here)