Home › Brake › BRAKE SYSTEM (OTHER) › BRAKE BOOSTER (for RHD)

BRAKE BOOSTER (for RHD) > INSTALLATION

for Preparation Click here


1. INSTALL BRAKE BOOSTER GASKET
  1. Install a new brake booster gasket to the brake booster with master cylinder assembly.


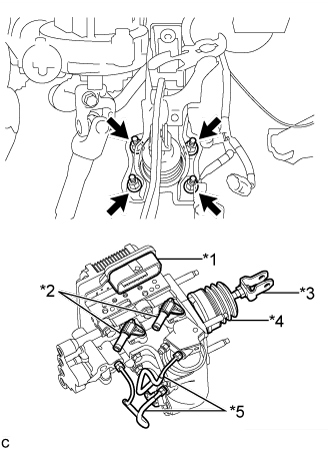
2. INSTALL BRAKE BOOSTER WITH MASTER CYLINDER ASSEMBLY


    C249831E01
  1. Install the brake booster with master cylinder assembly with the 4 nuts.
    Text in Illustration 
    *1
    Connector Portion
    *2
    Union
    *3
    Brake Master Cylinder Push Rod Clevis
    *4
    Boot
    *5
    Front No. 2 Brake Tube

    Torque:
    9.0 N*m{ 92 kgf*cm , 80 in.*lbf }

    NOTICE:
    1. Do not kink or damage the brake lines.
    2. Do not carry the brake booster with master cylinder assembly by the portion shown in bold in the illustration.
    3. Be careful not to allow any brake fluid to enter the connector.
    4. If installing a new brake booster with master cylinder assembly, do not remove the hole plugs before connecting the brake lines because the brake booster with master cylinder is filled with brake fluid.

  1. Install the wire harness clamp to the stud bolt of the brake booster with master cylinder assembly.


    C249850
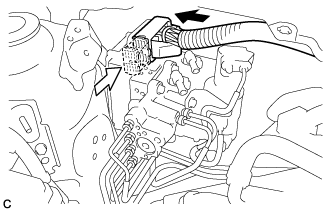
  1. Connect the connector to the brake booster with master cylinder assembly.
    Text in Illustration 
    V100135
    Connect the connector
    V100136
    Lock the lock lever

    NOTICE:
    1. Make sure that the connector can be connected smoothly. Do not allow foreign matter to enter.
    2. Make sure that the connector lock is locked securely.


3. CONNECT BRAKE LINE
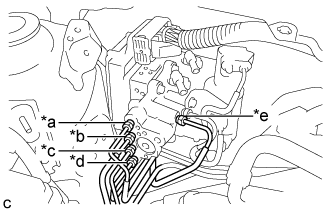
  1. Install the brake tube clamp to the clamp bracket of the brake booster with master cylinder assembly.


    C249848E01
  1. Temporarily tighten each brake line to the correct position on the brake booster with master cylinder assembly as shown in the illustration.
    Text in Illustration 
    *a
    to Front Wheel Cylinder LH
    *b
    to Rear Wheel Cylinder RH
    *c
    to Brake Booster Pump Assembly
    *d
    to Rear Wheel Cylinder LH
    *e
    to Front Wheel Cylinder RH

  1. Using a union nut wrench, fully tighten each brake line.

    Torque:
    15 N*m{ 155 kgf*cm , 11 ft.*lbf }

    NOTICE:
    1. Do not kink or damage the brake lines.
    2. Use the formula to calculate special torque values for situations where the union nut wrench is combined with a torque wrench (Click here).


4. INSTALL PUSH ROD PIN


    C251262
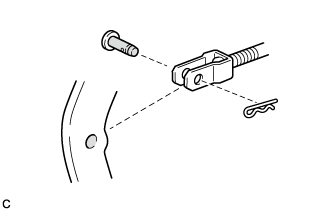
  1. Apply lithium soap base glycol grease to the push rod pin and installation hole of the brake pedal sub-assembly.
    Text in Illustration 
    V100145
    Lithium Soap Base Glycol Grease

  1. Install the push rod pin and a new clip to connect the push rod clevis to the brake pedal support assembly.

    NOTICE:
    Insert the push rod pin in the correct direction.


5. INSTALL BRAKE PEDAL RETURN SPRING
  1. Install the brake pedal return spring to the brake pedal support assembly.


6. INSTALL RESERVOIR BRACKET
  1. Install the reservoir bracket with the bolt and nut.

    Torque:
    8.0 N*m{ 82 kgf*cm , 71 in.*lbf }


7. CONNECT NO. 2 BRAKE ACTUATOR HOSE


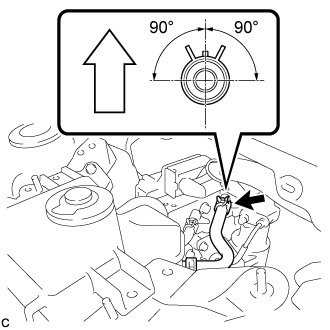
    C249845E01
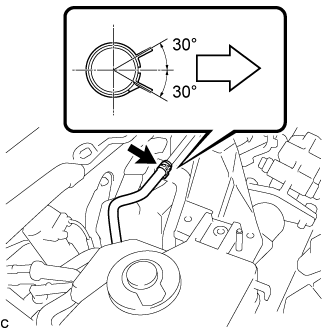
  1. Connect the No. 2 brake actuator hose to the No. 1 brake actuator tube with the clip.
    Text in Illustration 
    V100136
    Front of Vehicle

    NOTICE:
    1. When connecting the No. 2 brake actuator hose, face the identification mark to the front of the vehicle.
    2. Make sure to install the hose to the proper location.
    3. Install the clip within the range shown in the illustration.


8. CONNECT NO. 1 RESERVOIR HOSE


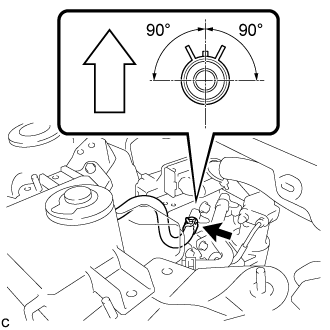
    C249843E01
  1. Connect the No. 1 reservoir hose to the brake booster with master cylinder assembly with the clip.
    Text in Illustration 
    V100136
    Up

    NOTICE:
    1. Make sure that the identification mark on the No. 1 reservoir hose is positioned within 30° of the brake booster with master cylinder assembly rib.
    2. When connecting the No. 1 reservoir hose, face the identification mark up.
    3. Make sure to install the hose to the proper location.
    4. Install the clip within the range shown in the illustration.


9. CONNECT NO. 2 RESERVOIR HOSE


    C249841E01
  1. Connect the No. 2 reservoir hose to the brake booster with master cylinder assembly with the clip.
    Text in Illustration 
    V100136
    Up

    NOTICE:
    1. Make sure that the identification mark on the No. 2 reservoir hose is positioned within 30° of the brake booster with master cylinder assembly rib.
    2. When connecting the No. 2 reservoir hose, face the identification mark up.
    3. Make sure to install the hose to the proper location.
    4. Install the clip within the range shown in the illustration.


10. BLEED NO. 1 BRAKE ACTUATOR TUBE
  1. Add brake fluid into the brake master cylinder reservoir assembly.


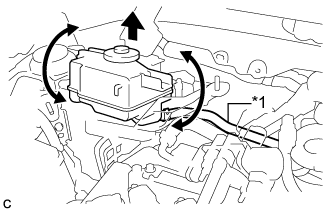
    C249861E01
  1. Lift up the brake master cylinder reservoir assembly as far as possible and rock it back and forth to bleed air from the No. 1 brake actuator tube.
    Text in Illustration 
    *1
    No. 1 Brake Actuator Tube

    NOTICE:
    1. Do not damage the hoses or tubes.
    2. Do not spill the brake fluid.
    3. Continue this procedure until only a minor amount of air remains in the brake actuator tube.


11. INSTALL BRAKE MASTER CYLINDER RESERVOIR ASSEMBLY
  1. Install the brake master cylinder reservoir assembly to the reservoir bracket with the 2 nuts.

    Torque:
    8.0 N*m{ 82 kgf*cm , 71 in.*lbf }


12. FILL RESERVOIR WITH BRAKE FLUID


13. CONNECT CABLE TO NEGATIVE AUXILIARY BATTERY TERMINAL


14. BLEED BRAKE SYSTEM
  1. Remove the outer cowl top panel sub-assembly.

    1. for LHD: Click here
    2. for RHD: Click here


  1. Bleed the brake system.


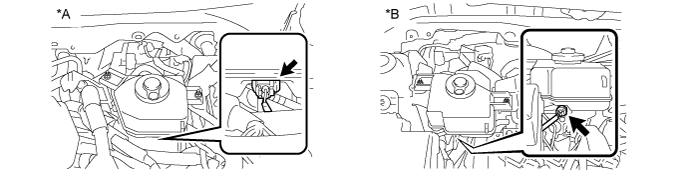
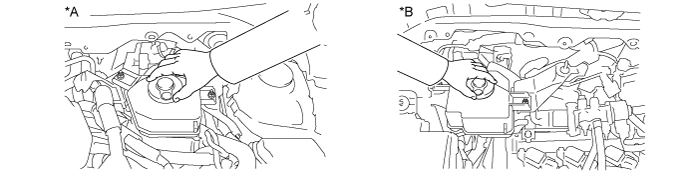
    1. Wait at least 2 minutes with the power switch off, and disconnect the reservoir level switch connector.


      C259395E01


      Text in Illustration 
      *A
      for LHD
      *B
      for RHD

      NOTICE:
      Do not depress the brake pedal or open/close the doors until the reservoir level switch connector is disconnected.

      HINT:
      This procedure is not required if the reservoir level switch connector has been disconnected.


    2. Remove the brake master cylinder reservoir filler cap assembly.


      C259396E01


      Text in Illustration 
      *A
      for LHD
      *B
      for RHD

    3. Add brake fluid into the reservoir between the MAX and MIN lines on the brake fluid reservoir.

      Brake fluid:
      SAE J1703 or FMVSS No. 116 DOT3

    4. Connect the intelligent tester to the DLC3 and turn the power switch on (IG).

    5. Turn the intelligent tester on and enter the following menus: Chassis / ABS/VSC/TRC / Air Bleeding.

    6. Select "ABS actuator has been replaced" on the intelligent tester display, and bleed air from the brake fluid following the instructions on the intelligent tester.

      NOTICE:
      Before following the instructions on the intelligent tester to perform linear valve offset calibration, release the parking brake. When calibration is complete, immediately apply the parking brake.


    7. C249825E01
    8. After air bleeding, tighten each bleeder plug.

      Torque:
      front bleeder plug:
      8.3 N*m{ 85 kgf*cm , 73 in.*lbf }
      rear bleeder plug:
      8.5 N*m{ 87 kgf*cm , 75 in.*lbf }
      stroke simulator bleeder plug:
      8.5 N*m{ 87 kgf*cm , 75 in.*lbf }

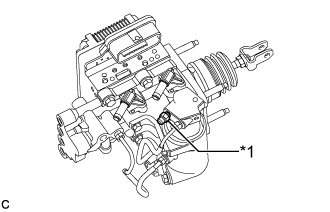
      HINT:
      The stroke simulator bleeder plug is positioned as shown in the illustration.

      Text in Illustration 
      *1
      Stroke Simulator Bleeder Plug

    9. Clear the DTCs (Click here).

    10. Turn the intelligent tester off and turn the power switch off.

    11. Install the brake master cylinder reservoir filler cap.
  1. Inspect for brake fluid leaks.

  1. Install the outer cowl top panel sub-assembly.

    1. for LHD: Click here
    2. for RHD: Click here


15. INSPECT AND ADJUST BRAKE PEDAL
(Click here)


16. OBTAIN ZERO POINT OF YAW RATE AND ACCELERATION SENSOR
(Click here)


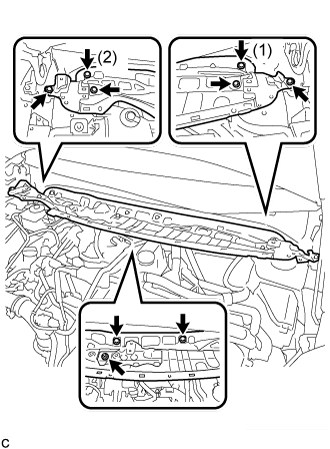
17. INSTALL OUTER COWL TOP PANEL SUB-ASSEMBLY


    C249838E01
  1. Install the outer cowl top panel sub-assembly with the 8 bolts and nut.

    Torque:
    Bolt:
    7.0 N*m{ 71 kgf*cm , 62 in.*lbf }
    Nut:
    12 N*m{ 122 kgf*cm , 9 ft.*lbf }

    NOTICE:
    Tighten the 2 bolts (1) and (2) first, and then tighten the rest of the bolts and nut.

  1. Engage the 3 clamps to install the wire harness.


18. INSTALL FRONT NO. 1 VENTILATOR SEAL
  1. Engage the clamp to install the front No. 1 ventilator seal to the outer cowl top panel sub-assembly.


19. INSTALL FRONT AIR SHUTTER SEAL
  1. Engage the clamp to install the front air shutter seal to the outer cowl top panel sub-assembly.


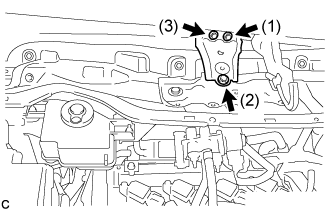
20. INSTALL INNER COWL TOP TO COWL BRACE


    C249834E01
  1. Install the inner cowl top to cowl brace to the outer cowl top panel sub-assembly with the 3 bolts.

    Torque:
    7.0 N*m{ 71 kgf*cm , 62 in.*lbf }

    NOTICE:
    Tighten the 3 bolts in the order shown in the illustration.


21. INSTALL WINDSHIELD WIPER MOTOR AND LINK ASSEMBLY