Home › Power Source / Network › NETWORKING › LIN COMMUNICATION SYSTEM

LIN COMMUNICATION SYSTEM > TERMINALS OF ECU

for Preparation Click here


CHECK INSTRUMENT PANEL JUNCTION BLOCK ASSEMBLY AND MAIN BODY ECU (MULTIPLEX NETWORK BODY ECU)


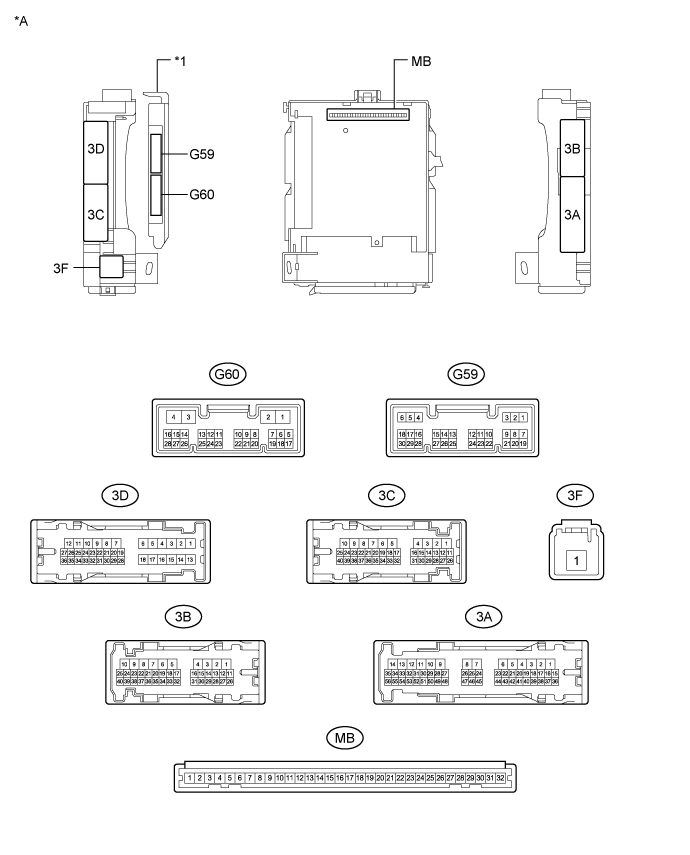
  1. Disconnect the MB main body ECU (multiplex network body ECU) connector.
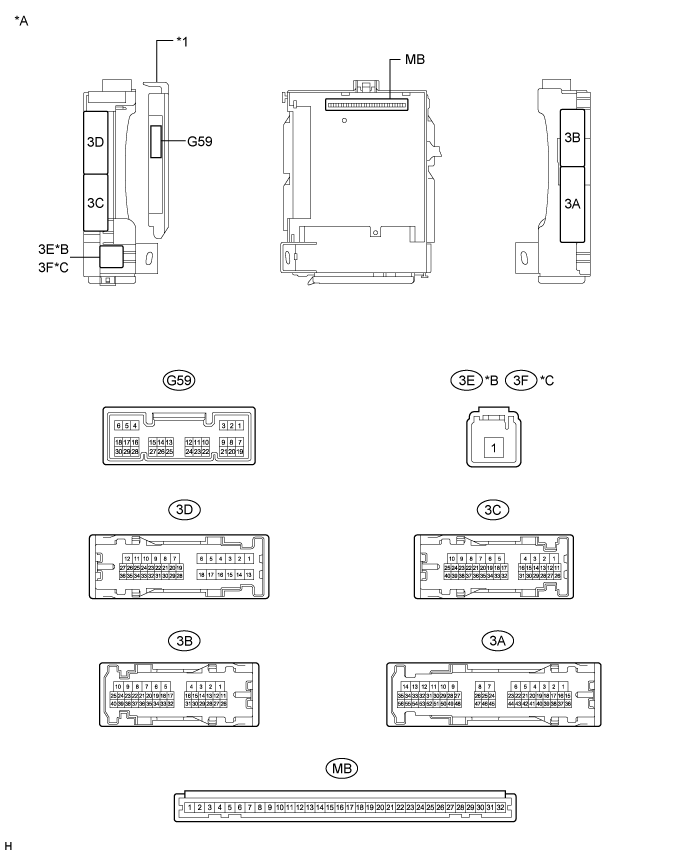

    B281049E03


    Text in Illustration 
    *A
    Main body ECU (multiplex network body ECU) with 1 connector
    *B
    for LHD
    *C
    for RHD
    -
    -
    *1
    Main body ECU (multiplex network body ECU)
    -
    -

    B297238E01


    Text in Illustration 
    *A
    Main body ECU (multiplex network body ECU) with 2 connectors
    -
    -
    *1
    Main body ECU (multiplex network body ECU)
    -
    -

  2. Measure the voltage and resistance according to the value(s) in the table below.

    HINT:
    Measure the values on the wire harness side with the connectors disconnected.


    Tester Connection
    Wiring Color
    Terminal Description
    Condition
    Specified Condition
    MB-30 (BECU) - Body ground
    -
    Auxiliary battery power supply
    Power switch off
    11 to 14 V
    MB-32 (IG) - Body ground
    -
    IG power supply
    Power switch on (IG)
    11 to 14 V
    MB-29 (ACC) - Body ground
    -
    ACC power supply
    Power switch on (ACC)
    11 to 14 V
    MB-11 (GND1) - Body ground
    -
    Ground
    Always
    Below 1 Ω
    If the result is not as specified, there may be a malfunction in the wire harness.

  3. Reinstall the main body ECU (multiplex network body ECU) to the instrument panel junction block assembly.

  4. Check for pulses according to the value(s) in the table below.

    Tester Connection
    Wiring Color
    Terminal Description
    Condition
    Specified Condition
    3B-12 (LIN2) - 3B-8 (GND1)
    B - W-B
    LIN communication line
    Power switch on (IG)
    Pulse generation
    If the result is not as specified, the main body ECU (multiplex network body ECU) or instrument panel junction block assembly may be malfunctioning.


CHECK POWER WINDOW REGULATOR MOTOR ASSEMBLY (for Driver Door)


  1. Disconnect the J3*1 or H3*2 power window regulator motor assembly (for driver door) connector.

    1. *1: for LHD
    2. *2: for RHD

    B270965E20


    Text in Illustration 
    *A
    for LHD
    *B
    for RHD

  2. Measure the voltage and resistance according to the value(s) in the table below.

    HINT:
    Measure the values on the wire harness side with the connector disconnected.


    for LHD 
    Tester Connection
    Wiring Color
    Terminal Description
    Condition
    Specified Condition
    J3-2 (B) - J3-1 (GND)
    LA-G - LA
    Auxiliary battery power supply
    Power switch off
    11 to 14 V
    J3-1 (GND) - Body ground
    LA - Body ground
    Ground
    Always
    Below 1 Ω

    for RHD 
    Tester Connection
    Wiring Color
    Terminal Description
    Condition
    Specified Condition
    H3-2 (B) - H3-1 (GND)
    LA-LG - LA
    Auxiliary battery power supply
    Power switch off
    11 to 14 V
    H3-1 (GND) - Body ground
    LA - Body ground
    Ground
    Always
    Below 1 Ω
    If the result is not as specified, there may be a malfunction in the wire harness.

  3. Reconnect the J3*1 or H3*2 power window regulator motor assembly (for driver door) connector.

    1. *1: for LHD
    2. *2: for RHD

  4. Check for pulses according to the value(s) in the table below.

    for LHD 
    Tester Connection
    Wiring Color
    Terminal Description
    Condition
    Specified Condition
    J3-9 (LIN) - J3-1 (GND)
    B - LA
    LIN communication line
    Power switch on (IG)
    Pulse generation

    for RHD 
    Tester Connection
    Wiring Color
    Terminal Description
    Condition
    Specified Condition
    H3-9 (LIN) - H3-1 (GND)
    B - LA
    LIN communication line
    Power switch on (IG)
    Pulse generation
    If the result is not as specified, the power window regulator motor assembly (for driver door) may be malfunctioning.


CHECK CERTIFICATION ECU (SMART KEY ECU ASSEMBLY)


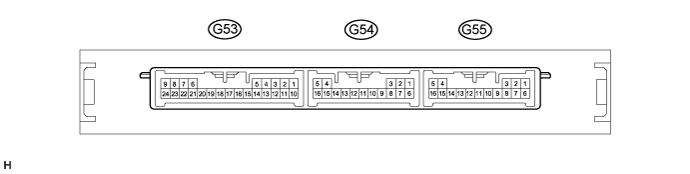
  1. Disconnect the G54 and G55 certification ECU (smart key ECU assembly) connectors.


    B278932E14

  2. Measure the voltage and resistance according to the value(s) in the table below.

    HINT:
    Measure the values on the wire harness side with the connector disconnected.


    Tester Connection
    Wiring Color
    Terminal Description
    Condition
    Specified Condition
    G54-5 (+B) - G55-1 (E)
    BE - W-B
    Auxiliary battery power supply
    Power switch off
    11 to 14 V
    G55-1 (E) - Body ground
    W-B - Body ground
    Ground
    Always
    Below 1 Ω
    If the result is not as specified, there may be a malfunction in the wire harness.

  3. Reconnect the G55 and G54 certification ECU (smart key ECU assembly) connectors.

  4. Measure the voltage and check for pulses according to the value(s) in the table below.

    Tester Connection
    Wiring Color
    Terminal Description
    Condition
    Specified Condition
    G54-16 (IG) - G55-1 (E)
    V - W-B
    IG power supply
    Power switch on (IG)
    11 to 14 V
    G54-16 (IG) - G55-1 (E)
    V - W-B
    IG power supply
    Power switch off
    Below 1 V
    G54-12 (LIN) - G55-1 (E)
    LG - W-B
    LIN communication line
    Power switch on (IG)
    Pulse generation
    If the result is not as specified, the certification ECU (smart key ECU assembly) may be malfunctioning.


CHECK POWER MANAGEMENT CONTROL ECU


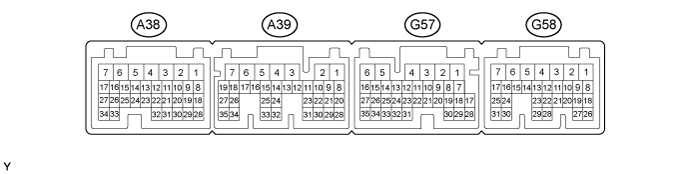
  1. Disconnect the G57 and G58 power management control ECU connectors.


    C146689E50

  2. Measure the voltage and resistance according to the value(s) in the table below.

    HINT:
    Measure the values on the wire harness side with the connectors disconnected.


    Tester Connection
    Wiring Color
    Terminal Description
    Condition
    Specified Condition
    G57-1 (AM22) - Body ground
    B - Body ground
    Auxiliary battery power supply
    Power switch off
    11 to 14 V
    G58-7 (AM21) - Body ground
    B - Body ground
    Auxiliary battery power supply
    Power switch off
    11 to 14 V
    G57-6 (E1) - Body ground
    BR - Body ground
    Ground
    Always
    Below 1 Ω
    If the result is not as specified, there may be a malfunction in the wire harness.

  3. Reconnect the G57 and G58 power management control ECU connectors.

  4. Check for pulses according to the value(s) in the table below.

    Tester Connection
    Wiring Color
    Terminal Description
    Condition
    Specified Condition
    G58-11 (LIN2) - G57-6 (E1)
    LG - BR
    LIN communication line
    Power switch on (IG)
    Pulse generation
    If the result is not as specified, the power management control ECU may be malfunctioning.


CHECK STEERING LOCK ECU (STEERING LOCK ACTUATOR ASSEMBLY)


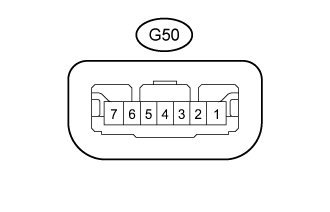
    C211401E17
  1. Disconnect the G50 steering lock ECU (steering lock actuator assembly) connector.

  2. Measure the resistance and voltage according to the value(s) in the table below.

    Terminal No. (Symbol)
    Wiring Color
    Terminal Description
    Condition
    Specified Condition
    G50-1 (GND) - Body ground
    W-B - Body ground
    Ground
    Always
    Below 1 Ω
    G50-7 (B) - Body ground
    GR - Body ground
    Auxiliary battery power supply
    Power switch off
    11 to 14 V
    G50-6 (IG2) - Body ground
    SB - Body ground
    IG power supply
    Power switch on (IG)
    11 to 14 V
    If the result is not as specified, there may be a malfunction on the wire harness side.

  3. Reconnect the G50 steering lock ECU (steering lock actuator assembly) connector.

  4. Measure the voltage and check for pulses according to the value(s) in the table below.

    Tester Connection
    Wiring Color
    Terminal Description
    Condition
    Specified Condition
    G50-5 (LIN) - G50-1 (GND)
    LG - W-B
    LIN communication line
    Power switch on (IG)
    Pulse generation
    If the result is not as specified, the steering lock ECU (steering lock actuator assembly) may be malfunctioning.


CHECK ID CODE BOX (IMMOBILISER CODE ECU)


  1. Disconnect the G49 ID code box (immobiliser code ECU) connector.


    B278917E03

  2. Measure the voltage and resistance according to the value(s) in the table below.

    HINT:
    Measure the values on the wire harness side with the connector disconnected.


    Tester Connection
    Wiring Color
    Terminal Description
    Condition
    Specified Condition
    G49-1 (+B) - G49-5 (GND)
    BE - W-B
    Auxiliary battery power supply
    Power switch off
    11 to 14 V
    G49-5 (GND) - Body ground
    W-B - Body ground
    Ground
    Always
    Below 1 Ω
    If the result is not as specified, there may be a malfunction in the wire harness.

  3. Reconnect the G49 ID code box (immobiliser code ECU) connector.

  4. Check for pulses according to the value(s) in the table below.

    Tester Connection
    Wiring Color
    Terminal Description
    Condition
    Specified Condition
    G49-2 (LIN1) - G49-5 (GND)
    LG - W-B
    LIN communication line
    Power switch on (IG)
    Pulse generation
    If the result is not as specified, the ID code box (immobiliser code ECU) may be malfunctioning.