Home › Suspension › ALIGNMENT / HANDLING DIAGNOSIS › REAR WHEEL ALIGNMENT

REAR WHEEL ALIGNMENT > INSPECTION

for Preparation Click here


NOTICE:
If the wheel alignment has been adjusted, or if suspension or underbody components have been removed/installed or replaced, be sure to perform the following initialization procedure in order for the system to function normally:
  1. Perform zero point calibration of the yaw rate and acceleration sensor.


1. PRECAUTION


C253259E01
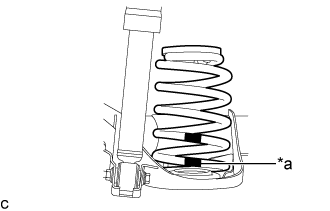
Standard values indicated by *1 and *2 in the specification tables are for the vehicles with a purple or blue identification mark on the bottom of the rear coil spring.
Text in Illustration 
*a
Colored identification mark on the bottom of the rear coil spring


2. INSPECT TIRES
  1. Check the tires for wear and proper inflation pressure.

    1. Adjust the tire pressure

      Cold Tire Inflation Pressure:

      Tire Size
      Front
      kPa (kgf/cm2, psi)
      Rear
      kPa (kgf/cm2, psi)
      175/65R15 84H
      230 (2.3, 33)
      230 (2.3, 33)*1
      220 (2.2, 32)*2
      185/60R15 84H
      220 (2.2, 32)
      220 (2.2, 32)

      *1: for Australia
      *2: except Australia

    2. Perform initialization (Click here).

    3. Tire pressure adjustment method when warm (w/ Tire Pressure Warning System:)
      1. Turn the power switch off.
      2. Connect the GTS to the DLC3.
      3. Turn the power switch on (IG).
      4. Turn the GTS on.
      5. Enter the following menus: Chassis / Tire Pressure Monitor / Data List.
      6. Adjust the tire pressure so that the displayed value is equal to the set pressure.
      7. Perform initialization and check that initialization completes (Click here).
      8. Check and record the value of the Data List item "Temperature in Tire". (Ts)
      9. Check and record the ambient temperature during tire pressure adjustment. (Tm)
      10. Readjust the tire pressure according to the difference between the tire internal temperature (Ts) and the ambient temperature (Tm). (P)

        HINT:
        Tire internal temperature: Ts, Ambient temperature: Tm, Tire pressure readjustment value: P
        P = (Specified Pressure) + (Ts - Tm)

      11. Check the pressure adjustment value with the Data List item "Tire Inflation Pressure".

      NOTICE:
      for ECE-R64 Type:
      If the tire pressure is decreased approximately 20 kPa (0.2 kgf/cm2, 2.9 psi) or more in order to adjust the tire pressure, even if the adjusted tire pressure is 80% or more than the tire pressure set during system initialization, the tire pressure warning light may illuminate if the tire pressure drops below 80% of the tire pressure set when the tires are warmed. In this case, perform initialization again.


    C164558
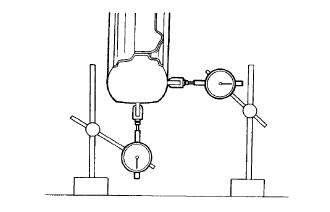
  1. Using a dial indicator, check the runout of the tires.

    Maximum tire runout:
    Vertical:
    1.4 mm (0.0551 in.)
    Lateral:
    2.0 mm (0.0787 in.)


3. MEASURE VEHICLE HEIGHT

NOTICE:
  1. Before inspecting the wheel alignment, adjust the vehicle height to the specified value.
  2. Be sure to perform measurement on a level surface.
  3. If it is necessary to go under the vehicle for measurement, confirm that the parking brake is applied and the vehicle is secured with chocks.
  4. Inspect while the vehicle is unloaded.
  5. The standard value shown here is a value that is used for adjusting the wheel alignment and does not indicate the height of an actual vehicle.

  1. Bounce the vehicle up and down at the corners to stabilize the suspension.


    C249970E01
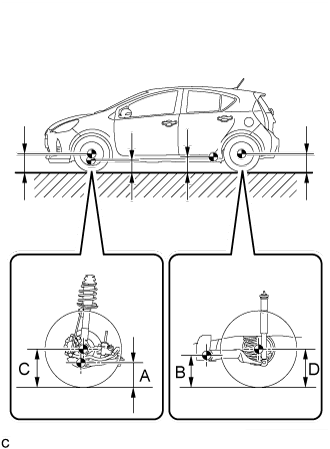
  1. Measure the vehicle height.

    Measurement points:
    1. A: Ground clearance of front lower No. 1 suspension arm bushing set bolt center
    1. B: Ground clearance of rear axle beam bushing set bolt center
    1. C: Ground clearance of front wheel center
    1. D: Ground clearance of rear wheel center

    Vehicle Height (Unloaded Vehicle):

    Tire Size
    Front C - A
    Rear D - B
    175/65R15
    92 mm (3.62 in.)
    29 mm (1.14 in.)
    185/60R15
    93 mm (3.66 in.)
    79 mm (3.11 in.) *1
    69 mm (2.72 in.) *2
    32 mm (1.26 in.)
    14 mm (0.55 in.) *1
    4 mm (0.16 in.) *2

    HINT:
    1. *1: Vehicles with purple identification mark on the bottom of the rear coil spring
    2. *2: Vehicles with blue identification mark on the bottom of the rear coil spring


4. INSPECT CAMBER

NOTICE:
Inspect while the vehicle is unloaded.

  1. Install a camber-caster-kingpin gauge.

  1. Inspect the camber.

    Camber (Unloaded Vehicle):

    Tire Size
    Camber Inclination
    Right-left Difference
    175/65R15
    -0°57' +/- 0°30' (-0.95° +/- 0.50°)
    0°30' (0.50°) or less
    185/60R15
    -0°58' +/- 0°30' (-0.97° +/- 0.50°)
    -0°55' +/- 0°30' (-0.92° +/- 0.50°) *1
    -0°54' +/- 0°30' (-0.90° +/- 0.50°) *2

    HINT:
    1. *1: Vehicles with purple identification mark on the bottom of the rear coil spring
    2. *2: Vehicles with blue identification mark on the bottom of the rear coil spring
    3. Camber is not adjustable. If the measurement is not within the specified range, inspect the suspension parts for damage and/or wear, and replace them if necessary.


5. INSPECT TOE-IN

NOTICE:
Inspect while the vehicle is unloaded.

  1. Bounce the vehicle up and down at the corners to stabilize the suspension.

  1. Release the parking brake and move the shift lever to N.

  1. Push the vehicle straight ahead approximately 5 m (16.4 ft.). (Step A)


    C188968E07
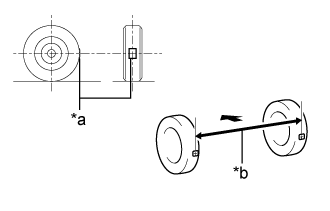
  1. Put tread center marks on the rearmost points of the rear wheels and measure the distance between the marks (dimension B).
    Text in Illustration 
    *a
    Tread Center Mark
    *b
    Dimension B
    V100135
    Front of the Vehicle

  1. Slowly push the vehicle straight ahead to cause the rear wheels to rotate 180°. Use the rear tire valve as a reference point.
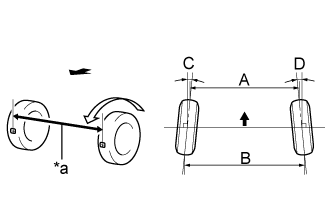
    HINT:
    Do not allow the wheels to rotate more than 180°. If the wheels rotate more than 180°, perform the procedure from Step A again.


    C188969E07
  1. Measure the distance between the tread center marks on the front of the wheels (dimension A).
    Text in Illustration 
    *a
    Dimension A
    V100135
    Front of the Vehicle

    Toe-in (Unloaded Vehicle):

    Tire Size
    Specified Condition
    Right-left Difference
    175/65R15
    C + D: 0°20' +/- 15' ( 0.33° +/- 0.25°)
    30' (0.50°) or less
    B - A: 3.9 +/- 3 mm (0.154 +/- 0.118 in.)
    6.0 mm (0.236 in.) or less
    185/60R15
    C + D: 0°21' +/- 15' ( 0.35° +/- 0.25°)
    C + D: 0°17' +/- 15' ( 0.28° +/- 0.25°) *1
    C + D: 0°14' +/- 15' ( 0.23° +/- 0.25°) *2
    30' (0.50°) or less
    B - A: 3.9 +/- 3 mm (0.154 +/- 0.118 in.)
    B - A: 3.2 +/- 3 mm (0.126 +/- 0.118 in.) *1
    B - A: 2.8 +/- 3 mm (0.110 +/- 0.118 in.) *2
    6.0 mm (0.236 in.) or less

    HINT:
    1. *1: Vehicles with purple identification mark on the bottom of the rear coil spring
    2. *2: Vehicles with blue identification mark on the bottom of the rear coil spring
    3. Measure "B - A" only when "C + D" cannot be measured.

    If the toe-in is not within the specified range, inspect the suspension parts and replace them if necessary.


6. PLACE FRONT WHEELS FACING STRAIGHT AHEAD


7. PERFORM YAW RATE AND ACCELERATION SENSOR CALIBRATION
(Click here)