When using a new lower instrument panel subassembly:
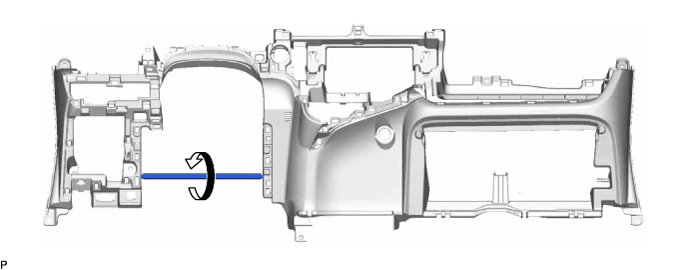
Immediately before installing the lower instrument panel sub-assembly, twist and cut off the portion shown in the illustration.
LOWER INSTRUMENT PANEL > INSTALLATION |
| 1. INSTALL LOWER INSTRUMENT PANEL SUB-ASSEMBLY (for LHD) |
When using a new lower instrument panel subassembly:
Immediately before installing the lower instrument panel sub-assembly, twist and cut off the portion shown in the illustration.
Install the lower instrument panel sub-assembly with the 2 bolts <A>, 7 screws <C> and screw <B>.
Engage the 2 claws to connect the DLC3.
Connect each connector.
Engage each clamp.
| 2. REMOVE LOWER INSTRUMENT PANEL SUB-ASSEMBLY (for RHD) |
When using a new lower instrument panel subassembly:
Immediately before installing the lower instrument panel sub-assembly, twist and cut off the portion shown in the illustration.
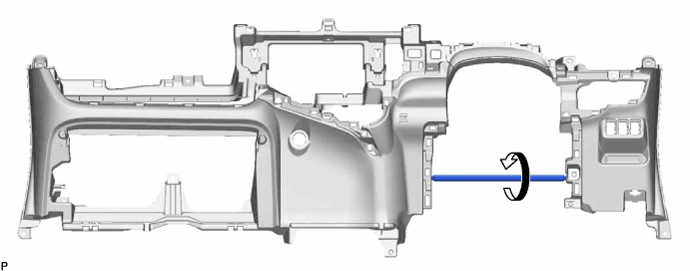
Install the lower instrument panel sub-assembly with the 2 bolts <A>, 7 screws <C> and screw <B>.
Engage the 2 claws to connect the DLC3.
Connect each connector.
Engage each clamp.
| 3. CONNECT HOOD LOCK CONTROL LEVER SUB-ASSEMBLY |
Engage the claw and 2 guides to connect the hood lock control lever sub-assembly.
| 4. INSTALL COWL SIDE TRIM BOARD RH |
| 5. INSTALL FRONT DOOR SCUFF PLATE RH |
| 6. INSTALL COWL SIDE TRIM BOARD LH |
Engage the clip.
Install the cowl side trim board with the clip.
| 7. INSTALL FRONT DOOR SCUFF PLATE LH |
Engage the 8 claws to install the front door scuff plate.
| 8. INSTALL GLOVE COMPARTMENT DOOR ASSEMBLY |
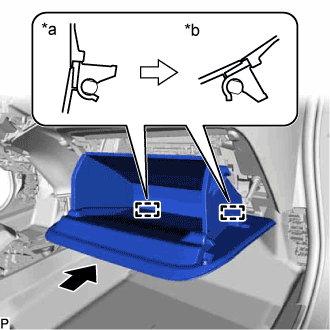 |
With the glove compartment door assembly opened approximately 55° from its closed position, engage the 2 hinges horizontally.
| *a | Opened approximately 55° |
| *b | Closed |
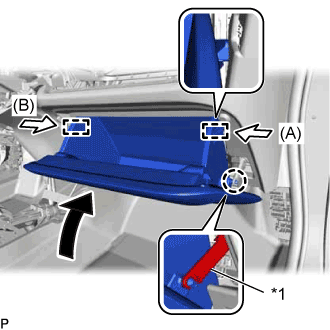 |
Slightly bend the stoppers (A) and (B) in the directions indicated by the arrows in the illustration and engage the stoppers to install the glove compartment door assembly.
| *1 | Glove Compartment Door Stopper Sub-assembly |
Engage the claw and connect the glove compartment door stopper sub-assembly.
| 9. INSTALL INSTRUMENT PANEL BOX ASSEMBLY |
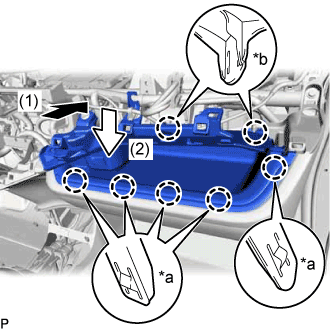 |
Push the instrument panel box assembly in the direction indicated by the arrow (1) to engage the 2 claws (B) as shown in the illustration.
| *a | Claw (A) |
| *b | Claw (B) |
Push the instrument panel box assembly in the direction indicated by the arrow (2) to engage the 5 claws (A) as shown in the illustration.
Install the instrument panel box assembly with the screw.
for LHD:
Engage the 3 clamps.
| 10. INSTALL REAR CONSOLE BOX ASSEMBLY |
Engage the 2 clips.
Install the rear console box assembly with the 3 bolts and 2 screws.
| 11. INSTALL CONSOLE BOX PLATE |
Install the console box plate.
| 12. INSTALL FRONT CONSOLE BOX |
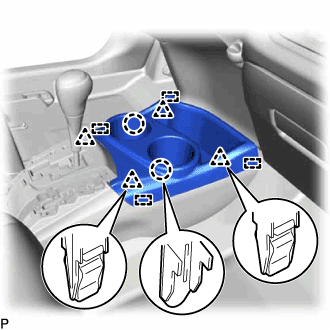 |
Engage the 4 guides, 2 claws and 4 clips to install the front console box.
| 13. INSTALL UPPER CONSOLE PANEL |
Engage the 2 claws and 6 clips to install the upper console panel.
| 14. INSTALL REAR CONSOLE BOX COVER |
Connect each connector.
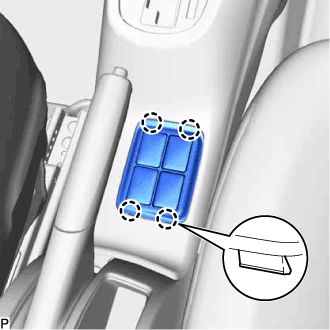 |
Engage the 4 claws to install the rear console box cover.
| 15. INSTALL ROOM TEMPERATURE SENSOR (COOLER THERMISTOR) |
Connect the connector and aspirator.
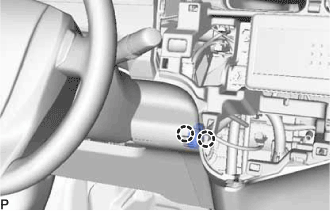 |
Engage the 2 claws to install the room temperature sensor (cooler thermistor).
| 16. INSTALL AIR CONDITIONING CONTROL ASSEMBLY |
Connect the connector.
Engage the 4 clips to install the air conditioning control assembly.
| 17. INSTALL LOWER INSTRUMENT CLUSTER FINISH PANEL GARNISH |
for LHD:
Engage the 3 claws, 8 clips and 3 guides to install the lower instrument cluster finish panel garnish.
for RHD:
Engage the 2 claws, 8 clips and 4 guides to install the lower instrument cluster finish panel garnish.
| 18. INSTALL RADIO TUNER OPENING COVER WITH BRACKET (w/o Radio Receiver) |
Install the radio tuner opening cover with bracket with the 4 screws <C>.
| 19. INSTALL RADIO RECEIVER ASSEMBLY WITH BRACKET (w/ Radio Receiver) |
Connect each connector.
Engage the 2 guides to the vehicle body to temporarily install the radio receiver assembly with bracket.
Install the radio receiver assembly with bracket with the 4 screws.
| 20. INSTALL NO. 6 HEATER TO REGISTER DUCT ASSEMBLY |
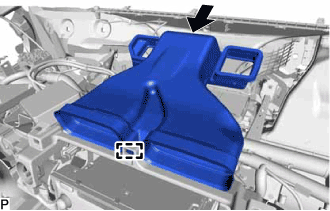 |
Engage the guide as shown in the illustration.
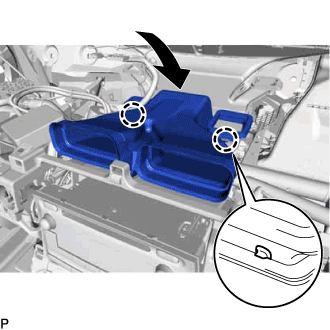 |
Engage the 2 claws as shown in the illustration.
Engage the clamp to install the No. 6 heater to register duct assembly.
| 21. INSTALL LOWER NO. 1 INSTRUMENT PANEL AIRBAG ASSEMBLY |
Check that the power switch is off.
Check that the cable is disconnected from the negative (-) auxiliary battery terminal.
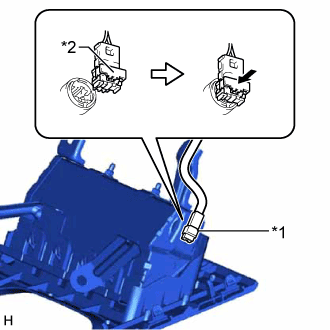 |
Connect the airbag connector to the lower No. 1 instrument panel airbag assembly.
| *1 | Airbag Connector |
| *2 | Airbag Connector Lock |
Push in the airbag connector lock to install the airbag connector.
for LHD:
Temporarily install the lower No. 1 instrument panel airbag assembly with the 7 claws and the 3 guides.
Install the 4 bolts.
for RHD:
Temporarily install the lower No. 1 instrument panel airbag assembly with the 9 claws and the 2 guides.
Install the 4 bolts.
| 22. INSTALL LOWER STEERING COLUMN COVER |
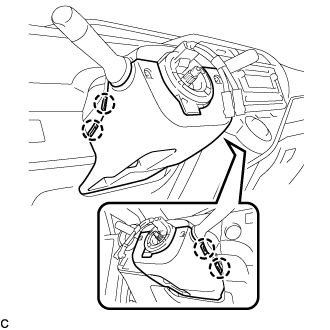 |
Engage the 4 claws to install the lower steering column cover.
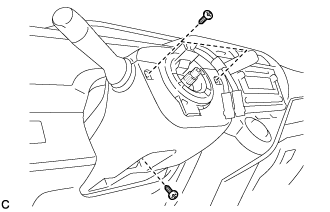 |
Install the 3 screws.
| 23. INSTALL LOWER INSTRUMENT PANEL FINISH PANEL LH (for LHD) |
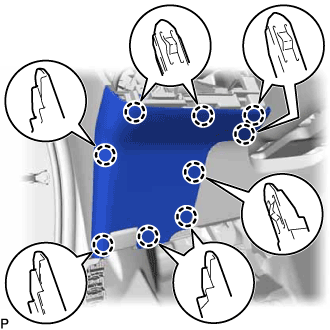 |
Engage the 9 claws to install the lower instrument panel finish panel LH as shown in the illustration.
| 24. INSTALL NO. 1 SWITCH HOLE BASE |
for LHD:
Connect each connector.
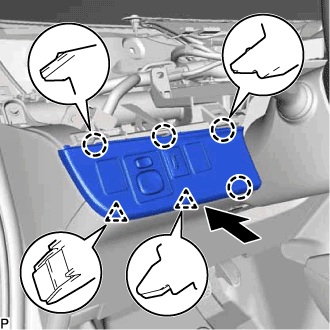 |
Engage the 4 claws and 2 clips to install the No. 1 switch hole base.
for RHD:
Connect each connector.
Engage the 2 claws and 3 clips to install the No. 1 switch hole base.
| 25. INSTALL UPPER INSTRUMENT PANEL ASSEMBLY |