| B |  |
| GO TO DTC CHART (HYBRID CONTROL SYSTEM) (Click here) |
DTC P0AA1-231 Hybrid Battery Positive Contactor Circuit Stuck Closed |
| DTC No. | INF Code | DTC Detection Condition | Trouble Area |
| P0AA1 | 231 | SMRB on the HV battery positive side is stuck closed. |
|
| 1.CHECK DTC OUTPUT (HYBRID CONTROL) |
Connect the intelligent tester to the DLC3.
Turn the power switch on (IG).
Enter the following menus: Powertrain / Hybrid Control / DTC.
Check if DTCs are output.
| Result | Proceed to |
| Only P0AA1-231 is output or P0AA1-231 and DTCs other than the ones in the table below are also output. | A |
| Any of the following DTCs are also output. | B |
| DTC No. | Relevant Diagnosis |
| P0A1A-151, 155, 156, 200, 658, 659, 791, 792, 793 | Generator Control Module |
| P0A1B-163, 164, 168, 193, 511, 512, 661, 786, 794, 795, 796 | Drive Motor "A" Control Module |
| P0A1D-148 | Hybrid Powertrain Control Module |
| P0A3F-243 | Drive Motor "A" Position Sensor Circuit |
| P0A40-500 | Drive Motor "A" Position Sensor Circuit Range/Performance |
| P0A41-245 | Drive Motor "A" Position Sensor Circuit Low |
| P0A4B-253 | Generator Position Sensor Circuit |
| P0A4C-513 | Generator Position Sensor Circuit Range/Performance |
| P0A4D-255 | Generator Position Sensor Circuit Low |
| P0A78-266, 267, 586 | Drive Motor "A" Inverter Performance |
| P0A94-442 | DC / DC Converter Performance |
| P0ADC-226 | Hybrid Battery Positive Contactor Control Circuit High |
| P0C76-523 | Hybrid Battery System Discharge Time Too Long |
| P2511-149 | ECM/PCM Power Relay Sensor Circuit Intermittent |
| P3004-132 | High Voltage Power Resource |
| P324E-788 | MG-ECU Power Relay Intermittent Circuit |
| U0110 (all INF codes)*1 | Lost Communication with Drive Motor Control Module "A" |
Turn the power switch off.
|
| ||||
| A | |
 |
| 2.CHECK FREEZE FRAME DATA (HYBRID CONTROL) |
Connect the intelligent tester to the DLC3.
Turn the power switch on (IG).
Enter the following menus: Powertrain / Hybrid Control / DTC.
Read the freeze frame data of DTC P0AA1-231.
| Result | Proceed to |
| VL-Voltage before Boosting is 55 V or more. | A |
| VL-Voltage before Boosting is less than 55 V. | B |
Turn the power switch off.
|
| ||||
| A | |
|
| 3.CHECK CONNECTOR CONNECTION CONDITION (POWER MANAGEMENT CONTROL ECU CONNECTOR) |
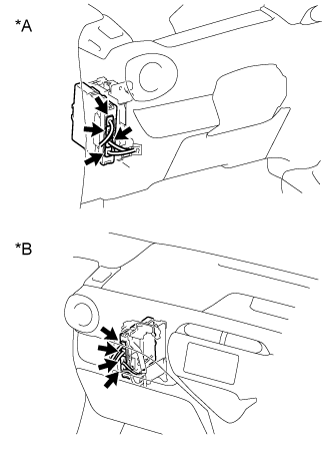 |
Check the connector connections and contact pressure of the relevant terminals for the power management control ECU connectors (Click here).
| *A | for LHD |
| *B | for RHD |
|
| ||||
|
| ||||
| 4.CONNECT SECURELY |
| NEXT | |
|
| 5.CHECK CONNECTOR CONNECTION CONDITION (FLOOR WIRE CONNECTOR) |
Check the connection condition of the floor wire connector and the contact pressure of each terminal. Check the terminals for deformation, and check the connector for water ingress and foreign matter (Click here).
| Result | Proceed to |
| OK | A |
| NG (The connector is not connected securely.) | B |
| NG (The terminals are not making secure contact or are deformed, or water or foreign matter exists in the connector.) | C |
|
| ||||
|
| ||||
|
| ||||
| 6.CONNECT SECURELY |
|
| ||||
| 7.REPAIR OR REPLACE HARNESS OR CONNECTOR |
| NEXT | |
|
| 8.CHECK CONNECTOR CONNECTION CONDITION (HYBRID BATTERY JUNCTION BLOCK ASSEMBLY CONNECTOR) |
Check that the service plug grip is not installed.
Remove the No. 1 hybrid vehicle battery cover panel LH .
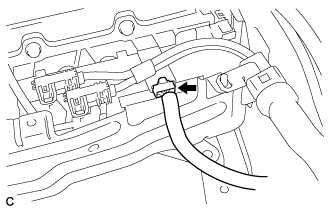 |
Check the connector connections and contact pressure of the relevant terminals for the hybrid battery junction block assembly connector (Click here ).
Install the No. 1 hybrid vehicle battery cover panel LH.
|
| ||||
|
| ||||
| 9.CONNECT SECURELY |
| NEXT | |
|
| 10.CHECK GROUND WIRE CONNECTION CONDITION (SMR ACTIVATION LOW-VOLTAGE CIRCUIT) |
Check the installation condition of the G6 ground wire.
|
| ||||
|
| ||||
| 11.CONNECT SECURELY |
| NEXT | |
|
| 12.CHECK HARNESS AND CONNECTOR (POWER MANAGEMENT CONTROL ECU - HYBRID BATTERY JUNCTION BLOCK ASSEMBLY |
Check that the service plug grip is not installed.
Remove the No. 1 hybrid vehicle battery cover panel LH .
Disconnect connector M40 from the hybrid battery junction block assembly.
Disconnect connector G80 from the power management control ECU.
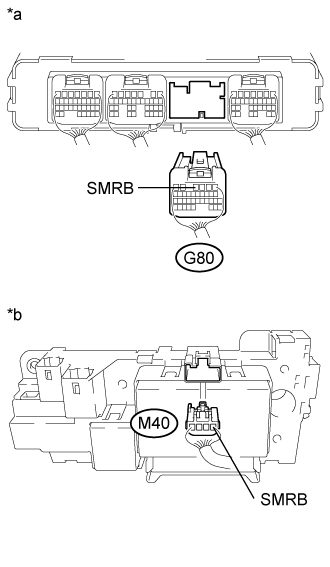 |
Measure the resistance according to the value(s) in the table below.
| Tester Connection | Switch Condition | Specified Condition |
| G80-4 (SMRB) - M40-1 (SMRB) | Power switch off | Below 1 Ω |
| Tester Connection | Switch Condition | Specified Condition |
| G80-4 (SMRB) and M40-1 (SMRB) - Body ground and other terminals | Power switch off | 10 kΩ or higher |
| *a | Rear view of wire harness connector (to Power Management Control ECU) |
| *b | Rear view of wire harness connector (to Hybrid Battery Junction Block Assembly) |
Connect the power management control ECU connector.
Connect the hybrid battery junction block assembly connector.
Install the No. 1 hybrid vehicle battery cover panel LH.
|
| ||||
|
| ||||
| 13.REPAIR OR REPLACE HARNESS OR CONNECTOR |
| NEXT | |
|
| 14.CHECK HARNESS AND CONNECTOR (HYBRID BATTERY JUNCTION BLOCK ASSEMBLY- BODY GROUND) |
Check that the service plug grip is not installed.
Remove the No. 1 hybrid vehicle battery cover panel LH .
Disconnect connector M40 from the hybrid battery junction block assembly.
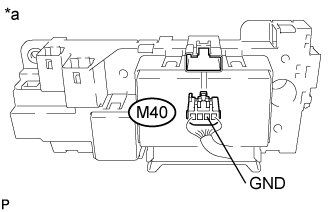 |
Measure the resistance according to the value(s) in the table below.
| Tester Connection | Switch Condition | Specified Condition |
| M40-2 (GND) - Body ground | Power switch off | Below 1 Ω |
| *a | Rear view of wire harness connector (to Hybrid Battery Junction Block Assembly) |
Connect the hybrid battery junction block assembly connector.
Install the No. 1 hybrid vehicle battery cover panel LH.
|
| ||||
|
| ||||
| 15.REPAIR OR REPLACE HARNESS OR CONNECTOR |
| NEXT | |
|
| 16.INSPECT HYBRID BATTERY JUNCTION BLOCK ASSEMBLY (SMRB) |
Check that the service plug grip is not installed.
Remove the No. 1 hybrid vehicle battery cover panel LH .
Disconnect connector M40 from the hybrid battery junction block assembly.
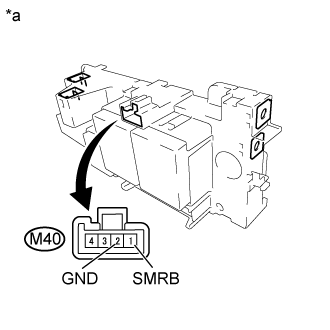 |
Measure the resistance according to the value(s) in the table below.
| Tester Connection | Condition | Specified Condition |
| M40-1 (SMRB) - M40-2 (GND) | -40 to 80 °C (-40 to 176°F) | 25.0 to 59.0 Ω |
| *a | Component without harness connected (Hybrid Battery Junction Block Assembly) |
Connect the hybrid battery junction block assembly connector.
Install the No. 1 hybrid vehicle battery cover panel LH.
|
| ||||
| OK | |
|
| 17.CHECK HYBRID BATTERY JUNCTION BLOCK ASSEMBLY |
Check that the service plug grip is not installed.
Remove the No. 2 hybrid battery shield sub-assembly .
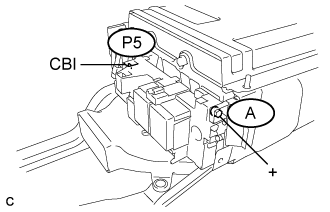 |
Measure the resistance according to the value(s) in the table below.
| Tester Connection | Switch Condition | Specified Condition |
| P5-1 (CBI) - A-1 (+) | Power switch off | 10 kΩ or higher |
Install the No. 2 hybrid battery shield sub-assembly.
|
| ||||
| OK | |
|
| 18.REPLACE HYBRID BATTERY JUNCTION BLOCK ASSEMBLY |
| NEXT | |
|
| 19.CHECK POWER MANAGEMENT CONTROL ECU (CHECK FOR NORMAL OPERATION) |
Install the service plug grip.
Connect the intelligent tester to the DLC3.
Turn the power switch on (IG).
Clear the DTCs (Click here).
Turn the power switch off and wait for 30 seconds or more.
Turn the power switch on (READY).
Enter the following menus: Powertrain / Hybrid Control / Data List / Power Resource VB, VL-Voltage before Boosting.
According to the display on the intelligent tester, read the Data List and monitor the values of "Power Resource VB" and "VL-Voltage before Boosting" for 3 minutes.
| Result | Proceed to |
| Difference between "Power Resource VB" and "VL-Voltage before Boosting" is always less than 100 V. | A |
| Difference between "Power Resource VB" and "VL-Voltage before Boosting" is 100 V or more. | B |
|
| ||||
| A | ||
 | ||
| ||
