EXTERIOR PANELS / TRIM NAME PLATE INSTALLATION
CAUTION / NOTICE / HINT
- HINT:
-
When installing the name plates, heat the vehicle body, back door outside garnish and name plates using a heat light.
| Item | Temperature |
|---|---|
| Vehicle Body | 40 to 60°C (104 to 140°F) |
·
Back Door Outside Garnish ·
Name Plate |
20 to 30°C (68 to 86°F) |
- CAUTION:
-
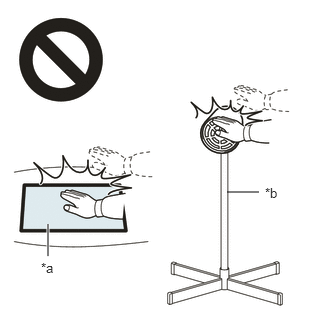 2.365,2 2.698,2 false 0.5,2.333 0.5,2.667 true 0.427,2.708 0.74,2.865 0.313,0.156 10 false *a 2.76,1.927 3.073,2.083 0.313,0.156 10 false *b
*a Heated Part *b Heat Light
- ·
Do not touch the heat light and heated parts, touching the heat light may result in burns.
·Touching heated parts for a long time may result in burns.
- NOTICE:
-
Do not heat the vehicle body, back door outside garnish or name plate excessively.
PROCEDURE

 75374
1.INSTALL SIDE PANEL EMBLEM
Clean the vehicle body surface.
Using a heat light, heat the vehicle body surface.
Remove any remaining double-sided tape from the vehicle body.
Wipe off any tape adhesive residue with cleaner.
Using a heat light, heat the vehicle body and a new side panel emblem.
Remove the release paper from the side panel emblem.
- HINT:
-
After removing the release paper, keep the exposed adhesive free from foreign matter.
for LH Side:
Install the side panel emblem as shown in the illustration.
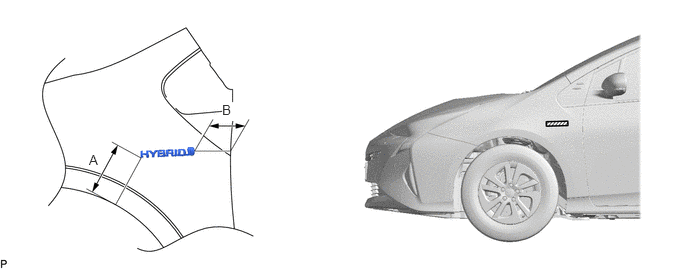
- Standard Measurement:
Area Measurement Area Measurement A 133.9 mm (5.27 in.) B 95.5 mm (3.76 in.)
for RH Side:
Install the side panel emblem as shown in the illustration.
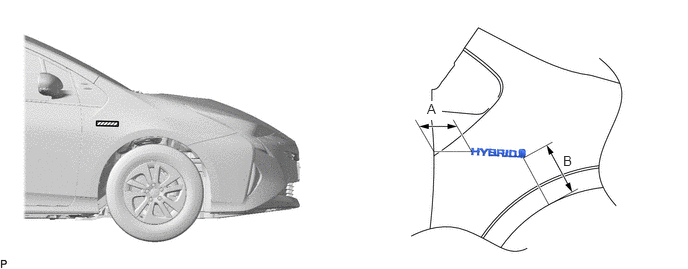
- Standard Measurement:
Area Measurement Area Measurement A 95.1 mm (3.74 in.) B 136.2 mm (5.36 in.)
75403
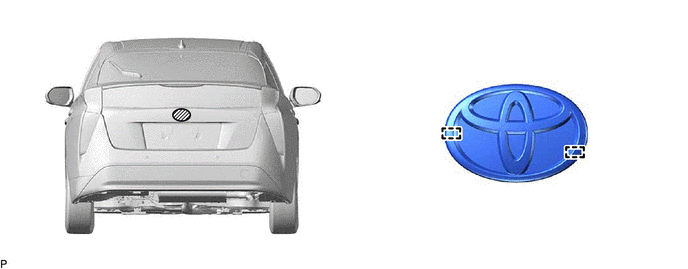
2.INSTALL BACK DOOR ORNAMENT SUB-ASSEMBLY
Clean the back door outside garnish surface.
Using a heat light, heat the back door outside garnish surface.
Remove any remaining double-sided tape from the back door outside garnish.
Wipe off any tape adhesive residue with cleaner.
Using a heat light, heat the back door outside garnish and a new back door ornament sub-assembly.
Remove the release paper from the back door ornament sub-assembly.
- HINT:
-
After removing the release paper, keep the exposed adhesive free from foreign matter.
Engage the 2 pins and install the back door ornament sub-assembly as shown in the illustration.
75443A
3.INSTALL NO. 3 LUGGAGE COMPARTMENT DOOR PLATE
Clean the back door outside garnish surface.
Using a heat light, heat the back door outside garnish surface.
Remove any remaining double-sided tape from the back door outside garnish.
Wipe off any tape adhesive residue with cleaner.
Using a heat light, heat the back door outside garnish and a new No. 3 luggage compartment door plate.
Remove the release paper from the No. 3 luggage compartment door plate.
- HINT:
-
After removing the release paper, keep the exposed adhesive free from foreign matter.
Install the No. 3 luggage compartment door plate as shown in the illustration.
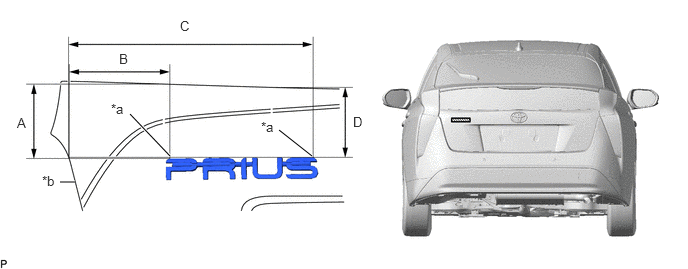
| *a | Edge of Curved Surface | *b | Profile of Back Door Outside Garnish |
- Standard Measurement:
Area Measurement Area Measurement A 105.6 mm (4.16 in.) B 100.9 mm (3.97 in.) C 235.6 mm (9.28 in.) D 97.9 mm (3.85 in.)
75441E
4.INSTALL NO. 1 BACK DOOR NAME PLATE
Clean the back door outside garnish surface.
Using a heat light, heat the back door outside garnish surface.
Remove any remaining double-sided tape from the back door outside garnish.
Wipe off any tape adhesive residue with cleaner.
Using a heat light, heat the back door outside garnish and a new No. 1 back door name plate.
Remove the release paper from the No. 1 back door name plate.
- HINT:
-
After removing the release paper, keep the exposed adhesive free from foreign matter.
Install the No. 1 back door name plate as shown in the illustration.
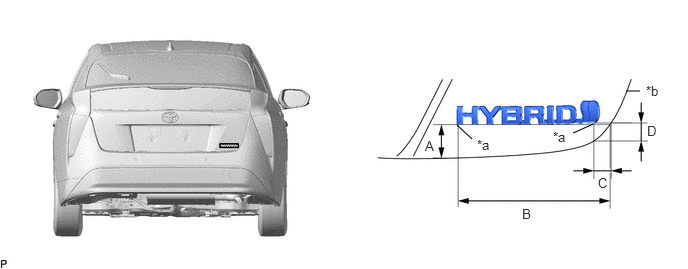
| *a | Edge of Curved Surface | *b | Profile of Back Door Outside Garnish |
- Standard Measurement:
Area Measurement Area Measurement A 32.5 mm (1.28 in.) B 146.1 mm (5.75 in.) C 18.4 mm (0.724 in.) D 18 mm (0.709 in.)
75442
5.INSTALL NO. 2 LUGGAGE COMPARTMENT DOOR NAME PLATE
for HYBRID Plate:
Clean the back door outside garnish surface.
Using a heat light, heat the back door outside garnish surface.
Remove any remaining double-sided tape from the back door outside garnish.
Wipe off any tape adhesive residue with cleaner.
Using a heat light, heat the back door outside garnish and a new No. 2 luggage compartment door name plate.
Remove the release paper from the No. 2 luggage compartment door name plate.
- HINT:
-
After removing the release paper, keep the exposed adhesive free from foreign matter.
Install the No. 2 luggage compartment door name plate as shown in the illustration.
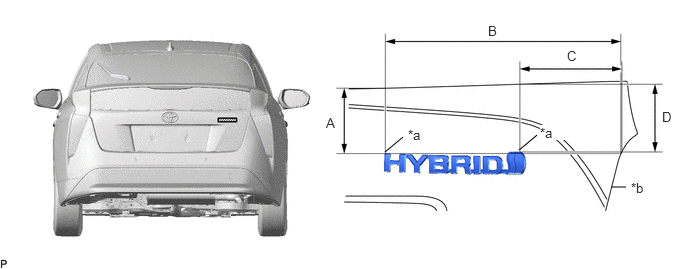
| *a | Edge of Curved Surface | *b | Profile of Back Door Outside Garnish |
- Standard Measurement:
Area Measurement Area Measurement A 98.5 mm (3.88 in.) B 231.9 mm (9.13 in.) C 103.3 mm (4.07 in.) D 102.3 mm (4.03 in.)
75442
6.INSTALL NO. 2 LUGGAGE COMPARTMENT DOOR NAME PLATE
for PRIUS Plate:
Clean the back door outside garnish surface.
Using a heat light, heat the back door outside garnish surface.
Remove any remaining double-sided tape from the back door outside garnish.
Wipe off any tape adhesive residue with cleaner.
Using a heat light, heat the back door outside garnish and a new No. 2 luggage compartment door name plate.
Remove the release paper from the No. 2 luggage compartment door name plate.
- HINT:
-
After removing the release paper, keep the exposed adhesive free from foreign matter.
Install the No. 2 luggage compartment door name plate as shown in the illustration.
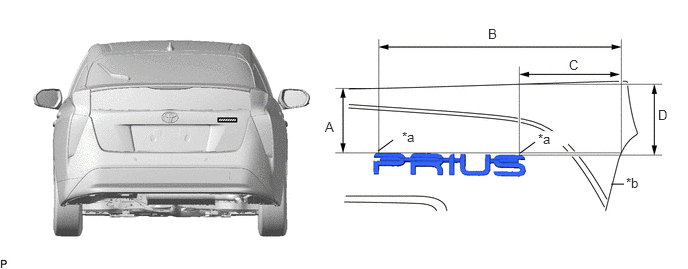
| *a | Edge of Curved Surface | *b | Profile of Back Door Outside Garnish |
- Standard Measurement:
Area Measurement Area Measurement A 95.7 mm (3.77 in.) B 238.9 mm (9.41 in.) C 103.7 mm (4.08 in.) D 104.1 mm (4.10 in.)