Troubleshooting · Vehicles built Jan 2007 – Jul 2007
Versions by build date: Jan 2007 – Jul 2007from Aug 2007
DESCRIPTION
When troubleshooting Multiplex OBD (M-OBD) vehicles, the vehicle must be connected to the intelligent tester. Various data output from the vehicle's Engine Control Module (ECM) can then be read. The Malfunction Indicator Lamp (MIL) is illuminated when the vehicle's onboard computer detects a malfunction in the computer itself or in drive system components. In addition, the applicable Diagnostic Trouble Codes (DTCs) are recorded in the ECM memory (Click here). When the malfunction does not recur, the MIL stays illuminated until the ignition switch is turned off, and the MIL turns OFF when the engine is started. Be aware that the DTCs remain recorded in the ECM memory. To check DTCs, connect the intelligent tester to the DLC3 on the vehicle.
NORMAL MODE AND CHECK MODE
The diagnosis system operates in "normal mode" during normal vehicle use. In normal mode, "2 trip detection logic" is used to ensure accurate detection of malfunctions. "Check mode" is also available to technicians as an option. In check mode, "1 trip detection logic" is used for simulating malfunction symptoms and increasing the system's ability to detect malfunctions, including intermittent malfunctions (Click here).
2 TRIP DETECTION LOGIC
When a malfunction is first detected, the malfunction is temporarily stored in the ECM memory (1st trip). If the same malfunction is detected during the next subsequent drive cycle, the MIL is illuminated (2nd trip).
FREEZE FRAME DATA
The ECM records vehicle and driving condition information as freeze frame data the moment a DTC is stored. When troubleshooting, freeze frame data can be helpful in determining whether the vehicle was running or stopped, whether the engine was warmed up or not, whether the air-fuel ratio was lean or rich, as well as other data recorded at the time of a malfunction.
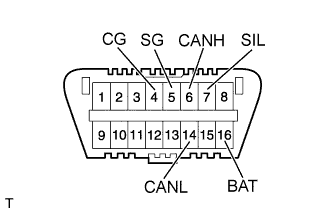
DLC3 (Data Link Connector 3)
If the result is not as specified, the DLC3 may have a malfunction. Repair or replace the harness and connector.
HINT:
Connect the cable of the intelligent tester to the DLC3, turn the ignition switch on (IG) and attempt to use the tester. If the display indicates that a communication error has occurred, there is a problem either with the vehicle or with the tester.
If communication is normal when the tester is connected to another vehicle, inspect the DLC3 of the original vehicle.
If communication is still not possible when the tester is connected to another vehicle, the problem may be in the tester itself. Consult the Service Department listed in the tester's instruction manual.
Symbols (Terminal No.)
Terminal Description
Condition
Specified Condition
SIL (7) - SG (5)
Bus "+" line
During transmission
Pulse generation
CG (4) - Body ground
Chassis ground
Always
Below 1 Ω
SG (5) - Body ground
Signal ground
Always
Below 1 Ω
BAT (16) - Body ground
Battery positive
Always
9 to 14 V
CANH (6) - CANL (14)
HIGH-level CAN bus line
Ignition switch off*
54 to 69 Ω
CANH (6) - BAT (16)
HIGH-level CAN bus line
Ignition switch off*
6 kΩ or higher
CANH (6) - CG (4)
HIGH-level CAN bus line
Ignition switch off*
200 Ω or higher
CANL (14) - BAT (16)
Low-level CAN bus line
Ignition switch off*
6 kΩ or higher
CANL (14) - CG (4)
Low-level CAN bus line
Ignition switch off*
200 Ω or higher
NOTICE:
*: Before measuring the resistance, leave the vehicle as is for at least 1 minute and do not operate the ignition switch, any other switches or the doors.
INSPECT BATTERY VOLTAGE
If the voltage is below 11 V, recharge or replace the battery before proceeding to the next step.
Battery voltage:
11 to 14 V
CHECK MIL
Check that the MIL illuminates when the ignition switch is turned on (IG). If the MIL does not illuminate, there is a problem in the MIL circuit (Click here).
When the engine is started, the MIL should turn off.