Black Smoke Emitted
Circuit diagnosis · Vehicles built from Jan 2007
Versions by build date: Nov 2005 – Dec 2006 from Jan 2007
INSPECTION PROCEDURE
- NOTICE:
- After replacing the ECM, the new ECM needs registration (Click here) and initialization (Click here).
- After replacing a supply pump, the ECM needs initialization (Click here).
- After replacing a injector, the ECM needs registration (Click here).
- After replacing the ECM, the new ECM needs registration (Click here) and initialization (Click here).
- HINT:
- Specified values in the following troubleshooting flowchart are for reference only. Variations in the Data List values may occur depending on the measuring conditions or the vehicle's age. Do not assume the vehicle to be normal when the Data List outputs standard values. There may be concealed factors of the malfunction.
| 1. CHECK OUTPUT DTC (RELATED TO ENGINE) |

Connect the intelligent tester to the DLC3.
Turn the ignition switch on (IG) and turn the tester ON.
Enter the following menus: Powertrain / Engine and ECT / DTC.
Read the DTCs.
- Result:
Display (DTC Output)
Proceed to
No output
A
DTCs related to the engine
B
|
|
||||

| A | |
 |
| 2. READ VALUE USING INJECTOR ASSEMBLY (INJECTION VOLUME AND INJECTION FEED BACK VAL #1 TO #4) |
Connect the intelligent tester to the DLC3.
Start the engine and turn the tester ON.
Enter the following menus: Powertrain / Engine and ECT / Data List.
Select the following menu items in order and read the values.
- Injection Volume
- Injection Feedback Val #1, #2, #3, and #4
- Standard value:
Item
Engine Speed*
Reference Value
Injection Volume
Idling (No engine load)
3.9 to 7.0 mm3
Injection Feedback Val #1
Idling (No engine load)
-3.0 to 3.0 mm3
Injection Feedback Val #2
Idling (No engine load)
-3.0 to 3.0 mm3
Injection Feedback Val #3
Idling (No engine load)
-3.0 to 3.0 mm3
Injection Feedback Val #4
Idling (No engine load)
-3.0 to 3.0 mm3
- HINT:
- *: If no idling conditions are specified, the shift lever should be in the neutral position, and the A/C switch and all accessory switches should be OFF.
- Injection Volume
|
|
||||

| OK | |
|
| 3. PERFORM ENGINE RPM ACCELERATION |
- HINT:
- If the exhaust gas contains excessive black smoke, perform the following operations:
Accelerate the engine speed to the maximum rpm with no load 20 times.
Check the volume of black smoke in the exhaust gas.
- Result:
Result
Proceed to
Black smoke is not present
OK
Black smoke remains in the exhaust gas
NG
- HINT:
- Soot deposits in the exhaust system may cause excessive black smoke.
|
|
||||
| NG | |
|
| 4. CHECK AIR INTAKE SYSTEM AND EXHAUST SYSTEM |
Inspect the engine condition (Click here).
|
|
||||
| OK | |
|
| 5. READ VALUE USING INTELLIGENT TESTER (EGR LIFT POSITION) |
Connect the intelligent tester to the DLC3.
Turn the ignition switch on (IG) and turn the tester ON.
Enter the following menus: Powertrain / Engine and ECT / Data List / EGR Lift Position.
Read the value.
- Standard value:
- 0 to 60% idling after engine warmed up and vehicle is under normal atmospheric pressure.
- HINT:
- In the chart above, "Idling" means that the engine should be idled under the following conditions:
- Idle the engine, turn the A/C switch OFF and move the shift lever to N.
- After the engine is warmed up, the engine should have no load.
- Idle the engine, turn the A/C switch OFF and move the shift lever to N.
|
|
||||
| OK | |
|
| 6. CHECK TURBOCHARGING PRESSURE |
Check the turbocharger pressure (Click here).
- Standard pressure:
- 48 to 53 kPa (0.49 to 0.54 kgf/cm2, 6.9 to 7.7 psi)
|
|
||||
| OK | |
|
| 7. PERFORM ACTIVE TEST USING FUEL PRESSURE SENSOR AND INJECTOR ASSEMBLY |
Connect the intelligent tester to the DLC3.
Start the engine and turn the tester ON.
Enter the following menus: Powertrain / Engine and ECT / Data List.
Select the following menu items in order and read the values.
- Fuel Pressure
- Injection Volume
- Main Injection
- Pilot 2 Injection
- Injection Feedback Val #1, #2, #3, and #4
- Reference:
Item
Engine Speed*
Reference Value
Fuel Pressure
Idling
32 to 43 MPa
Fuel Pressure
2,000 rpm (no engine load)
47 to 53 MPa
Fuel Pressure
3,000 rpm (no engine load)
60 to 66 MPa
Injection Volume
Idling
3.9 to 7.0 mm3
Injection Volume
2,000 rpm (no engine load)
5.6 to 9.1 mm3
Injection Volume
3,000 rpm (no engine load)
7.9 to 11.4 mm3
Main Injection
Idling
170 to 370 μs
Pilot 2 Injection
Idling
140 to 200 μs
Injection Feedback Val #1
Idling
-3.0 to 3.0 mm3
Injection Feedback Val #2
Idling
-3.0 to 3.0 mm3
Injection Feedback Val #3
Idling
-3.0 to 3.0 mm3
Injection Feedback Val #4
Idling
-3.0 to 3.0 mm3
- HINT:
- If no idling conditions are specified, the shift lever should be in the neutral position, and the A/C switch and all accessory switches should be OFF.
- Result:
Result
Proceed to
Within reference value
A
One of Injection Feedback Val #1 to #4 is not within reference value
B
Other result
C
- Fuel Pressure
|
|
||||
|
|
||||
| A | |
|
| 8. CHECK CYLINDER COMPRESSION PRESSURE |
Check the cylinder compression pressure (Click here).
- Standard pressure:
- 2,700 kPa (27.5 kgf/cm2, 392 psi)
- Minimum pressure:
- 2,200 kPa (22.4 kgf/cm2, 319 psi)
- Difference between each cylinder:
- 500 kPa (5.1 kgf/cm2, 73 psi)
|
|
||||
| OK | |
|
| 9. CHECK WIRE HARNESS (INJECTOR - EDU) |
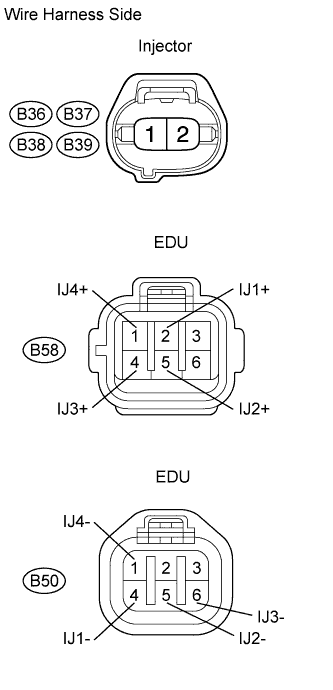  |
Disconnect the B36, B37, B38, and B39 injector connectors.
Disconnect the B50 and B58 EDU connectors.
Measure the resistance of the wire harness side connectors.
- Standard resistance:
Tester Connection
Specified Condition
B36-1 - B58-2 (IJ1+)
Below 1 Ω
B37-1 - B58-5 (IJ2+)
Below 1 Ω
B38-1 - B58-4 (IJ3+)
Below 1 Ω
B39-1 - B58-1 (IJ4+)
Below 1 Ω
B36-2 - B50-4 (IJ1-)
Below 1 Ω
B37-2 - B50-5 (IJ2-)
Below 1 Ω
B38-2 - B50-6 (IJ3-)
Below 1 Ω
B39-2 - B50-1 (IJ4-)
Below 1 Ω
B36-1 or B58-2 (IJ1+) - Body ground
10 kΩ or higher
B37-1 or B58-5 (IJ2+) - Body ground
10 kΩ or higher
B38-1 or B58-4 (IJ3+) - Body ground
10 kΩ or higher
B39-1 or B58-1 (IJ4+) - Body ground
10 kΩ or higher
B36-2 or B50-4 (IJ1-) - Body ground
10 kΩ or higher
B37-2 or B50-5 (IJ2-) - Body ground
10 kΩ or higher
B38-2 or B50-6 (IJ3-) - Body ground
10 kΩ or higher
B39-2 or B50-1 (IJ4-) - Body ground
10 kΩ or higher
Reconnect the injector connectors.
Reconnect the EDU connectors.
|
|
||||
| OK | |
|
| 10. PERFORM ACTIVE TEST USING INTELLIGENT TESTER (CONTROL THE CYLINDER FUEL CUT) |
Connect the intelligent tester to the DLC3.
Start the engine and turn the tester ON.
Enter the following menus: Powertrain / Engine and ECT / Active Test / Control the Cylinder #1, #2, #3, and #4 Fuel Cut.
Check the engine idling condition while the fuel injection of each cylinder is cut using the tester.
- Result:
Engine Idling Condition
Proceed to
Becomes unstable
A
Does not change
B
- HINT:
- Replace the injector mounted on the cylinder that causes no significant idle speed change.
|
|
||||
| A | ||
 |
||
| ||
| 11. READ VALUE USING INTELLIGENT TESTER (ENGINE COOLANT TEMPERATURE) |
Connect the intelligent tester to the DLC3.
Turn the ignition switch on (IG) and turn the tester ON.
Enter the following menus: Powertrain / Engine and ECT / Data List / Coolant Temp.
Read the value.
- Standard value:
- Between 75 and 95°C (167 and 203°F) with warm engine.
|
|
||||
| OK | |
|
| 12. READ VALUE USING MANIFOLD ABSOLUTE PRESSURE SENSOR |
Connect the intelligent tester to the DLC3.
Turn the ignition switch on (IG) and turn the tester ON.
Enter the following menus: Powertrain / Engine and ECT / Data List / MAP and Atmosphere Pressure.
Read the value.
- Standard value:
Condition
MAP Value
No pressure applied
Same as atmospheric pressure
Vacuum applied
Becomes vacuum
Pressure applied
Becomes pressurized
|
|
||||
| OK | |
|
| 13. READ VALUE USING INTELLIGENT TESTER (ENGINE SPEED) |
Connect the intelligent tester to the DLC3.
Turn the ignition switch on (IG) and turn the tester ON.
Enter the following menus: Powertrain / Engine and ECT / Data List / Engine Speed.
Read the value.
- Standard value:
- Between 750 to 1,000 rpm with warm engine (A/C switch OFF).
|
|
||||
| OK | |
|
| 14. READ VALUE USING INTELLIGENT TESTER (ACCEL POSITION 1 AND 2) |
Connect the intelligent tester to the DLC3.
Turn the ignition switch on (IG) and turn the tester ON.
Enter the following menus: Powertrain / Engine and ECT / Data List / Coolant Temp.
Read the value.
- Standard voltage:
Accelerator Pedal
Accelerator Pedal Condition
Specified Condition
Accel Position 1
Released
0.6 to 1.0 V
Accel Position 1
Depressed
3.4 to 3.8 V
Accel Position 2
Released
1.4 to 1.8 V
Accel Position 2
Depressed
4.2 to 4.6 V
- HINT:
- In the chart above, "Idling" means that the engine should be idled under the following conditions:
- Idle the engine, turn the A/C switch OFF and move the shift lever to N.
- After the engine is warmed up, the engine should have no load.
- Idle the engine, turn the A/C switch OFF and move the shift lever to N.
|
|
||||
| OK | |
|
| 15. READ VALUE USING INTELLIGENT TESTER (INTAKE AIR TEMPERATURE) |
Connect the intelligent tester to the DLC3.
Turn the ignition switch on (IG) and turn the tester ON.
Enter the following menus: Powertrain / Engine and ECT / Data List / Inlet Air.
Read the value.
- OK:
- Same as air temperature near to intake manifold.
- HINT:
- In the chart above, "Idling" means that the engine should be idled under the following conditions:
- Idle the engine, turn the A/C switch OFF and move the shift lever to N.
- After the engine is warmed up, the engine should have no load.
- Idle the engine, turn the A/C switch OFF and move the shift lever to N.
|
|
||||
| OK | |
|
| 16. READ VALUE USING INTELLIGENT TESTER (FUEL PRESSURE) |
Connect the intelligent tester to the DLC3.
Turn the ignition switch on (IG) and turn the tester ON.
Enter the following menus: Powertrain / Engine and ECT / Data List / Coolant Temp.
Read the value.
- Standard value:
- 32 to 43 MPa engine idling.
|
|
||||
| OK | ||
|
||
| ||
| 17. INSPECT ENGINE COOLANT TEMPERATURE SENSOR |
Disconnect the engine coolant temperature sensor.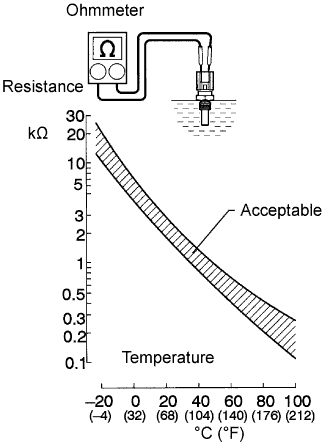
Measure the resistance of the sensor.
- Standard resistance:
Connection
Specified Condition
20°C (68°F)
2.32 to 2.59 kΩ
80°C (176°F)
0.310 to 0.326 kΩ
- NOTICE:
- When checking the ECT sensor in water, keep the terminals dry. After the check, wipe the sensor dry.
- HINT:
- Alternative procedure: Connect an ohmmeter to the installed ECT sensor and read the resistance. Use an infrared thermometer to measure the engine temperature in the immediate vicinity of the sensor. Compare these values against the resistance/ temperature graph. Change the engine temperature (warm up or cool down) and repeat the test.
Reconnect the engine coolant temperature sensor.
|
|
||||
| OK | ||
|
||
| ||
| 18. CHECK WIRE HARNESS (MANIFOLD ABSOLUTE PRESSURE SENSOR - ECM) |
Disconnect the B45 manifold absolute pressure sensor connector.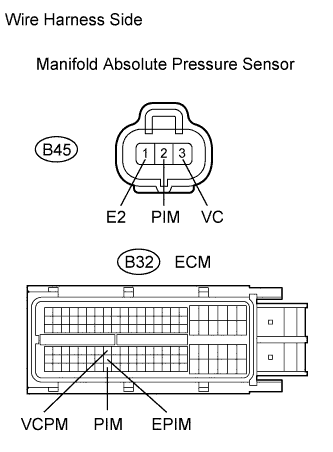
Disconnect the B32 ECM connector.
Measure the resistance of the wire harness side connectors.
- Standard resistance:
Tester Connection
Specified Condition
B45-2 (PIM) - B32-117 (PIM)
Below 1 Ω
B45-3 (VC) - B32-71 (VCPM)
Below 1 Ω
B45-1 (E) - B32-94 (EPIM)
Below 1 Ω
B45-2 (PIM) or B32-117 (PIM) - Body ground
10 kΩ or higher
B45-3 (VC) or B32-71 (VCPM) - Body ground
10 kΩ or higher
B45-1 (E) or B32-94 (EPIM) - Body ground
10 kΩ or higher
Reconnect the manifold absolute pressure sensor connector.
Reconnect the ECM connector.
|
|
||||
| OK | ||
|
||
| ||
| 19. INSPECT CRANKSHAFT POSITION SENSOR |
Disconnect the B42 crankshaft position sensor connector.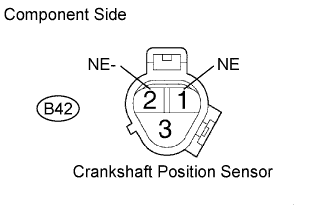
Measure the resistance of the sensor.
- Standard resistance:
Tester Connection
Condition
Specified Condition
B42-1 (NE) - B42-2 (NE-)
Cold
835 to 1,400 Ω
B42-1 (NE) - B42-2 (NE-)
Hot
1,060 to 1,645 Ω
- HINT:
- In the table above, the terms "Cold" and "Hot" refer to the temperature of the coils in the sensor. "Cold" means approximately -10 to 50°C (14 to 122°F). "Hot" means approximately 50 to 100°C (122 to 212°F).
Reconnect the crankshaft position sensor connector.
|
|
||||
| OK | ||
|
||
| ||
| 20. CHECK WIRE HARNESS (ACCELERATOR PEDAL POSITION SENSOR - ECM) |
Disconnect the A6 sensor connector.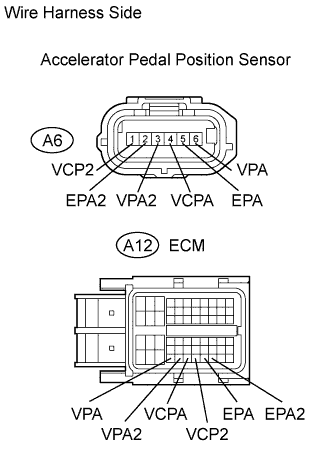
Disconnect the A12 ECM connector.
Measure the resistance of the wire harness side connectors.
- Standard resistance:
Tester Connection
Specified Condition
A6-1 (VCP2) - A12-56 (VCP2)
Below 1 Ω
A6-2 (EPA2) - A12-58 (EPA2)
Below 1 Ω
A6-3 (VPA2) - A12-54 (VPA2)
Below 1 Ω
A6-4 (VCPA) - A12-55 (VCPA)
Below 1 Ω
A6-5 (EPA) - A12-57 (EPA)
Below 1 Ω
A6-6 (VPA) - A12-53 (VPA)
Below 1 Ω
A6-1 (VCP2) or A12-56 (VCP2) - Body ground
10 kΩ or higher
A6-2 (EPA2) or A12-58 (EPA2) - Body ground
10 kΩ or higher
A6-3 (VPA2) or A12-54 (VPA2) - Body ground
10 kΩ or higher
A6-4 (VCPA) or A12-55 (VCPA) - Body ground
10 kΩ or higher
A6-5 (EPA) or A12-57 (EPA) - Body ground
10 kΩ or higher
A6-6 (VPA) or A12-53 (VPA) - Body ground
10 kΩ or higher
Reconnect the sensor connector.
Reconnect the ECM connector.
|
|
||||
| OK | ||
|
||
| ||
| 21. INSPECT INTAKE AIR TEMPERATURE SENSOR |
Remove the intake air temperature sensor.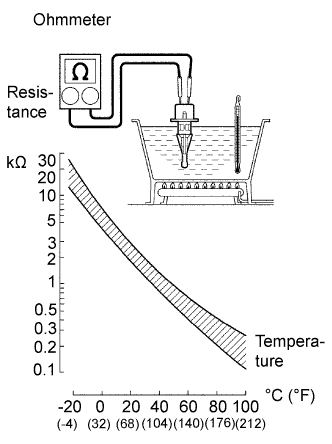
Measure the resistance of the sensor.
- Standard resistance:
Tester Connection
Condition
Specified Condition
1 - 2
20°C (68°F)
2.21 to 2.69 kΩ
- NOTICE:
- When checking the sensor in water, keep the terminals dry. After the check, wipe the sensor dry.
Reconnect the intake air temperature sensor.
|
|
||||
| OK | ||
|
||
| ||
| 22. INSPECT COMMON RAIL ASSEMBLY (FUEL PRESSURE SENSOR) |
Disconnect the B60 fuel pressure sensor connector.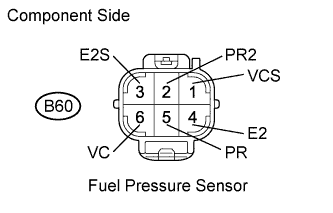
Measure the resistance of each terminal of the fuel pressure sensor.
- Standard resistance:
Tester Connection
Specified Condition
B60-5 (PR) - B60-4 (E2)
16.4 kΩ or less
B60-2 (PR2) - B60-3 (E2S)
16.4 kΩ or less
B60-5 (PR) - B60-6 (VC)
3 kΩ or less
B60-2 (PR2) - B60-1 (VC2)
3 kΩ or less
Reconnect the fuel pressure sensor connector.
|
|
||||
| OK | |
|
| 23. CHECK WIRE HARNESS (FUEL PRESSURE SENSOR - ECM) |
Disconnect the B60 fuel pressure sensor connector.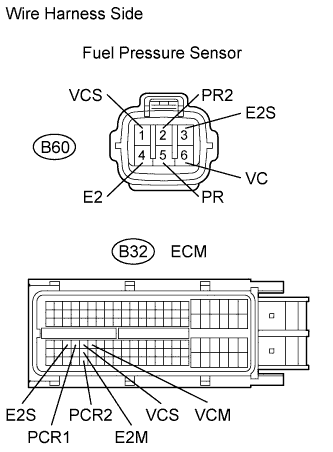
Disconnect the B32 ECM connector.
Measure the resistance of the wire harness side connectors.
- Standard resistance:
Tester Connection
Specified Condition
B60-5 (PR) - B32-67 (PCR1)
Below 1 Ω
B60-2 (PR2) - B32-114 (PCR2)
Below 1 Ω
B60-1 (VCS) - B32-68 (VCS)
Below 1 Ω
B60-6 (VC) - B32-69 (VCM)
Below 1 Ω
B60-4 (E2) - B32-91 (E2M)
Below 1 Ω
B60-3 (E2S) - B32-66 (E2S)
Below 1 Ω
B60-5 (PR) or B32-67 (PCR1) - Body ground
10 kΩ or higher
B60-2 (PR2) or B32-114 (PCR2) - Body ground
10 kΩ or higher
B60-1 (VCS) or B32-68 (VCS) - Body ground
10 kΩ or higher
B60-6 (VC) or B32-69 (VCM) - Body ground
10 kΩ or higher
B60-4 (E2) or B32-91 (E2M) - Body ground
10 kΩ or higher
B60-3 (E2S) or B32-66 (E2S) - Body ground
10 kΩ or higher
Reconnect the fuel pressure sensor connector.
Reconnect the ECM connector.
|
|
||||
| OK | |
|
| 24. REPLACE ECM |
Replace the ECM.
- NOTICE:
- After replacing the ECM, the new ECM needs registration (Click here) and initialization (Click here).
Check the volume of black smoke in the exhaust gas.
- OK:
- Black smoke is not present.
|
|
||||
| OK | ||
|
||
| ||