INSTALLATION
Removal / installation · Vehicles built from Nov 2005
- NOTICE:
- Do not heat the vehicle body, emblem and name plate excessively.
- HINT:
- When installing the emblem and name plate, heat the vehicle body, emblem and name plate using a heat light.
- Standard heating temperature:
Item
Specified Condition
Vehicle body
40 to 60°C (104 to 140°F)
Name plate
20 to 30°C (68 to 86°F)
| 1. INSTALL BACK DOOR NAME EMBLEM (w/o Tire Carrier) |

Clean the vehicle body surface.
Using a heat light, heat the vehicle body surface.
Remove the double-sided tape from the vehicle body.
Wipe off any tape adhesive residue with cleaner.
If reusing the emblem:
Clean the emblem.Using a heat light, heat the emblem.
Remove the double-sided tape from the emblem.
Wipe off any tape adhesive residue with cleaner.
Apply new double-sided tape to the emblem.
Install the emblem.
Using a heat light, heat the vehicle body and emblem.
Remove the peeling paper from the face of the emblem.
- HINT:
- After removing the peeling paper, keep the exposed adhesive free from foreign matter.
Install the emblem.
- NOTICE:
- Install the emblem exactly according to the specifications below.
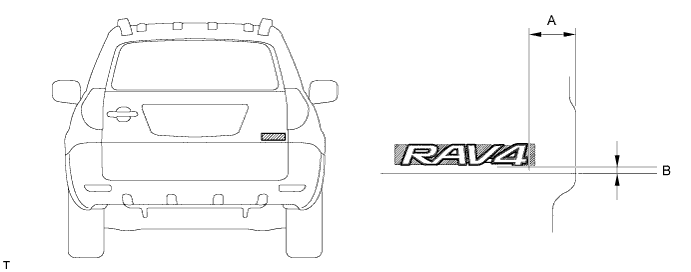

- Standard measurement:
Area
Specified Condition
A
66.6 mm (2.622 in.)
B
7.2 mm (0.283 in.)
| 2. INSTALL BACK DOOR NAME PLATE (w/o Tire Carrier) |
Clean the vehicle body surface.
Using a heat light, heat the vehicle body surface.
Remove the double-sided tape from the vehicle body.
Wipe off any tape adhesive residue with cleaner.
If reusing the name plate:
Clean the name plate.Using a heat light, heat the name plate.
Remove the double-sided tape from the name plate.
Wipe off any tape adhesive residue with cleaner.
Apply new double-sided tape to the name plate.
Install the name plate.
Using a heat light, heat the vehicle body and name plate.
Remove the peeling paper from the face of the name plate.
- HINT:
- After removing the peeling paper, keep the exposed adhesive free from foreign matter.
Install the name plate.
- NOTICE:
- Install the name plate exactly according to the specifications below.
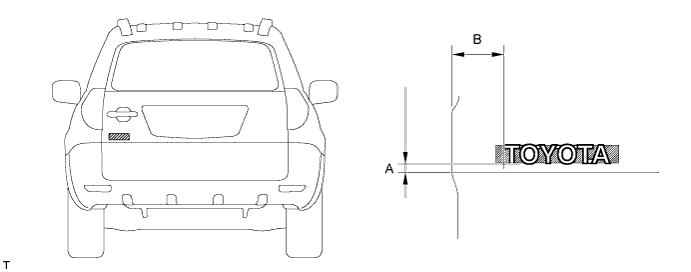
- Standard measurement:
Area
Specified Condition
A
12.6 mm (0.496 in.)
B
71.5 mm (2.814 in.)
| 3. INSTALL NO. 4 BACK DOOR NAME PLATE (for 4WD) |
Clean the vehicle body surface.
Using a heat light, heat the vehicle body surface.
Remove the double-sided tape from the vehicle body.
Wipe off any tape adhesive residue with cleaner.
If reusing the name plate:
Clean the name plate.Using a heat light, heat the name plate.
Remove the double-sided tape from the name plate.
Wipe off any tape adhesive residue with cleaner.
Apply new double-sided tape to the name plate.
Install the name plate.
Using a heat light, heat the vehicle body and name plate.
Remove the peeling paper from the face of the name plate.
- HINT:
- After removing the peeling paper, keep the exposed adhesive free from foreign matter.
Install the name plate.
- NOTICE:
- Install the name plate exactly according to the specifications below.
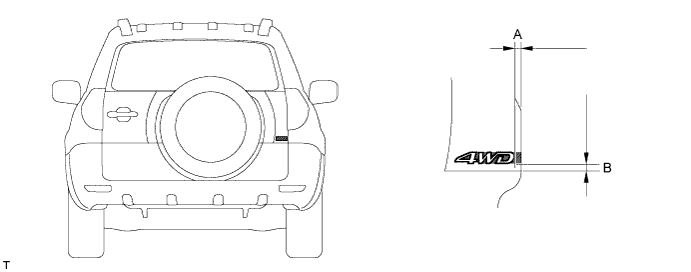
- Standard measurement:
Area
Specified Condition
A
8 mm (0.314 in.)
B
8.6 mm (0.338 in.)
| 4. INSTALL NO. 1 BACK DOOR EMBLEM |
| 5. INSTALL BACK DOOR NAME PLATE |
| 6. INSTALL NO. 1 BACK DOOR EMBLEM ASSEMBLY |
Clean the vehicle body surface.
Using a heat light, heat the vehicle body surface.
Remove the double-sided tape from the vehicle body.
Wipe off any tape adhesive residue with cleaner.
If reusing the name plate and emblem:
Clean the name plate and emblem.Using a heat light, heat the name plate and emblem.
Remove the double-sided tape from the name plate and emblem.
Wipe off any tape adhesive residue with cleaner.
Apply new double-sided tape to the name plate and emblem.
Install the name plate and emblem.
Using a heat light, heat the vehicle body and name plate and emblem.
Remove the peeling paper from the face of the name plate and emblem.
- HINT:
- After removing the peeling paper, keep the exposed adhesive free from foreign matter.
Install the name plate and emblem.
- NOTICE:
- Install the name plate and emblem exactly according to the specifications below.
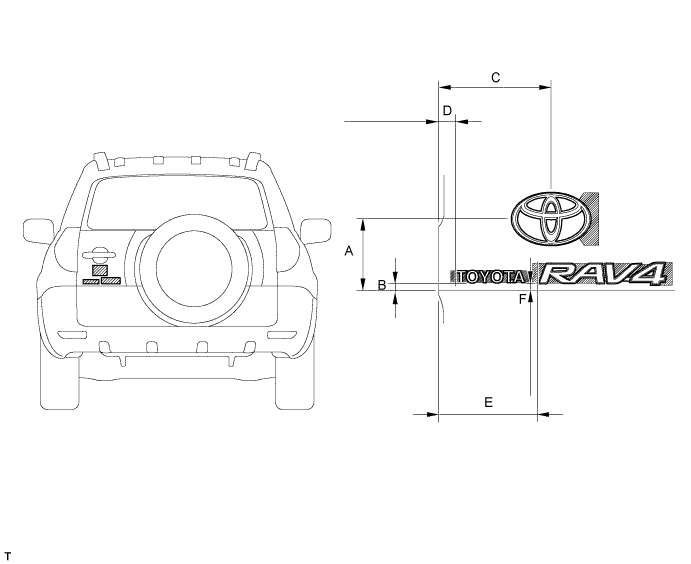
- Standard measurement:
Area
Specified Condition
A
92.8 mm (3.653 in.)
B
9.3 mm (0.366 in.)
C
157.5 mm (6.200 in.)
D
25.3 mm (0.996 in.)
E
138.0 mm (5.433 in.)
F
8.2 mm (0.322 in.)