ADJUSTMENT
Removal / installation · Vehicles built from Aug 2007
Versions by build date: Nov 2005 – Dec 2006 Jan 2007 – Jul 2007 from Aug 2007
| 1. CHECK PARKING BRAKE LEVER TRAVEL |

Pull the lever upward with a force of approximately 200 N (20 kgf, 44 lbf) and count the number of clicks.
- OK:
- 6 to 8 clicks (without rear brake dragging)
| 2. REMOVE UPPER REAR CONSOLE PANEL SUB-ASSEMBLY |
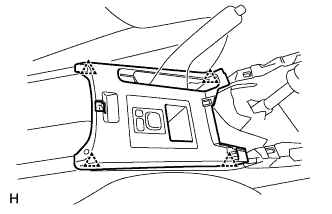  |
Using a screwdriver, detach the 4 clips.
- HINT:
- Tape the screwdriver tip before use.
Disconnect the connector and remove the upper rear console panel.
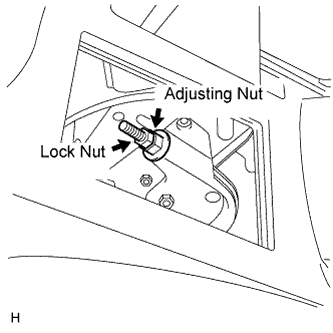
| 3. LOOSEN LOCK NUT AND NO. 1 WIRE ADJUSTING NUT |
 |
| 4. REMOVE REAR WHEEL |
| 5. ADJUST PARKING BRAKE SHOE CLEARANCE |
Temporarily install the hub nuts.
Remove the shoe adjusting hole plug, and then turn the adjuster to expand the shoe adjuster until the disc locks.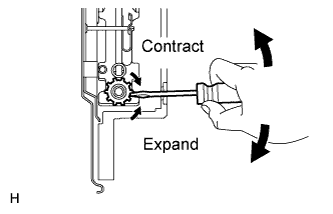
Turn the shoe adjuster so that it contracts to a point where the disc can rotate smoothly.
- Standard:
- 8 notches
Check that the shoe has no brake drag.
| 6. INSTALL REAR WHEEL |
- Torque:
- 103 N*m{ 1,050 kgf*cm , 76 ft.*lbf }
| 7. ADJUST PARKING BRAKE LEVER TRAVEL |
Turn the No. 1 wire adjusting nut until the lever travel is correct.
- OK:
- 6 to 8 clicks (without rear brake dragging)
<Lever pulling force: approximately 200 N (20 kgf, 44 lbf)>
Tighten the lock nut.
- Torque:
- 6.0 N*m{ 61 kgf*cm , 53 in.*lbf }
Operate the parking brake lever 3 to 4 times, and check the parking brake lever travel.
- OK:
- 6 to 8 clicks (without rear brake dragging)
<Lever pulling force: approximately 200 N (20 kgf, 44 lbf)>
When operating the parking brake lever, check that the brake warning light illuminates at the first click.
- Standard condition:
- Brake warning light always illuminates at the first click.