INSTALLATION
Removal / installation · Vehicles built from Aug 2007
Versions by build date: Nov 2005 – Dec 2006 Jan 2007 – Jul 2007 from Aug 2007
- HINT:
- Use the same procedures for the LH side and RH side.
- The procedures listed below are for the LH side.
- A bolt without a torque specification is shown in the standard bolt chart (Click here).
| 1.
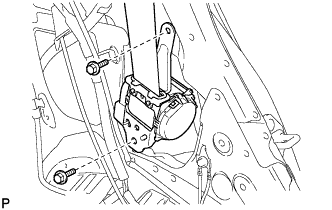
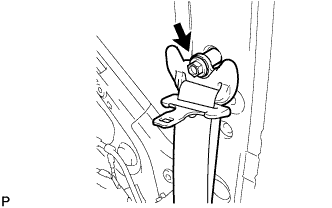
INSTALL REAR NO. 1 SEAT BELT ASSEMBLY OUTER LH |
 |
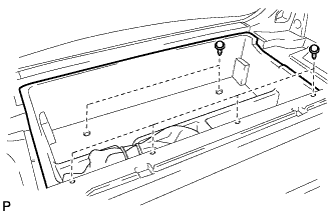
Align the claws with the seat belt positioning holes, and install the retractor of the seat belt with the 2 bolts as shown in the illustration.
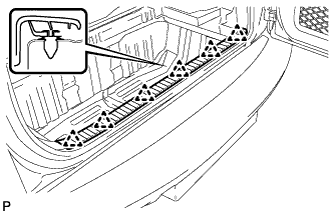
-
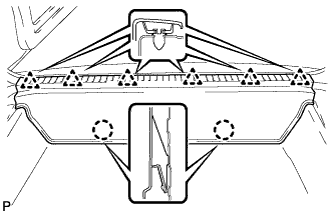
Torque:
- 8.5 N*m{
87 kgf*cm
, 75 in.*lbf
}
for upper bolt
- 42 N*m{
428 kgf*cm
, 31 ft.*lbf
}
for lower bolt
- Connect the shoulder anchor with the bolt.
-
Torque:
- 42 N*m{
428 kgf*cm
, 31 ft.*lbf
}
| 2.
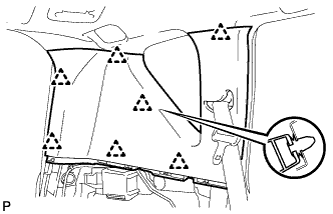
INSTALL INNER ROOF SIDE GARNISH ASSEMBLY LH (for Short Body)
|
|
- Attach the 7 clips to install the garnish.
| 3.
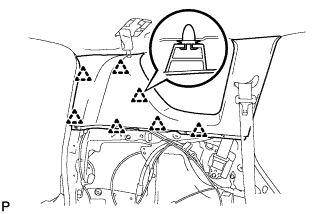
INSTALL INNER ROOF SIDE GARNISH ASSEMBLY LH (for Long Body)
|
|
- Attach the 7 clips to install the garnish.
| 4.
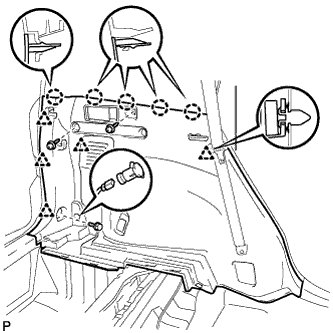
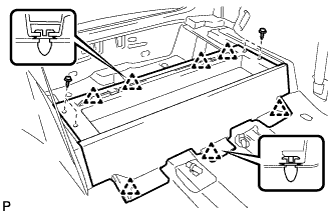
INSTALL DECK TRIM SIDE PANEL ASSEMBLY LH (for Short Body)
|
|
Install the belt hanger to the trim board.
Connect the power outlet socket connector.
Attach the 5 clips and 5 claws to install the trim board.
Install the bolt and 2 screws.
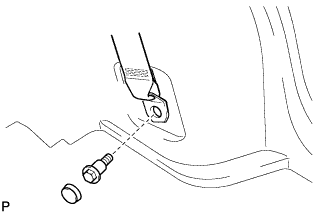
- Connect the rear No.1 seat belt's floor anchor.
Connect the floor anchor with the bolt.
-
Torque:
- 42 N*m{
428 kgf*cm
, 31 ft.*lbf
}
Install the anchor cover.
| 5.
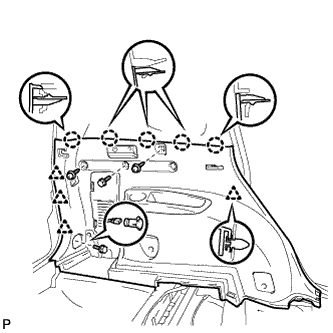
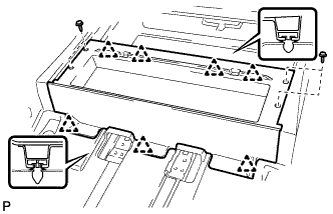
INSTALL DECK TRIM SIDE PANEL ASSEMBLY LH (for Long Body)
|
|
- Install the belt hanger to the trim board.
Connect the power outlet socket connector.
Attach the 4 clips and 5 claws to install the trim board.
Install the 2 screws and 2 bolts.
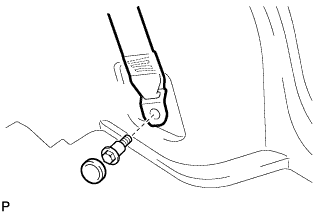
- Connect the rear No.1 seat belt's floor anchor.
Connect the floor anchor with the bolt.
-
Torque:
- 42 N*m{
428 kgf*cm
, 31 ft.*lbf
}
Install the anchor cover.
| 6.
CONNECT REAR NO. 1 SEAT BELT ASSEMBLY OUTER LH |
|
Connect the seat belt's floor anchor with the bolt.
-
Torque:
- 42 N*m{
428 kgf*cm
, 31 ft.*lbf
}
Attach the lap belt outer anchor cover.
| 7.
INSTALL CHILD RESTRAINT SEAT TETHER ANCHOR BRACKET (for Short Body) |
|
| 8.
INSTALL CHILD RESTRAINT SEAT TETHER ANCHOR COVER (for Short Body) |
|
| 9.
INSTALL REAR DOOR OPENING TRIM WEATHERSTRIP RH |
|
| 10.
INSTALL RECLINING REMOTE CONTROL LEVER BEZEL LH |
|
| 11.
INSTALL REAR FLOOR FINISH PLATE (for Short Body)
|
|
- Attach the 6 clips to install the finish plate.
| 12.
INSTALL REAR FLOOR FINISH PLATE (for Long Body)
|
|
- Attach the 2 claws and 6 clips to install the finish plate.
| 13.
INSTALL BACK DOOR WEATHERSTRIP |
|
| 14.
INSTALL REAR NO. 1 FLOOR MAT SUPPORT SIDE PLATE (for Short Body)
|
|
Attach the 7 clips to install the side plate.
Install the 4 screws.
| 15.
INSTALL REAR NO. 1 FLOOR MAT SUPPORT SIDE PLATE (for Long Body)
|
|
Attach the 7 clips to install the side plate.
Install the 4 screws.
| 16.
INSTALL JACK CARRIER ASSEMBLY (for Short Body)
|
|
- Install the jack carrier with the 7 clips.
| 17.
INSTALL REAR FLOOR NO. 3 BOARD |
|
| 18.
INSTALL REAR FLOOR NO. 2 BOARD |
|
| 19.
INSTALL DECK BOARD ASSEMBLY |
|
| 20.
INSTALL REAR FLOOR NO. 1 BOARD |
|
| 21.
INSTALL TONNEAU COVER ASSEMBLY |
|
| 22.
INSTALL PACKAGE TRAY TRIM POCKET SUB-ASSEMBLY |
|
| 23.
INSTALL REAR DOOR OPENING TRIM WEATHERSTRIP LH |
|
| 24.
INSTALL REAR DOOR SCUFF PLATE LH (for Short Body)
|
|
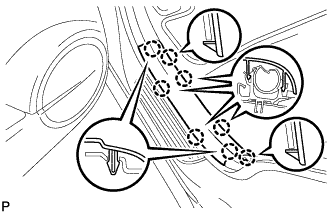
- Attach the 8 claws to install the scuff plate.
| 25.
INSTALL REAR DOOR SCUFF PLATE LH (for Long Body)
|
|
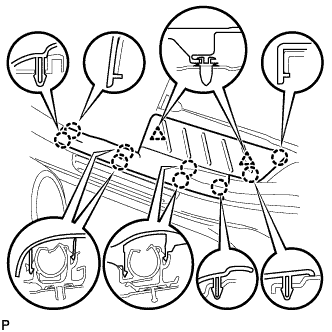
- Attach the 9 claws and 2 clips to install the scuff plate.
| 26.
CONNECT CABLE TO NEGATIVE BATTERY TERMINAL |
|