REMOVAL
Removal / installation · Vehicles built Nov 2005 – Jul 2007
| 1. DRAIN BRAKE FLUID |

- NOTICE:
- Wash off brake fluid immediately if it comes in contact with any painted surface.
| 2. REMOVE BRAKE MASTER CYLINDER SUB-ASSEMBLY |
  |
Release the vacuum pressure in the brake booster as follows.
Stop the engine.
Depress the brake pedal several times.
for Manual Transaxle:
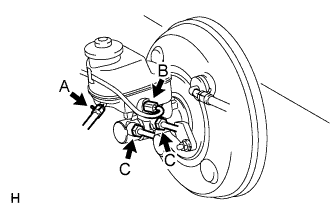
Disconnect the clutch reservoir tube labeled A from the master cylinder.
Disconnect the brake fluid level warning switch connector labeled B.
Using SST, disconnect the 2 brake lines labeled C from the master cylinder.
- SST
- 09023-00101
Remove the 2 nuts.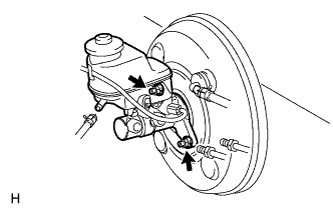
Pull out the master cylinder from the brake booster.
- NOTICE:
- The master cylinder and piston are designed so that the piston can easily fall out. Prevent this by making sure to tip of the master cylinder points downward when handling the master cylinder.
- Make sure foreign matter does not attach to the master cylinder's piston. If foreign matter attaches, clean it off with a cloth. Then apply lithium soap base glycol grease to the entire outer circumference contact surface area of the piston.
- The master cylinder and piston are designed so that the piston can easily fall out. Prevent this by making sure to tip of the master cylinder points downward when handling the master cylinder.
Remove the O-ring from the master cylinder.
| 3. DISCONNECT VACUUM HOSE |
| 4. REMOVE PUSH ROD PIN |
Remove the clip from the push rod pin.
Remove the push rod pin from the push rod clevis.
| 5. REMOVE BRAKE MASTER CYLINDER PUSH ROD CLEVIS |
Loosen the push rod clevis lock nut.
Remove the push rod clevis.
| 6. REMOVE BRAKE BOOSTER ASSEMBLY |
Remove the 4 nuts.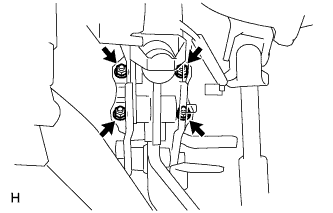
Pull out the booster with gasket.
| 7. REMOVE BRAKE BOOSTER GASKET |
| 8. REMOVE BRAKE VACUUM CHECK VALVE ASSEMBLY |
| 9. REMOVE CHECK VALVE GROMMET |