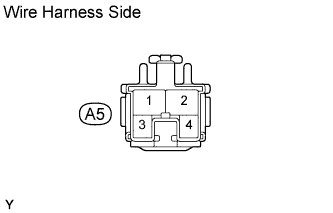
Stop Light Switch Circuit
Circuit diagnosis · Vehicles built Nov 2005 – Jul 2008
Versions by build date: Nov 2005 – Jul 2008 from Aug 2008
DESCRIPTION
When the stop light switch is turned on, current flows to the stop lights to illuminate them.WIRING DIAGRAM
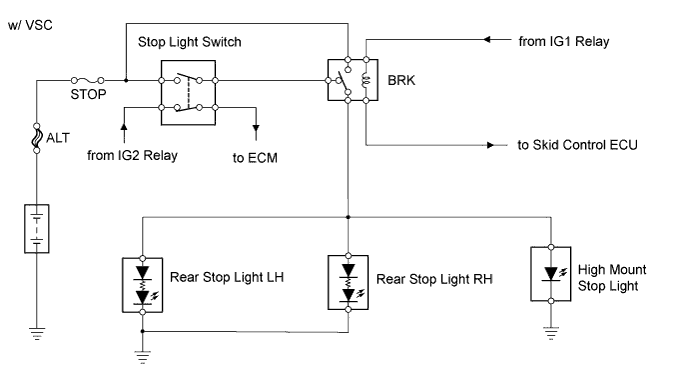

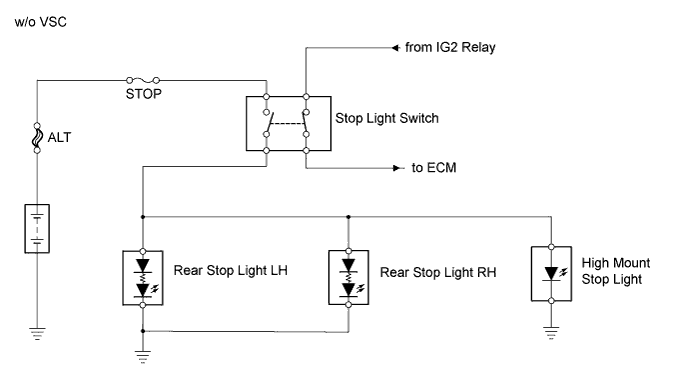
INSPECTION PROCEDURE
| 1. INSPECT FUSE (STOP) |
 |
Remove the STOP fuse from the instrument panel junction block.
Measure the resistance of the fuse.
- Standard resistance:
- Below 1 Ω
|
NG |
 |
|
|
|
| OK |
|
 |
|
| 2. INSPECT STOP LIGHT (REAR COMBINATION LIGHT) |
|
Remove the rear combination light.
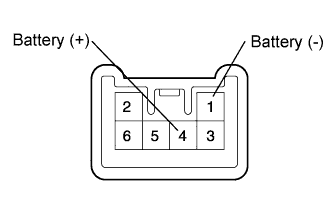
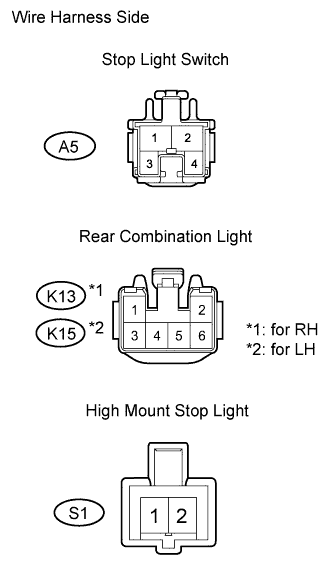
Connect the positive (+) lead from the battery to terminal 4 and the negative (-) lead to terminal 1, then check that the light comes on.
- OK:
- Light comes on.
|
NG |
|
|
| REPLACE REAR COMBINATION LIGHT ASSEMBLY |
|
|
| OK |
|
|
|
| 3. INSPECT STOP LIGHT (HIGH MOUNT STOP LIGHT) |
|
Remove the high mount stop light.
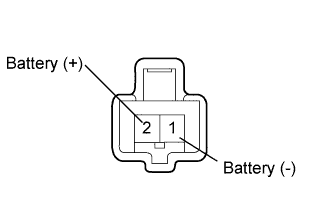
Connect the positive (+) lead from the battery to terminal 2 and the negative (-) lead to terminal 1, then check that the light comes on.
- OK:
- Light comes on
Result
Result
|
Proceed to
|
OK: w/ VSC
|
A
|
OK: w/o VSC
|
B
|
NG
|
C
|
|
B |
 |
|
|
|
|
C |
|
|
| REPLACE HIGH MOUNT STOP LIGHT ASSEMBLY |
|
|
| A |
|
|
|
| 4. INSPECT BRK RELAY |
|
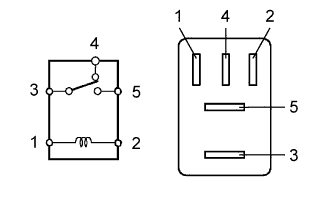
Remove the BRK relay from the engine room No. 1 relay block.
Measure the resistance of the relay.
- Standard resistance:
Tester Connection
|
Specified Condition
|
3 - 4
|
Below 1 Ω
|
3 - 4
|
10 kΩ or higher
(Battery voltage applied to terminals 1 and 2)
|
3 - 5
|
10 kΩ or higher
|
3 - 5
|
Below 1 Ω
(Battery voltage applied to terminals 1 and 2)
|
|
NG |
|
|
|
|
| OK |
|
|
|
| 5. INSPECT STOP LIGHT SWITCH |
|
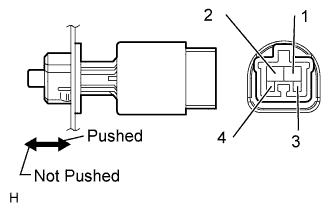
- Remove the stop light switch.
Measure the resistance of the switch.
- Standard resistance:
Tester Connection
|
Condition
|
Specified Condition
|
1 - 2
|
Switch pin not pushed
|
Below 1 Ω
|
3 - 4
|
Switch pin pushed
|
10 kΩ or higher
|
1 - 2
|
Switch pin pushed
|
10 kΩ or higher
|
3 - 4
|
Switch pin not pushed
|
Below 1 Ω
|
|
NG |
|
|
| REPLACE STOP LIGHT SWITCH |
|
|
| OK |
|
|
|
| 6. CHECK WIRE HARNESS (STOP LIGHT SWITCH - BATTERY) |
|
- Disconnect the A5 stop light switch connector.
Measure the voltage of the wire harness side connector.
- Standard voltage:
Tester Connection
|
Specified Condition
|
A5-2 - Body ground
|
10 to 14 V
|
|
NG |
|
|
| REPAIR OR REPLACE HARNESS AND CONNECTOR |
|
|
| OK |
|
|
|
| 7. CHECK WIRE HARNESS (STOP LIGHT SWITCH - REAR STOP LIGHT) |
|
Disconnect the A5 stop light switch connector.
Disconnect the K13 and K15 rear combination light connectors.
Disconnect the S1 high mount stop light connector.
Measure the resistance of the wire harness side connectors.
- Standard resistance:
Tester Connection
|
Specified Condition
|
A5-1 - K13-4
|
Below 1 Ω
|
A5-1 or K13-4 - Body ground
|
10 kΩ or higher
|
A5-1 - K15-4
|
Below 1 Ω
|
A5-1 or K15-4 - Body ground
|
10 kΩ or higher
|
A5-1 - S1-2
|
Below 1 Ω
|
A5-1 or S1-2 - Body ground
|
10 kΩ or higher
|
|
NG |
|
|
| REPAIR OR REPLACE HARNESS AND CONNECTOR |
|
|
| OK |
|
 |
|
| REPAIR OR REPLACE HARNESS AND CONNECTOR (REAR STOP LIGHT - BODY GROUND) |
|