REPLACEMENT
Removal / installation · Vehicles built from Nov 2005
- CAUTION:
- Prolonged and repeated contact with mineral oil will result in the loss of the skin's natural oils, leading to dryness, irritation and dermatitis. In addition, used engine oil contains potentially harmful contaminants which may cause skin cancer.
- Wear protective clothing and gloves. Avoid contact with used oil. If contact occurs, wash the area thoroughly with soap and waterless hand cleaner. Never use gasoline, thinners, or solvents to wash the skin.
- In order to protect the environment, dispose of used oil and used oil filters at designated disposal sites only.
- Prolonged and repeated contact with mineral oil will result in the loss of the skin's natural oils, leading to dryness, irritation and dermatitis. In addition, used engine oil contains potentially harmful contaminants which may cause skin cancer.
| 1. DRAIN ENGINE OIL |

Remove the oil filler cap.
Remove the clip and open the oil pan drain service cover.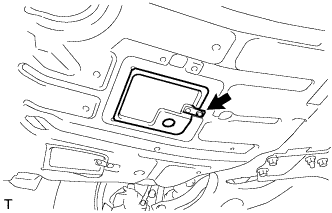

Remove the oil drain plug and gasket, and drain the engine oil into a container.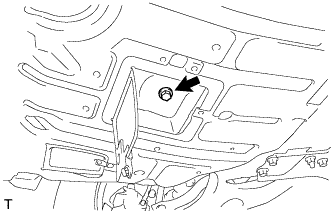
| 2. REMOVE OIL FILTER CAP ASSEMBLY |
Remove the clip and open the oil filter element service cover.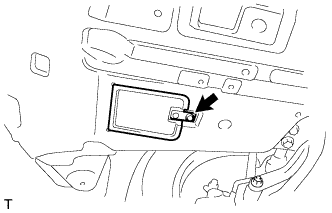
Remove the oil filter drain plug and O-ring, and then insert the drain pipe into the oil filter cap and drain the engine oil into a container.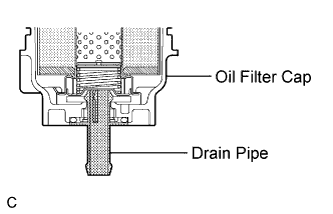
- HINT:
- The drain pipe is supplied with the oil filter element.
Using SST, remove the oil filter cap together with the oil filter element.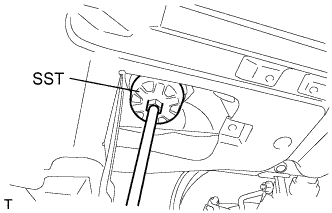
- SST
- 09228-06501
| 3. REMOVE OIL FILTER ELEMENT |
Remove the oil filter element and 2 O-rings from the oil filter cap.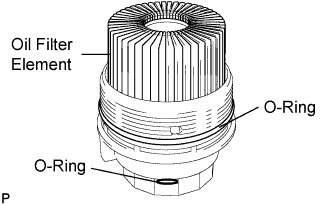
- NOTICE:
- Be sure to remove the O-ring (for the cap) by hand, without using any tools, to prevent damage to the groove for the O-ring on the cap.
| 4. INSTALL OIL FILTER ELEMENT |
Clean the oil filter cap threads and O-ring groove.
Apply a small amount of engine oil to a new O-ring and install it to the oil filter cap.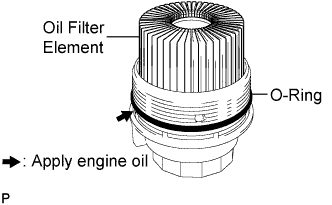
Set a new oil filter element in the oil filter cap.
| 5. INSTALL OIL FILTER CAP ASSEMBLY |
Remove any dirt or foreign matter from the installation surface and inside of the engine.
Apply a small amount of engine oil to the O-ring again and install the oil filter cap.
- NOTICE:
- Be careful that the O-ring does not get caught between the parts.
Using SST, tighten the oil filter cap.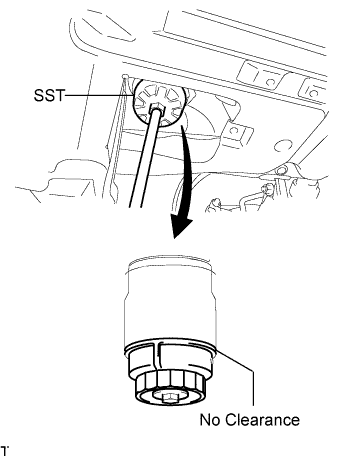
- SST
- 09228-06501
- Torque:
- 40 N*m{ 408 kgf*cm , 30 ft.*lbf }
- NOTICE:
- Make sure that the oil filter is installed securely as shown in the illustration.
- Be careful that the O-ring does not get caught between the parts.
- Make sure that the oil filter is installed securely as shown in the illustration.
Apply a small amount of engine oil to a new drain plug O-ring, and install it to the oil filter cap.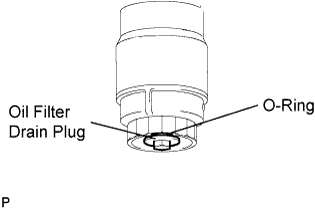
- NOTICE:
- Before installing the O-ring, remove any dirt or foreign matter from the installation surface of the oil filter cap.
Install the oil filter drain plug to the filter cap.
- Torque:
- 12.5 N*m{ 127.5 kgf*cm , 9.2 ft.*lbf }
- NOTICE:
- Be careful that the O-ring does not get caught between the parts.
Close the oil filter element service cover and install the clip.
| 6. ADD ENGINE OIL |
Wipe the oil pan and drain plug before installing the plug.
Install a new gasket and the oil pan drain plug.
- Torque:
- 38 N*m{ 387 kgf*cm , 28 ft.*lbf }
Close the oil pan drain service cover and install the clip.
Add new oil.
- Standard oil capacity:
Item
Specified Condition
Drain and refill with oil filter change
5.9 liters ( 6.2 US qts, 5.2 Imp. qts)
Drain and refill without oil filter change
5.5 liters ( 5.8 US qts, 4.8 Imp. qts)
Dry fill
6.7 liters ( 7.1 US qts, 5.9 Imp. qts)
Install the oil filler cap.
| 7. CHECK FOR ENGINE OIL LEAKS |
Start the engine. Make sure that no oil leaks from the connection point of the oil filter cap assembly.
| 8. PERFORM OIL CHANGE REMINDER LIGHT RESET PROCEDURE |
- NOTICE:
- To prevent the oil change reminder light from coming on after changing the engine oil, perform the oil change reminder light reset procedure (Click here).