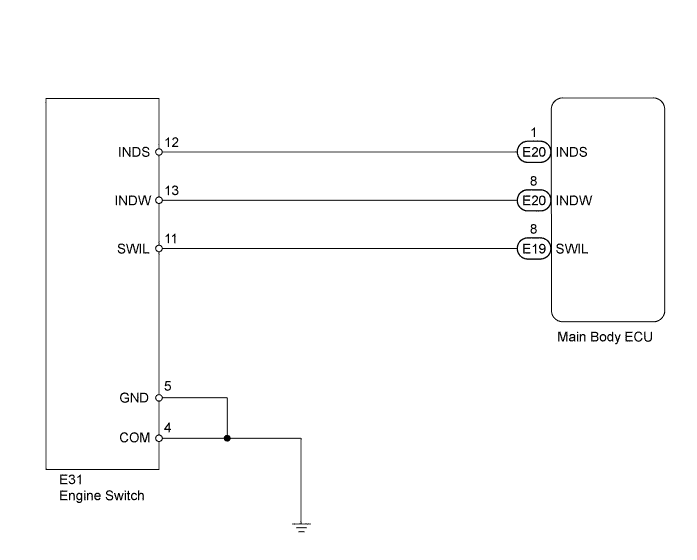
ENTRY AND START SYSTEM > Engine Switch Indicator Circuit |
| Power Source Mode/Condition | Indicator Light Condition | |
| Clutch pedal released | Clutch pedal depressed | |
| Off | OFF | Illuminates (green) |
| On (ACC, IG) | Illuminates (amber) | Illuminates (green) |
| Engine running | OFF | OFF |
| Steering lock locked | Flashes (green) for 30 seconds | Flashes (green) for 30 seconds |
| System malfunction | Flashes (amber) for 15 seconds | Flashes (amber) for 15 seconds |
| Clutch start switch malfunction | Flashes (green) for 15 seconds | Flashes (green) for 15 seconds |
| 1.INSPECT ENGINE SWITCH |
 |
Remove the engine switch (Click here).
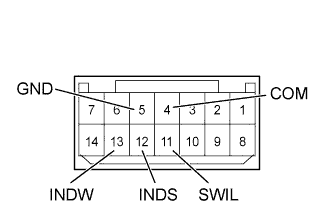
Apply battery voltage to the switch and check the illumination condition of the engine switch indicator light.
| Measurement Condition | Condition | Specified Condition |
| Battery terminal (+) → Terminal 11 (SWIL) Battery terminal (-) → Terminal 4 (COM) or 5 (GND) | Battery voltage is applied to the terminals | Illuminates (Illumination of lettering) |
| Battery terminal (+) → Terminal 12 (INDS) Battery terminal (-) → Terminal 4 (COM) or 5 (GND) | Battery voltage is applied to the terminals | Illuminates (green) |
| Battery terminal (+) → Terminal 13 (INDW) Battery terminal (-) → Terminal 4 (COM) or 5 (GND) | Battery voltage is applied to the terminals | Illuminates (amber) |
|
| ||||
| OK | |
 |
| 2.CHECK HARNESS AND CONNECTOR (ENGINE SWITCH - MAIN BODY ECU AND BODY GROUND) |
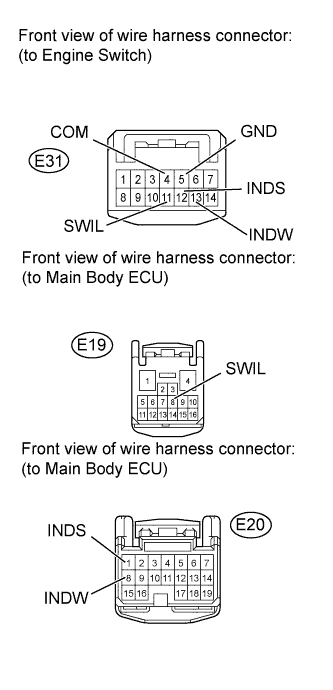 |
Disconnect the E31 engine switch connector.
Disconnect the E19 and E20 main body ECU connectors.
Measure the resistance according to the value(s) in the table below.
| Tester Connection | Condition | Specified Condition |
| E31-11 (SWIL) - E19-8 (SWIL) | Always | Below 1 Ω |
| E31-12 (INDS) - E20-1 (INDS) | Always | Below 1 Ω |
| E31-13 (INDW) - E20-8 (INDW) | Always | Below 1 Ω |
| E31-5 (GND) - Body ground | Always | Below 1 Ω |
| E31-4 (COM) - Body ground | Always | Below 1 Ω |
| E31-11 (SWIL) or E19-8 (SWIL) - Body ground | Always | 10 kΩ or higher |
| E31-12 (INDS) or E20-1 (INDS) - Body ground | Always | 10 kΩ or higher |
| E31-13 (INDW) or E20-8 (INDW) - Body ground | Always | 10 kΩ or higher |
|
| ||||
| OK | ||
 | ||
| ||
