NAME PLATE > INSTALLATION |
| Item | Specified Condition |
| Vehicle body | 40 to 60°C (104 to 140°F) |
| Back door outside garnish | 20 to 30°C (68 to 86°F) |
| Emblem | 20 to 30°C (68 to 86°F) |
| Name plate | 20 to 30°C (68 to 86°F) |
| 1. INSTALL NO. 1 BACK DOOR EMBLEM ASSEMBLY (w/ Tire Carrier) |
Clean the vehicle body surface.
Using a heat light, heat the vehicle body surface.
Remove the double-sided tape from the vehicle body.
Wipe off any tape adhesive residue with cleaner.
Install a new emblem.
Using a heat light, heat the vehicle body and a new emblem.
Remove the peeling paper from the face of the emblem.
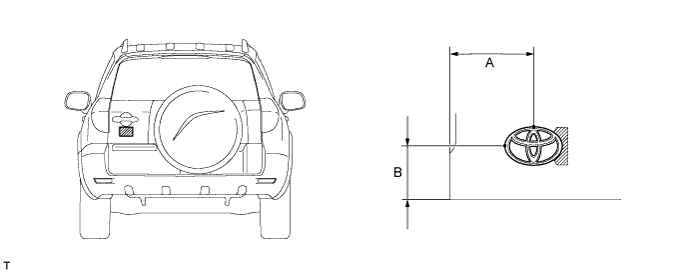
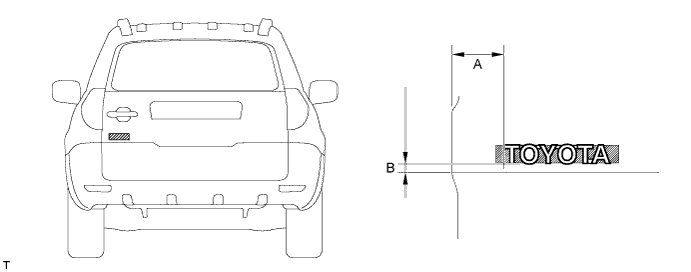
Install the emblem in the position shown in the illustration.

| Area | Specified Condition |
| A | 157.5 mm (6.20 in.) |
| B | 92.8 mm (3.65 in.) |
| 2. INSTALL BACK DOOR NAME PLATE (w/ Tire Carrier) |
Clean the vehicle body surface.
Using a heat light, heat the vehicle body surface.
Remove the double-sided tape from the vehicle body.
Wipe off any tape adhesive residue with cleaner.
Install a new name plate.
Using a heat light, heat the vehicle body and a new name plate.
Remove the peeling paper from the face of the name plate.
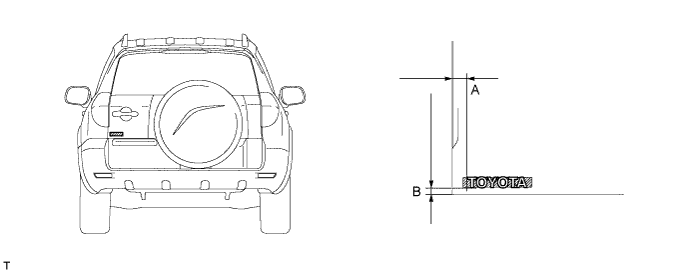
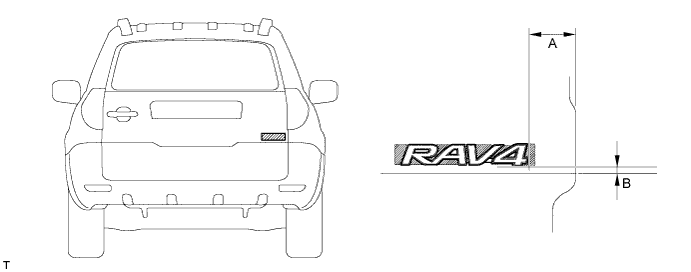
Install the name plate in the position shown in the illustration.

| Area | Specified Condition |
| A | 25.3 mm (0.996 in.) |
| B | 9.3 mm (0.366 in.) |
| 3. INSTALL NO. 1 BACK DOOR EMBLEM (w/ Tire Carrier) |
Clean the vehicle body surface.
Using a heat light, heat the vehicle body surface.
Remove the double-sided tape from the vehicle body.
Wipe off any tape adhesive residue with cleaner.
Install a new emblem.
Using a heat light, heat the vehicle body and a new emblem.
Remove the peeling paper from the face of the emblem.
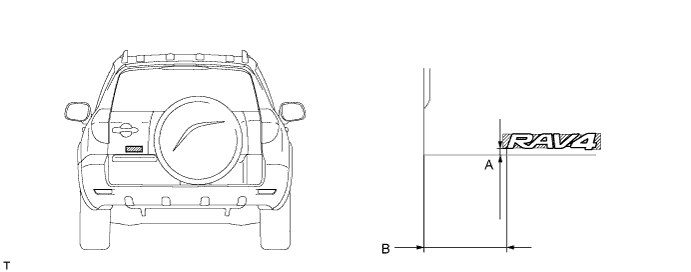
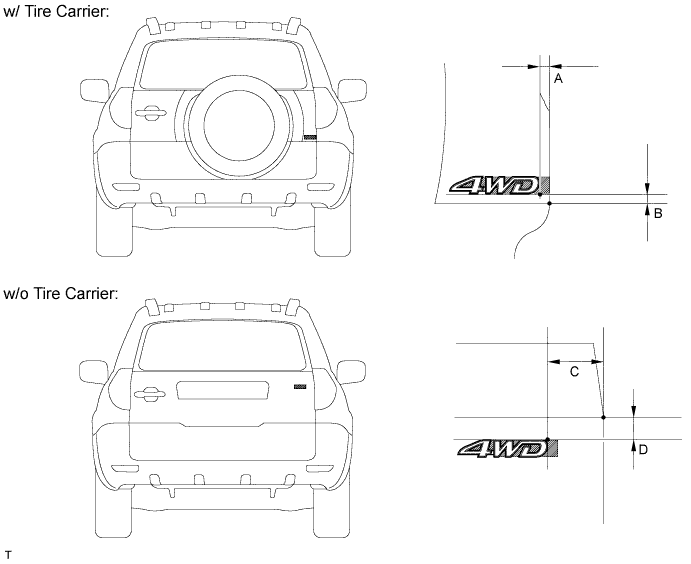
Install the emblem in the position shown in the illustration.

| Area | Specified Condition |
| A | 8.2 mm (0.328 in.) |
| B | 138.0 mm (5.43 in.) |
| 4. INSTALL NO. 1 BACK DOOR NAME PLATE (w/o Tire Carrier) |
Clean the back door outside garnish surface.
Using a heat light, heat the back door outside garnish surface.
Remove the double-sided tape from the back door outside garnish.
Wipe off any tape adhesive residue with cleaner.
Install a new name plate.
Using a heat light, heat the back door outside garnish and a new name plate.
Remove the peeling paper from the face of the name plate.
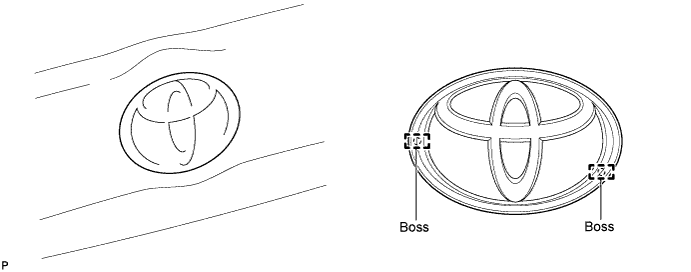
Align the boss positions and install the name plate.

| 5. INSTALL NO. 3 BACK DOOR NAME PLATE (w/o Tire Carrier) |
Clean the vehicle body surface.
Using a heat light, heat the vehicle body surface.
Remove the double-sided tape from the vehicle body.
Wipe off any tape adhesive residue with cleaner.
Install a new name plate.
Using a heat light, heat the vehicle body and a new name plate.
Remove the peeling paper from the face of the name plate.
Install the name plate in the position shown in the illustration.

| Area | Specified Condition |
| A | 71.5 mm (2.81 in.) |
| B | 12.6 mm (0.496 in.) |
| 6. INSTALL NO. 2 BACK DOOR EMBLEM (w/o Tire Carrier) |
Clean the vehicle body surface.
Using a heat light, heat the vehicle body surface.
Remove the double-sided tape from the vehicle body.
Wipe off any tape adhesive residue with cleaner.
Install a new emblem.
Using a heat light, heat the vehicle body and a new emblem.
Remove the peeling paper from the face of the emblem.
Install the emblem in the position shown in the illustration.

| Area | Specified Condition |
| A | 66.6 mm (2.62 in.) |
| B | 7.2 mm (0.283 in.) |
| 7. INSTALL NO. 4 BACK DOOR NAME PLATE (for 4WD) |
Clean the vehicle body surface.
Using a heat light, heat the vehicle body surface.
Remove the double-sided tape from the vehicle body.
Wipe off any tape adhesive residue with cleaner.
Install a new name plate.
Using a heat light, heat the vehicle body and a new name plate.
Remove the peeling paper from the face of the name plate.
Install the name plate in the position shown in the illustration.

| Area | Specified Condition |
| A | 8 mm (0.315 in.) |
| B | 8.6 mm (0.339 in.) |
| C | 66.6 mm (2.62 in.) |
| D | 37.2 mm (1.46 in.) |
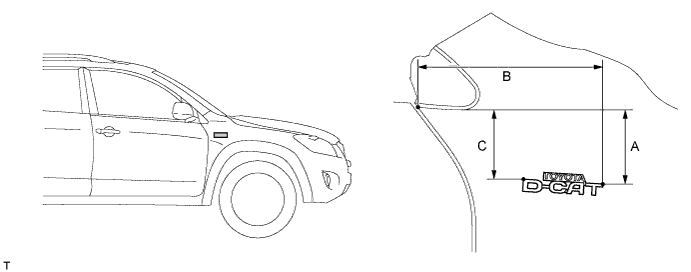
| 8. INSTALL FRONT FENDER NO. 1 NAME PLATE |
Clean the vehicle body surface.
Using a heat light, heat the vehicle body surface.
Remove the double-sided tape from the vehicle body.
Wipe off any tape adhesive residue with cleaner.
Install a new name plate.
Using a heat light, heat the vehicle body and a new name plate.
Remove the peeling paper from the face of the name plate.
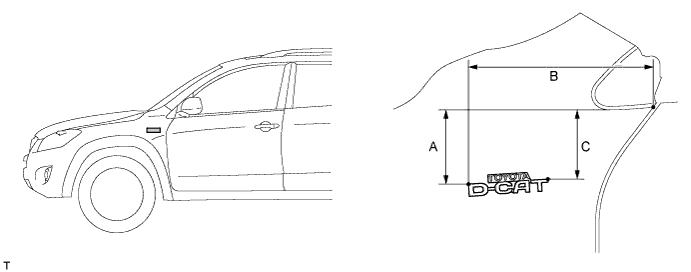
Install the name plate in the position shown in the illustration.

| Area | Specified Condition |
| A | 123.4 mm (4.86 in.) |
| B | 235.5 mm (9.27 in.) |
| C | 109.9 mm (4.33 in.) |
| 9. INSTALL FRONT FENDER NO. 2 NAME PLATE |
Clean the vehicle body surface.
Using a heat light, heat the vehicle body surface.
Remove the double-sided tape from the vehicle body.
Wipe off any tape adhesive residue with cleaner.
Install a new name plate.
Using a heat light, heat the vehicle body and a new name plate.
Remove the peeling paper from the face of the name plate.
Install the name plate in the position shown in the illustration.

| Area | Specified Condition |
| A | 124.1 mm (4.89 in.) |
| B | 235.4 mm (9.27 in.) |
| C | 109.2 mm (4.30 in.) |