Home › ENGINE ยท 2AD-FHV › FUEL › COMMON RAIL

COMMON RAIL > INSTALLATION

for Preparation Click here


NOTICE:
  1. When replacing the injectors (including shuffling the injectors between the cylinders), common rail, intake manifold or cylinder head, it is necessary to replace the injection pipes with new ones.
  2. When replacing the fuel supply pump, common rail, intake manifold or cylinder head, it is necessary to replace the fuel inlet pipe with a new one.


1. INSTALL COMMON RAIL ASSEMBLY


    A203059
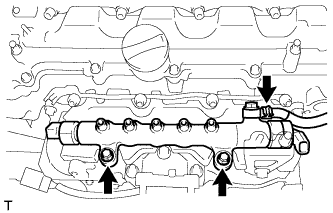
  1. Install the common rail with the 2 bolts.

    Torque:
    21 N*m{ 209 kgf*cm , 15 ft.*lbf }

  1. Using pliers, grip the claws of the clip and slide the clip to connect the fuel hose.


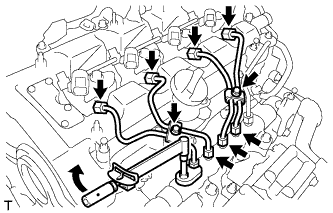
2. INSTALL INJECTION PIPE SUB-ASSEMBLY


    A203045
  1. Using a 14 mm union nut wrench, tighten the 4 nuts at the common rail end of the injection pipes.

    Torque:
    30 N*m{ 306 kgf*cm , 22 ft.*lbf }

    NOTICE:
    Use the formula to calculate special torque values for situations where a union nut wrench is combined with a torque wrench (Click here).

  1. Using a 14 mm union nut wrench, tighten the 4 nuts at the injector end of the injection pipes.

    Torque:
    30 N*m{ 306 kgf*cm , 22 ft.*lbf }

    NOTICE:
    Use the formula to calculate special torque values for situations where a union nut wrench is combined with a torque wrench (Click here).

  1. Install the 4 injection pipe clamps with the 2 bolts.

    Torque:
    5.0 N*m{ 51 kgf*cm , 44 in.*lbf }


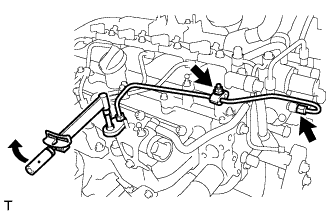
3. INSTALL FUEL INLET PIPE SUB-ASSEMBLY


    A203057
  1. Temporarily install the fuel inlet pipe with the 2 clamps and nut.

  1. Using a 14 mm union nut wrench, first tighten the nut at the common rail end of the fuel inlet pipe.

    Torque:
    30 N*m{ 306 kgf*cm , 22 ft.*lbf }

    NOTICE:
    Use the formula to calculate special torque values for situations where a union nut wrench is combined with a torque wrench (Click here).

  1. Using a 14 mm union nut wrench, tighten the nut at the supply pump end of the fuel inlet pipe.

    Torque:
    30 N*m{ 306 kgf*cm , 22 ft.*lbf }

    NOTICE:
    Use the formula to calculate special torque values for situations where a union nut wrench is combined with a torque wrench (Click here).

  1. Tighten the No. 2 injection pipe clamp nut.

    Torque:
    5.0 N*m{ 51 kgf*cm , 44 in.*lbf }


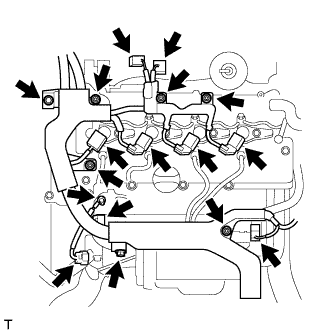
4. CONNECT ENGINE WIRE


A207973
  1. Connect the engine wire to the engine cover bracket with the bolt and 5 nuts.

    Torque:
    7.5 N*m{ 76 kgf*cm , 66 in.*lbf }

  1. Connect the engine wire to the wire bracket with the bolt.

    Torque:
    19 N*m{ 194 kgf*cm , 14 ft.*lbf }

  1. Connect the pressure discharge valve connector.

  1. Connect the emission control valve wire connector.

  1. Connect the fuel pressure sensor connector.

  1. Connect the glow plug wire harness with the nut and grommet.

    Torque:
    4.0 N*m{ 41 kgf*cm , 35 in.*lbf }

  1. Connect the 4 injector connectors.

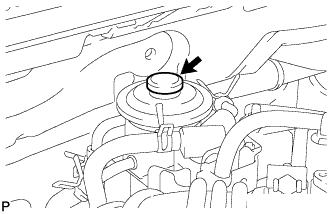
  1. Connect the vacuum switching valve connector.

  1. Connect the vacuum regulating valve connector.


5. CONNECT CABLE TO NEGATIVE BATTERY TERMINAL


6. BLEED AIR FROM FUEL SYSTEM


    A131613
  1. Using the hand pump mounted on the fuel filter cap, bleed the air from the fuel system. Continue pumping until the pump resistance increases.

    NOTICE:
    1. Hand pump pumping speed: Max. 2 strokes/ sec.
    2. The hand pump must be pushed with a full stroke during pumping.
    3. When the fuel pressure at the supply pump inlet port reaches a saturated pressure, the hand pump resistance increases.
    4. If pumping is interrupted during the air bleeding process, fuel in the fuel line may return to the fuel tank. Continue pumping until the hand pump resistance increases.
    5. If the hand pump resistance does not increase despite consecutively pumping 200 times or more, there may be a fuel leak between the fuel tank and fuel filter, the hand pump may be malfunctioning, or the vehicle may have run out of fuel.
    6. If air bleeding using the hand pump is incomplete, the common rail pressure does not rise to the pressure range necessary for normal use, and the engine cannot be started.

  1. Start the engine.

    NOTICE:
    1. Even if air bleeding using the hand pump has been completed, the starter may need to be cranked for 10 seconds or more to start the engine.
    2. Do not crank the engine continuously for more than 20 seconds. The battery may be discharged.
    3. Use a fully-charged battery.


    1. When the engine can be started, proceed to the next step.

    2. If the engine cannot be started, bleed the air again using the hand pump until the hand pump resistance increases (refer to the procedures above). Then start the engine.

  1. Turn the ignition switch off.

  1. Connect the intelligent tester to the DLC3.

  1. Turn the ignition switch to ON and turn the intelligent tester on.

  1. Clear DTCs (Click here).

  1. Start the engine.*1


    A194065E03
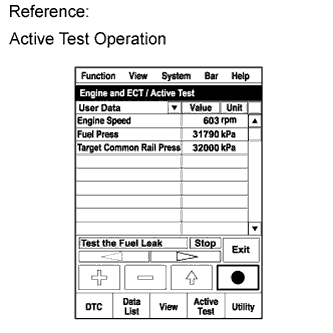
  1. Enter the following menus: Powertrain / Engine and ECT / Active Test / Test the Fuel Leak.*2

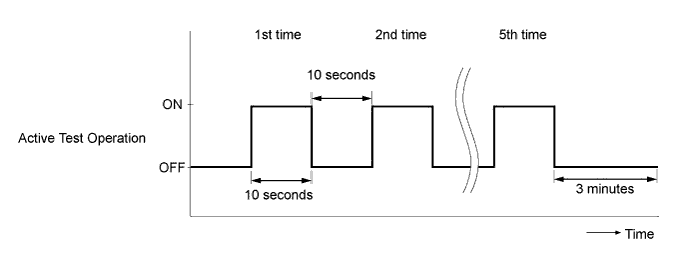
  1. Perform the following test 5 times with on/off intervals of 10 seconds: Active Test / Test the Fuel Leak.*3


  1. Allow the engine to idle for 3 minutes or more after performing the Active Test for the fifth time.

    A192848E04

    HINT:
    When the Active Test "Test the Fuel Leak" is used to change the pump control mode, the actual fuel pressure inside the common rail drops below the target fuel pressure when the Active Test is off, but this is normal and does not indicate a pump malfunction.

  1. Enter the following menus: Powertrain / Engine and ECT / DTC.

  1. Read Current DTCs.

    1. When no DTCs are output, the air bleeding is completed.

    2. If any DTCs are output, proceed to the next step.

  1. Clear the DTCs (Click here).

  1. Repeat steps *1 to *3.

  1. Enter the following menus: Powertrain / Engine and ECT / DTC.

  1. Read Current DTCs.

    OK:
    No DTCs are output.


7. INSPECT FOR FUEL LEAK

HINT:
Using the intelligent tester to perform Active Tests allow relays, VSVs, actuators and other items to be operated without removing any parts. This non-intrusive functional inspection can be very useful because intermittent operation may be discovered before parts or wiring is disturbed. Performing Active Tests early in troubleshooting is one way to save diagnostic time. Data List information can be displayed while performing Active Tests.

  1. Perform Active Test.

    1. Connect the intelligent tester to the DLC3.

    2. Turn the ignition switch to ON.

    3. Start the engine.

    4. Turn the intelligent tester on.

    5. Enter the following menus: Powertrain / Engine and ECT / Active Test.

    6. Perform the Active Test.

      Tester Display
      Test Part
      Control Range
      Diagnostic Notes
      Test the Fuel Leak
      Pressurizes common rail internal fuel pressure, and checks for fuel leaks
      Stop/Start
      Performs inspection of the high pressure fuel system.
      1. Engine Speed: 2050 rpm
      2. Fuel Pressure: 172000 kPa
      3. Target Common Rail Pressure: 176000 kPa
      4. Target Pump SCV Current: 1.4 A
      5. MAP: 176 kPa
      6. MAF: 39 g/sec.


8. INSTALL NO. 1 ENGINE COVER


    A203808
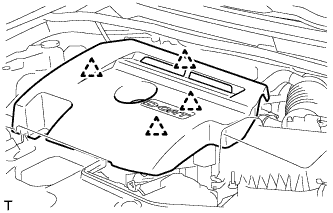
  1. Attach the 4 clips to install the engine cover.