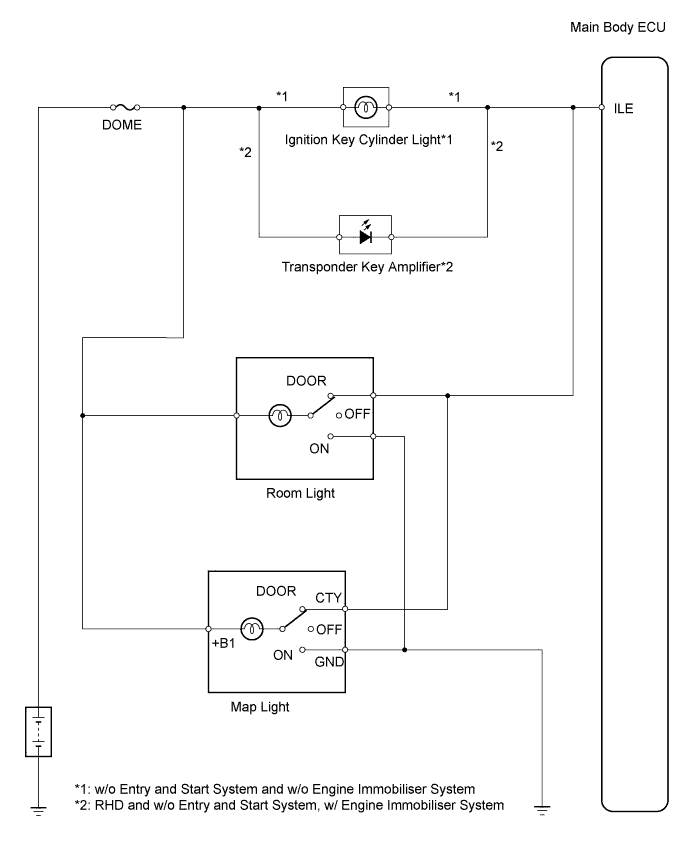
LIGHTING SYSTEM > Illumination Circuit |
| 1.PERFORM ACTIVE TEST USING INTELLIGENT TESTER (MAIN BODY ECU) |
Connect the intelligent tester to the DLC3.
Turn the ignition switch on (IG) and press the intelligent tester main switch ON.
Select the item below in the ACTIVE TEST and then check that the relay operates.
| Item | Test Details | Diagnostic Note |
| Illumi Output | Test Details: Turn interior light and key illumination ON/OFF Vehicle Condition: Room light SW is in DOOR position and all doors are closed | - |
|
| ||||
| NG | |
 |
| 2.INSPECT FUSE (DOME) |
Remove the DOME fuse from the engine room No. 2 relay block.
Measure the resistance of the fuse.
|
| ||||
| OK | |
|
| 3.INSPECT ROOM LIGHT ASSEMBLY |
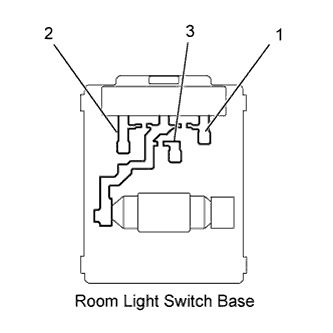 |
Remove the room light assembly.
Measure the resistance of the room light switch base.
| Tester Connection | Switch Operation | Specified Condition |
| 1 - 2 1 - 3 | OFF | 10 kΩ or higher |
| 1 - 2 | DOOR | Below 1 Ω |
| 1 - 3 | ON | Below 1 Ω |
|
| ||||
| OK | |
|
| 4.INSPECT ROOM LIGHT BULB |
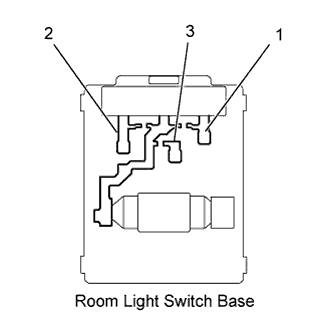 |
Remove the room light assembly.
Connect the positive (+) lead from the battery to terminal 1 and the negative (-) lead to terminal 2, then check that the bulb illuminates when the switch is in the DOOR position.
Connect the positive (+) lead from the battery to terminal 1 and the negative (-) lead to terminal 3, then check that the bulb illuminates when the switch is in the ON position.
|
| ||||
| OK | |
|
| 5.CHECK HARNESS AND CONNECTOR (BATTERY - ROOM LIGHT AND JUNCTION BLOCK) |
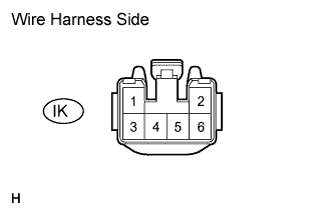 |
Disconnect the IK instrument panel junction block connector.
Measure the voltage of the wire harness side connector.
| Tester Connection | Condition | Specified Condition |
| IK-2 - Body ground | Room light switch in DOOR position | 10 to 14 V |
|
| ||||
| OK | |
|
| 6.INSPECT MAP LIGHT BULB |
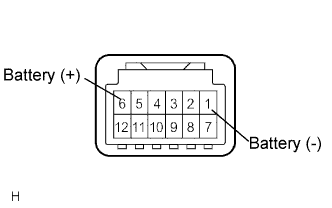 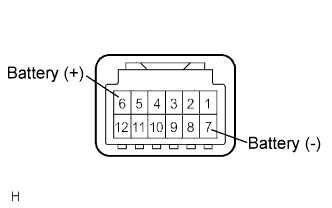 |
Remove the map light assembly.
Connect the positive (+) lead from the battery to terminal 6 and the negative (-) lead to terminal 1, then check that the bulb illuminates when the switch is in the DOOR position.
Connect the positive (+) lead from the battery to terminal 6 and the negative (-) lead to terminal 7, then check that the bulb illuminates when the switch is in the ON position.
|
| ||||
| NG | |
|
| 7.INSPECT MAP LIGHT |
Remove the map light assembly.
Replace the map light bulb.
|
Inspect the map light.
Connect the positive (+) lead from the battery to terminal 6 and the negative (-) lead to terminal 1, then check that the light comes on when the switch is in the DOOR position.
|
Connect the positive (+) lead from the battery to terminal 6 and the negative (-) lead to terminal 7, then check that the light comes on when the switch is in the ON position.
|
| ||||
| OK | |
|
| 8.CHECK WIRE HARNESS (BATTERY - MAP LIGHT AND JUNCTION BLOCK) |
|
Disconnect the IK instrument panel junction block connector.
Measure the voltage of the wire harness side connector.
| Tester Connection | Condition | Specified Condition |
| IK-2 - Body ground | Room light switch in DOOR position | 10 to 14 V |
|
| ||||
| OK | |
|
| 9.INSPECT IGNITION KEY CYLINDER LIGHT |
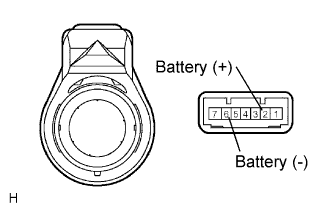 |
RHD and w/o Entry and start system, w/ Engine immobiliser system
Remove the transponder key amplifier.
Connect the positive (+) lead from the battery to terminal 2 and the negative (-) lead to terminal 6, then check that the light comes on.
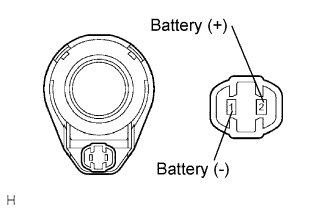 |
w/ Entry and start system and w/o Engine immobiliser system
Remove the ignition key cylinder light.
Connect the positive (+) lead from the battery to terminal 2 and the negative (-) lead to terminal 1, then check that the light comes on.
|
| ||||
| OK | |
|
| 10.CHECK WIRE HARNESS (INSTRUMENT PANEL JUNCTION BLOCK - BATTERY) |
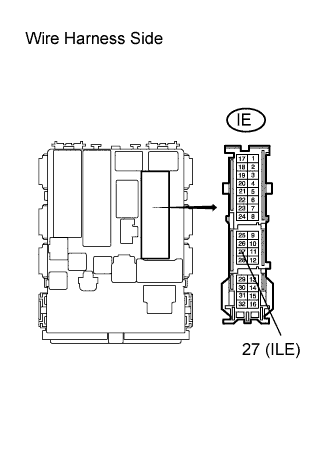 |
Disconnect the IE instrument panel junction block connector.
Measure the voltage of the wire harness side connector.
| Tester Connection | Specified Condition |
| IE-27 (ILE) - Body ground | 10 to 14 V |
|
| ||||
| OK | ||
 | ||
| ||

