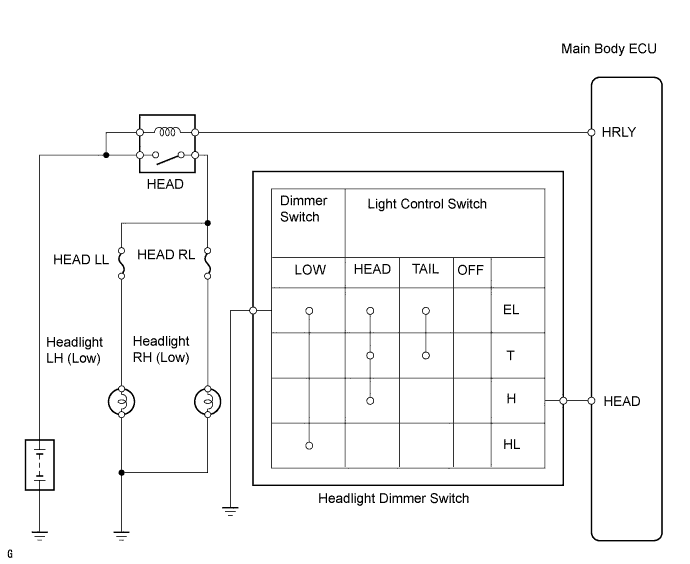
LIGHTING SYSTEM > Headlight Relay Circuit |
| 1.PERFORM ACTIVE TEST USING INTELLIGENT TESTER (MAIN BODY ECU) |
Connect the intelligent tester to the DLC3.
Turn the ignition switch on (IG) and press the intelligent tester main switch ON.
Select the item below in the ACTIVE TEST and then check that the relay operates.
| Item | Test Details: Display (Range) | Diagnostic Note |
| Head Light | Headlight Relay ON/OFF | - |
|
| ||||
| NG | |
 |
| 2.INSPECT FUSE (HEAD LL, HEAD RL) |
Remove the HEAD LL fuse and HEAD RL fuse from the engine room No. 2 relay block.
Measure the resistance of the fuses.
|
| ||||
| OK | |
|
| 3.INSPECT HEADLIGHT RELAY (Marking: HEAD) |
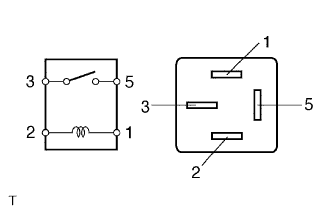 |
Remove the headlight relay from the engine room No. 2 relay block.
Measure the resistance of the relay.
| Tester Connection | Specified Condition |
| 3 - 5 | 10 kΩ or higher |
| 3 - 5 | Below 1 Ω (Battery voltage applied to terminals 1 and 2) |
|
| ||||
| OK | |
|
| 4.INSPECT BULB (HEADLIGHT BULB) |
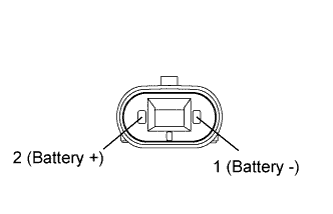 |
Remove the headlight bulbs.
Connect the positive (+) lead from the battery to terminal 2 and the negative (-) lead to terminal 1, then check that the bulb illuminates.
|
| ||||
| OK | |
|
| 5.CHECK WIRE HARNESS (MAIN BODY ECU - BATTERY) |
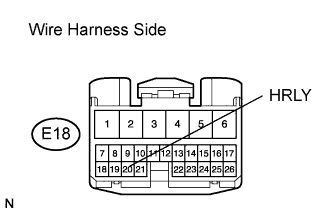 |
Disconnect the E18 main body ECU connector.
Measure the voltage of the wire harness side connectors.
| Tester Connection | Specified Condition |
| E18-20 (HRLY) - Body ground | 10 to 14 V |
|
| ||||
| OK | |
|
| 6.CHECK INSTRUMENT PANEL JUNCTION BLOCK (MAIN BODY ECU) |
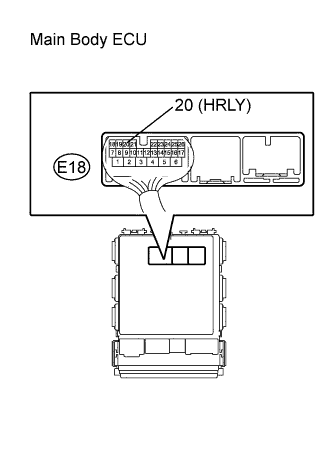 |
Measure the voltage of the ECU.
| Tester Connection | Condition | Specified Condition |
| E18-20 (HRLY) - Body ground | Light control switch OFF | 10 to 14 V |
| E18-20 (HRLY) - Body ground | Light control switch ON (HEAD) | Below 1 V |
|
| ||||
| OK | ||
 | ||
| ||
| 7.CHECK WIRE HARNESS (DIMMER SWITCH - MAIN BODY ECU AND BODY GROUND) |
Disconnect the E20 main body ECU connector.
Disconnect the E15 headlight dimmer switch connector.
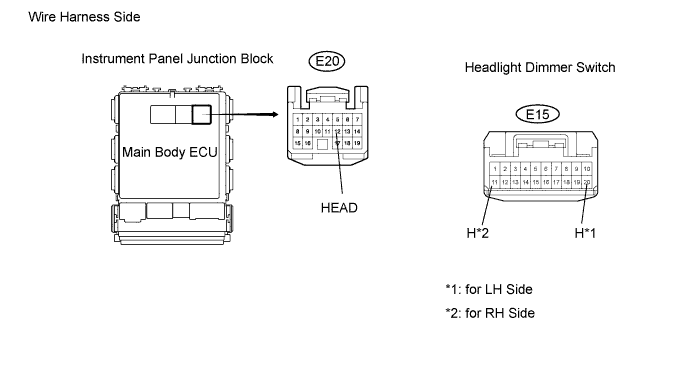
Measure the resistance of the wire harness side connectors.
| Tester Connection | Specified Condition |
| E20-12 (HEAD) - E15-20 (H) | Below 1 Ω |
| E20-12 (HEAD) or E15-20 (H) - Body ground | 10 kΩ or higher |
| Tester Connection | Specified Condition |
| E20-12 (HEAD) - E15-11 (H) | Below 1 Ω |
| E20-12 (HEAD) or E15-11 (H) - Body ground | 10 kΩ or higher |
|
| ||||
| OK | |
|
| 8.INSPECT HEADLIGHT DIMMER SWITCH |
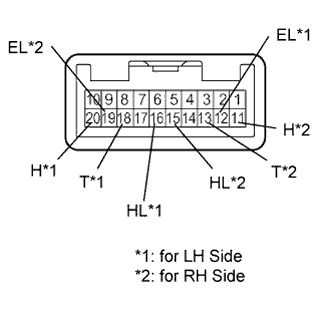 |
Remove the E15 headlight dimmer switch.
Measure the resistance of the switch.
| Tester Connection | Switch Condition | Specified Condition |
| 18 (T) - 12 (EL) | Light control switch TAIL | Below 1 Ω |
| 18 (T) - 12 (EL) | Light control switch OFF | 10 kΩ or higher |
| 20 (H) - 12 (EL) | Light control switch HEAD | Below 1 Ω |
| 20 (H) - 12 (EL) | Light control switch OFF | 10 kΩ or higher |
| 16 (HL) - 12 (EL) | Dimmer switch LOW | Below 1 Ω |
| 16 (HL) - 12 (EL) | Dimmer switch HIGH | 10 kΩ or higher |
| Tester Connection | Switch Condition | Specified Condition |
| 13 (T) - 19 (EL) | Light control switch TAIL | Below 1 Ω |
| 13 (T) - 19 (EL) | Light control switch OFF | 10 kΩ or higher |
| 11 (H) - 19 (EL) | Light control switch HEAD | Below 1 Ω |
| 11 (H) - 19 (EL) | Light control switch OFF | 10 kΩ or higher |
| 15 (HL) - 19 (EL) | Dimmer switch LOW | Below 1 Ω |
| 15 (HL) - 19 (EL) | Dimmer switch HIGH | 10 kΩ or higher |
|
| ||||
| OK | ||
| ||
| ||

