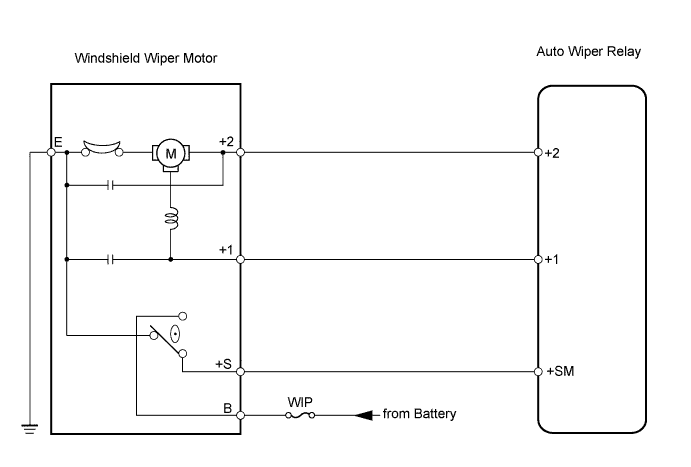
WIPER AND WASHER SYSTEM (w/ Rain Sensor) > Front Wiper Motor Circuit |
| 1.INSPECT WINDSHIELD WIPER MOTOR ASSEMBLY |
 |
Check windshield wiper motor operation.
Remove the windshield wiper motor (Click here).
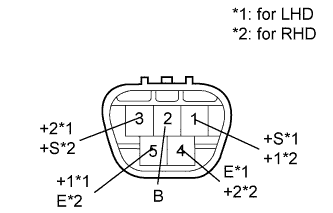
Apply battery voltage to the wiper motor connector and check the operation of the wiper motor.
| Measurement Condition | Specified Condition |
| Battery positive (+) → Terminal 3 (+2) Battery negative (-) → Terminal 4 (E) | Motor operates at HI speed |
| Battery positive (+) → Terminal 5 (+1) Battery negative (-) → Terminal 4 (E) | Motor operates at LO speed |
| Measurement Condition | Specified Condition |
| Battery positive (+) → Terminal 4 (+2) Battery negative (-) → Terminal 5 (E) | Motor operates at HI speed |
| Battery positive (+) → Terminal 1 (+1) Battery negative (-) → Terminal 5 (E) | Motor operates at LO speed |
 |
Check automatic stop operation.
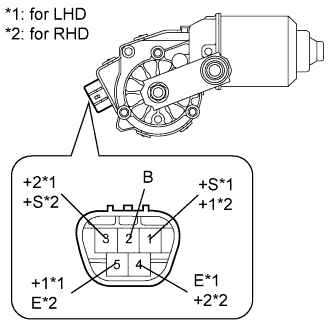
Connect the battery's positive (+) lead to terminal 5*1 or 1*2 (+1) and the negative (-) lead to terminal 4*1 or 5*2 (E). With the motor rotating at low speed (LO), disconnect the 5*1 or 1*2 (+1) to stop the wiper motor operation at any position other than the automatic stop position.
Using SST, connect terminals 5 (+1)*1 or 1 (+1)*2 and 1 (B)*1 or 3 (B)*2. Then connect the battery's positive (+) lead to terminal 2 (B) to restart the motor operation at low speed (LO).
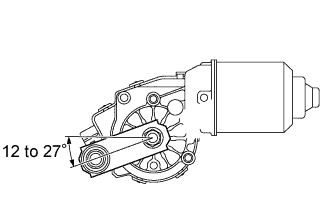 |
Check that the motor stops automatically at the automatic stop position.
|
| ||||
| OK | |
 |
| 2.CHECK WIRE HARNESS (MOTOR - RELAY AND BODY GROUND) |
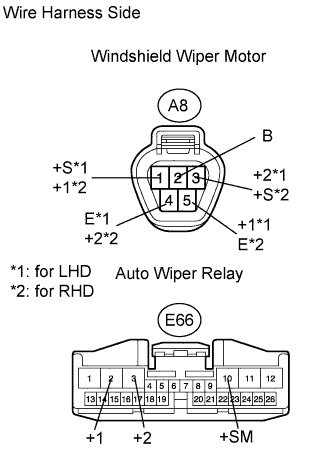 |
Disconnect the A8 motor connector.
Disconnect the E66 relay connector.
Measure the resistance of the wire harness side connectors.
| Tester Connection | Specified Condition |
| A8-5 (+1) - E66-2 (+1) | Below 1 Ω |
| A8-3 (+2) - E66-3 (+2) | |
| A8-1 (+S) - E66-10 (+SM) | |
| A8-4 (E) - Body ground |
| Tester Connection | Specified Condition |
| A8-1 (+1) - E66-2 (+1) | Below 1 Ω |
| A8-4 (+2) - E66-3 (+2) | |
| A8-3 (+S) - E66-10 (+SM) | |
| A8-5 (E) - Body ground |
|
| ||||
| OK | ||
 | ||
| ||
