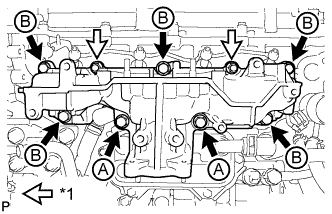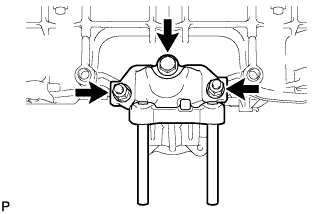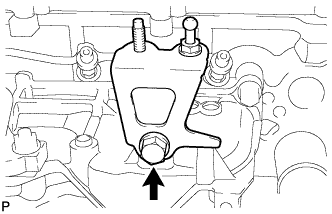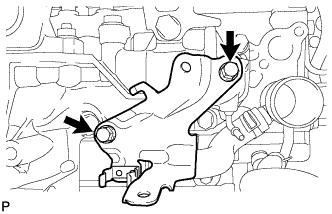
Home › ENGINE ยท 2AD-FHV › LUBRICATION › OIL PUMP

OIL PUMP > INSTALLATION

for Preparation Click here


NOTICE:
  1. When replacing the injectors (including shuffling the injectors between the cylinders), common rail, intake manifold or cylinder head, it is necessary to replace the injection pipes with new ones.
  2. When replacing the fuel supply pump, common rail, intake manifold or cylinder head, it is necessary to replace the fuel inlet pipe with a new one.


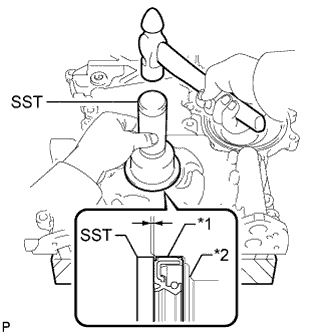
1. INSTALL FRONT CRANKSHAFT OIL SEAL


    A201761E01
  1. Using SST and a hammer, tap in a new oil seal until its surface is flush with the timing chain cover edge.

    SST
    09223-50010  

    Standard depth:
    0 to 0.6 mm (0 to 0.236 in.)

    Text in Illustration 
    *1
    Oil Seal
    *2
    Timing Chain Cover

    NOTICE:
    1. Keep the lip of the oil seal free from foreign matter.
    2. Do not tap in the oil seal at an angle.
  1. Apply MP grease to the lip of the oil seal.

    NOTICE:
    1. Do not allow foreign matter to contact the lip of the oil seal.
    2. Do not allow MP grease to contact the dust seal.


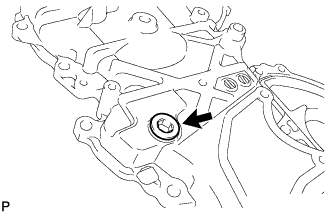
2. INSTALL STRAIGHT SCREW PLUG


    A201758
  1. Using a 10 mm socket hexagon wrench, install a new gasket and the straight screw plug.

    Torque:
    19 N*m{ 194 kgf*cm , 14 ft.*lbf }


3. INSTALL TIMING CHAIN COVER SUB-ASSEMBLY


    A201756E01
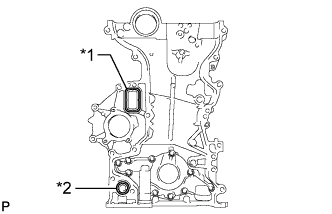
  1. Install a new gasket and new O-ring to the timing chain cover.
    Text in Illustration 
    *1
    Gasket
    *2
    O-Ring

  1. Remove any old seal packing material.


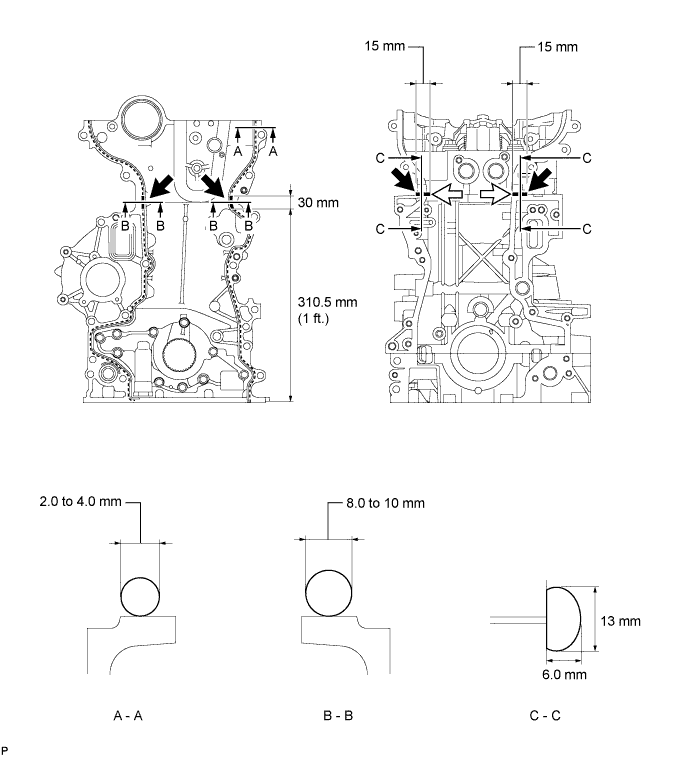
  1. Apply seal packing in a continuous line to the timing chain cover as shown in the following illustration.


    A201764E01

    Seal packing:
    Toyota Genuine Seal Packing Black, Three Bond 1207B or equivalent


    Apply Seal Packing as Follows:

    Area
    Seal Packing Diameter (Round)
    Seal Packing Dimension (Flat)
    Seal Packing Application Length
    A - A
    2.0 to 4.0 mm (0.0787 to 0.157 in.)
    -
    -
    B - B
    8.0 to 10 mm (0.315 to 0.394 in.)
    -
    30 mm (1.18 in.)
    C - C
    -
    13 mm (0.512 in.) or more wide and 6.0 mm (0.236 in.) or more thick
    15 mm (0.591 in.)

    NOTICE:
    1. Be sure to clean and degrease the contact surfaces, especially the 4 areas indicated by the arrows in the illustration.
    2. When the contact surfaces are wet, wipe them off with an oil-free cloth before applying seal packing.
    3. When applying seal packing to area C - C, apply it in the direction of the white arrows in the illustration.
    4. Install the timing chain cover within 3 minutes and tighten the bolts within 15 minutes after applying seal packing.
    5. Do not start the engine for at least 4 hours after installation.


    A206344E01
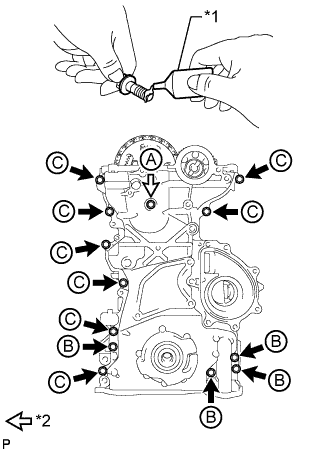
  1. Apply adhesive to the 4 bolts labeled B.

    Adhesive:
    Toyota Genuine Adhesive 1324, Three Bond 1324 or equivalent

    Text in Illustration 
    *1
    Adhesive
    *2
    Bolt and New Seal Washer

  1. Temporarily install the timing chain cover and a new seal washer with the 13 bolts.

    Standard Bolt:
    Item
    Length
    Bolt A
    60 mm (2.36 in.)
    Bolt B
    30 mm (1.18 in.)
    Bolt C
    30 mm (1.18 in.)

    HINT:
    Bolt B and C are identical.

  1. Tighten the 12 bolts labeled B and C.

    Torque:
    23 N*m{ 229 kgf*cm , 17 ft.*lbf }

  1. Tighten the bolt labeled A.

    Torque:
    21 N*m{ 214 kgf*cm , 15 ft.*lbf }


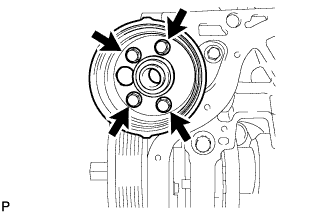
4. INSTALL CRANKSHAFT PULLEY
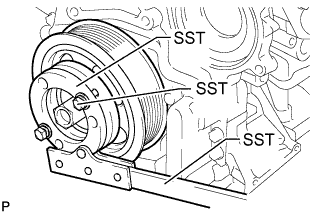
  1. Align the keyway of the pulley with the key located on the crankshaft, then slide the pulley into place to install it.


    A201753E01
  1. Using SST, install the pulley bolt.

    SST
    09213-58014   (91551-80840)
    09330-00021  

    Torque:
    300 N*m{ 3059 kgf*cm , 221 ft.*lbf }


5. INSTALL WATER PUMP ASSEMBLY
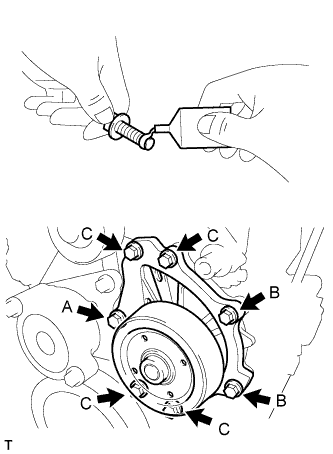
  1. Install a new gasket to the timing chain cover.


    A196727E02
  1. Apply adhesive to 2 or 3 threads of the bolt labeled A as shown in the illustration.

    Adhesive:
    Toyota Genuine Adhesive 1324, Three Bond 1324 or equivalent

    Standard Bolt Length:
    Item
    Specified Condition
    Bolt A and C
    45 mm (1.77 in.)
    Bolt B
    30 mm (1.18 in.)


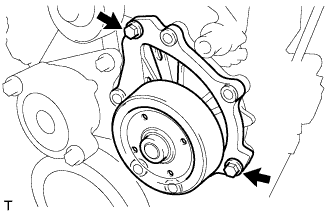
    A196785
  1. Install the water pump with the 2 bolts shown in the illustration.

    Torque:
    23 N*m{ 229 kgf*cm , 17 ft.*lbf }


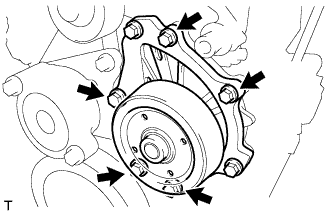
    A196794
  1. Install the 5 bolts shown in the illustration.

    Torque:
    23 N*m{ 229 kgf*cm , 17 ft.*lbf }


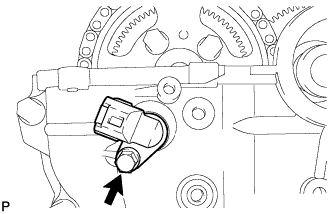
6. CONNECT CRANKSHAFT POSITION SENSOR WIRE HARNESS


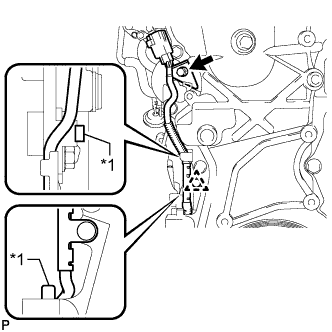
    A201751E01
  1. Install the sensor wire harness with the bolt and clip.

    Torque:
    8.8 N*m{ 90 kgf*cm , 78 in.*lbf }

    Text in Illustration 
    *1
    Protrusion

    NOTICE:
    Make sure the sensor wire harness is installed in the position shown in the illustration.


7. INSTALL CAMSHAFT POSITION SENSOR
  1. Apply a light coat of engine oil to the O-ring of the sensor.

    NOTICE:
    Make sure that the O-ring is not cracked or jammed when installing the sensor.


    A201744
  1. Install the sensor with the bolt.

    Torque:
    8.8 N*m{ 90 kgf*cm , 78 in.*lbf }


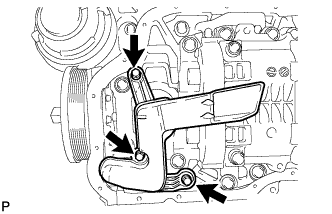
8. INSTALL OIL STRAINER SUB-ASSEMBLY
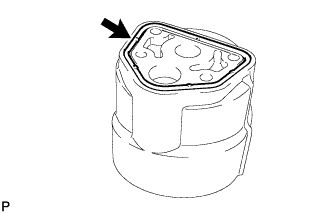
  1. Install a new O-ring to the oil strainer.

  1. Apply a light coat of engine oil to the O-ring.


    A201739
  1. Install the oil strainer with the 3 bolts.

    Torque:
    9.0 N*m{ 92 kgf*cm , 80 in.*lbf }


9. INSTALL OIL FILTER BRACKET


    A201742
  1. Install a new gasket to the oil filter bracket.


    A201741
  1. Install the oil filter bracket with the 4 bolts.

    Torque:
    9.0 N*m{ 92 kgf*cm , 80 in.*lbf }


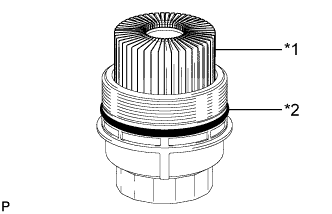
10. INSTALL OIL FILTER ELEMENT
  1. Clean the inside of the oil filter cap, its threads and its O-ring groove.


    A201807E01
  1. Apply a small amount of engine oil to a new O-ring and install it to the oil filter cap.
    Text in Illustration 
    *1
    New Oil Filter Element
    *2
    New O-Ring

  1. Set a new oil filter element in the oil filter cap.

  1. Remove any dirt or foreign matter from the installation surface of the engine.

  1. Apply a small amount of engine oil to the O-ring again and temporarily install the oil filter cap.

  1. Check and clean the oil filter installation surface.


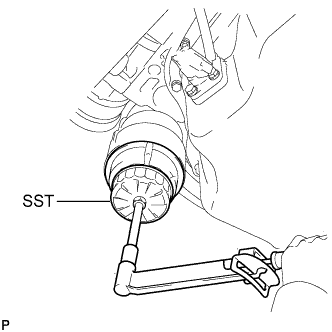
    A210249E01
  1. Using SST, tighten the oil filter cap.

    SST
    09228-06501  

    Torque:
    40 N*m{ 408 kgf*cm , 30 ft.*lbf }

  1. Close the oil filter element service cover and install the clip.


11. INSTALL NO. 2 OIL PAN SUB-ASSEMBLY
  1. Remove any old seal packing material.


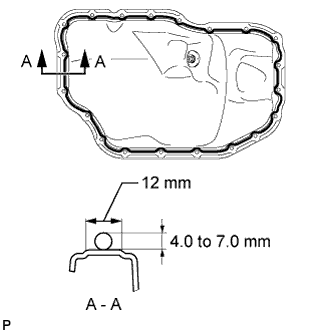
    A201738E01
  1. Apply seal packing in a continuous line as shown in the illustration.

    Seal packing:
    Toyota Genuine Seal Packing Black, Three Bond 1207B or equivalent

    Standard Seal Packing Dimension:
    Area
    Seal Packing Diameter
    Acceptable Seal Packing Application Range
    A - A
    4.0 to 7.0 mm (0.157 to 0.276 in.)
    12 mm (0.472 in.)

    NOTICE:
    1. Remove any oil from the contact surface.
    2. Install the oil pan within 3 minutes and tighten the bolts within 10 minutes after applying seal packing.
    3. Do not start the engine for at least 4 hours after installing.


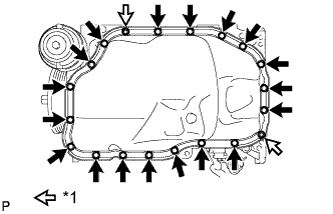
    A201737E01
  1. Install the oil pan with the 18 bolts and 2 nuts.

    Torque:
    11 N*m{ 107 kgf*cm , 8 ft.*lbf }

    Text in Illustration 
    *1
    Nut


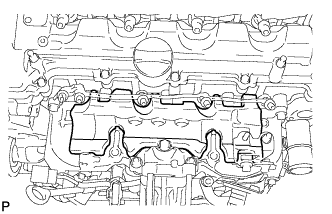
12. INSTALL CYLINDER HEAD COVER SUB-ASSEMBLY
  1. Remove any old seal packing material.


    A201847E01
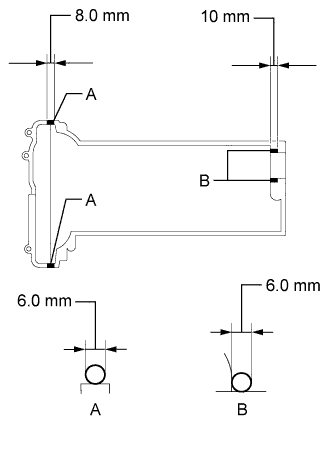
  1. Apply seal packing to the cylinder head as shown in the illustration.

    Seal packing:
    Toyota Genuine Seal Packing Black, Three Bond 1207B or equivalent

    Standard Seal Packing Dimension:
    Area
    Seal Packing Diameter
    Seal Packing Application Length
    A
    6.0 mm (0.236 in.)
    8.0 mm (0.315 in.)
    B
    6.0 mm (0.236 in.)
    10 mm (0.394 in.)


    A201723E01
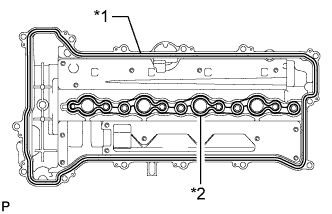
  1. Install a new cylinder head cover gasket and new No. 2 cylinder head cover gasket to the cylinder head cover.
    Text in Illustration 
    *1
    Cylinder Head Cover Gasket
    *2
    No. 2 Cylinder Head Cover Gasket

    NOTICE:
    Make sure the gaskets are not twisted and are not improperly seated on the cylinder head cover.


    A201722E01
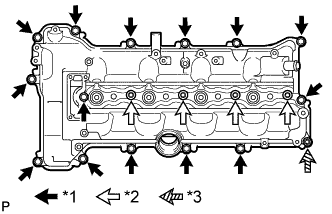
  1. Install the cylinder head cover with the 4 nozzle holder clamp seats, 14 bolts and nut.

    Torque:
    for nozzle holder clamp seat:
    16 N*m{ 167 kgf*cm , 12 ft.*lbf }
    for bolt and nut:
    11 N*m{ 112 kgf*cm , 8 ft.*lbf }

    Text in Illustration 
    *1
    Bolt
    *2
    Nozzle Holder Clamp Seat
    *3
    Nut


13. INSTALL OIL FILLER CAP SUB-ASSEMBLY


14. INSTALL PCV HOSE


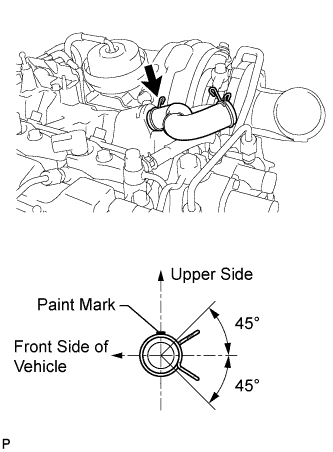
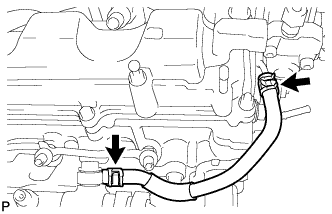
  1. Install the PCV hose.

    HINT:
    A206319E01
    The direction of the hose clamp is indicated in the illustration.


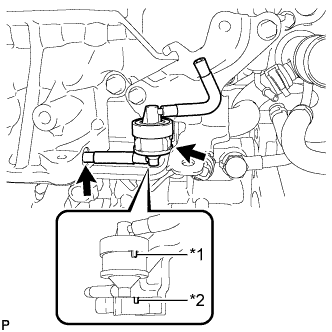
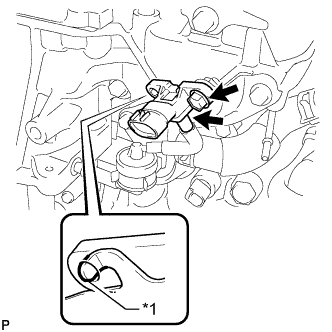
15. INSTALL VACUUM SWITCHING VALVE BRACKET


    A197569
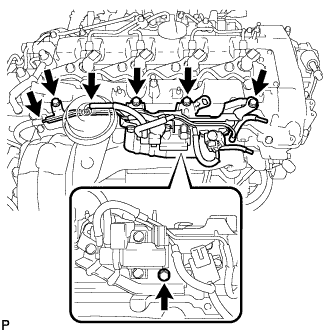
  1. Install the vacuum switching valve bracket with the 5 bolts.

    Torque:
    9.0 N*m{ 92 kgf*cm , 80 in.*lbf }

  1. Connect the 2 vacuum hoses.


16. INSTALL NO. 1 VACUUM TRANSMITTING PIPE SUB-ASSEMBLY


    A197568
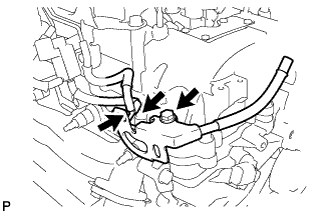
  1. Install the No. 1 vacuum transmitting pipe with the bolt.

    Torque:
    9.0 N*m{ 92 kgf*cm , 80 in.*lbf }

  1. Connect the 2 vacuum hoses.


17. INSTALL INJECTOR ASSEMBLY

NOTICE:
Before installing the injector, check for carbon, foreign matter, etc. on the seal surfaces of the cylinder head and injector. If there is foreign matter, remove it before installing the injector.

  1. Install 4 new nozzle seats to the cylinder head.


    A203043E02
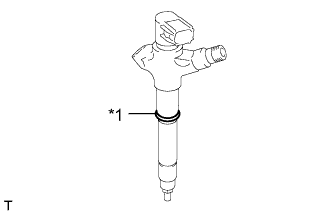
  1. Install a new O-ring to each injector.
    Text in Illustration 
    *1
    New O-Ring

  1. Apply a light coat of engine oil to the O-rings on each injector.

  1. Install the 4 injectors to the cylinder head.

    NOTICE:
    Fit the injectors to the nozzle seats.


    A203044E02
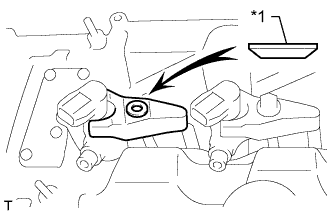
  1. Install the nozzle holder clamps and washers as shown in the illustration.
    Text in Illustration 
    *1
    Washer

    NOTICE:
    Pay attention to the mounting orientation (beveled edge) of the washer.

  1. Temporarily install the nozzle holder clamp bolts.

    NOTICE:
    When temporarily attaching the nozzle holder clamp and the nozzle holder clamp bolt, be careful not to position them at an angle.
    HINT:
    Apply a light coat of engine oil on the threads of the nozzle holder clamp bolts.

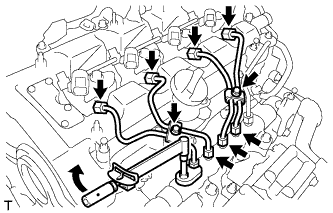
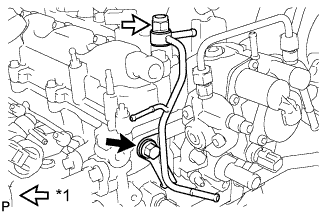
  1. Temporarily install the 4 injection pipes.

  1. Temporarily install the No. 1 leakage pipe with 4 new gaskets, the 4 union bolts and bolt.

  1. Tighten the 4 nozzle holder clamp bolts.

    Torque:
    25 N*m{ 255 kgf*cm , 18 ft.*lbf }


18. INSTALL NO. 1 NOZZLE LEAKAGE PIPE


    A203040
  1. Tighten the 4 union bolts.

    Torque:
    18 N*m{ 184 kgf*cm , 13 ft.*lbf }

  1. Tighten the bolt.

    Torque:
    21 N*m{ 209 kgf*cm , 15 ft.*lbf }


19. INSTALL NO. 2 NOZZLE LEAKAGE PIPE


    A201721E01
  1. Temporarily install the No. 2 nozzle leakage pipe and a new gasket with the check valve and bolt.
    Text in Illustration 
    *1
    Check Valve

  1. Tighten the check valve.
    Torque:
    32 N*m{ 321 kgf*cm , 23 ft.*lbf }

  1. Tighten the bolt.
    Torque:
    32 N*m{ 321 kgf*cm , 23 ft.*lbf }


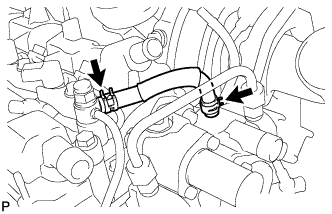
20. INSTALL NO. 3 FUEL HOSE


A197572


21. INSTALL FUEL TUBE SUB-ASSEMBLY


    A203050E02
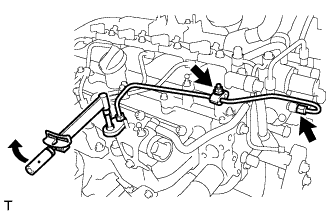
  1. Temporarily install the fuel tube with 2 new gaskets, the check valve and union bolt.
    Text in Illustration 
    *1
    Check Valve

  1. Tighten the check valve.

    Torque:
    32 N*m{ 321 kgf*cm , 23 ft.*lbf }

  1. Tighten the union bolt.

    Torque:
    23 N*m{ 235 kgf*cm , 17 ft.*lbf }


    A205046
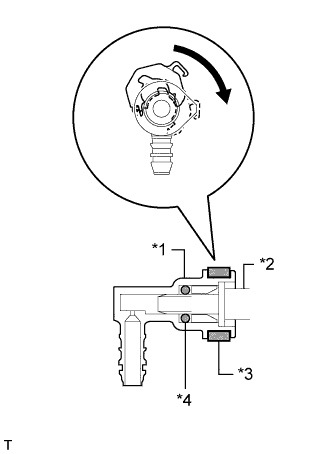
  1. Insert the fuel tube connector onto the injector.


    A203842E02
  1. Turn the retainer in the direction indicated by the arrow until it makes a "click" sound.
    Text in Illustration 
    *1
    Fuel Tube Connector
    *2
    Injector
    *3
    Retainer
    *4
    O-Ring

    NOTICE:
    If the fuel tube connector is not inserted to the correct position on the injector, the retainer cannot be turned far enough in the direction of the arrow.


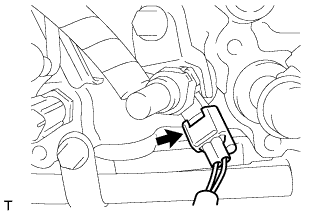
    A203047
  1. Connect the exhaust fuel addition injector connector.


22. INSTALL FUEL HOSE PROTECTOR


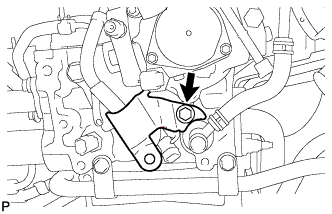
    A197570
  1. Install the fuel hose protector with the bolt.

    Torque:
    21 N*m{ 209 kgf*cm , 15 ft.*lbf }


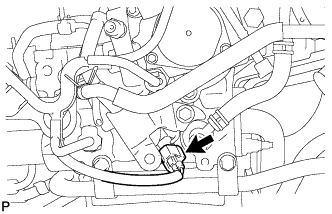
    A206325
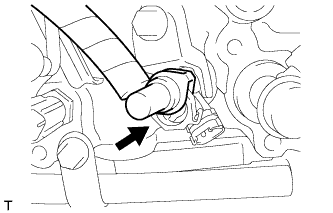
  1. Connect the connector.


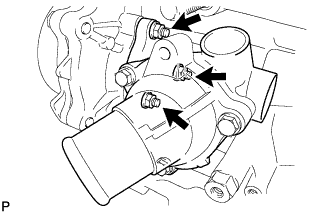
23. INSTALL WATER INLET HOUSING


    A142993
  1. Install a new gasket and the inlet housing with the 3 nuts.

    Torque:
    9.0 N*m{ 92 kgf*cm , 80 in.*lbf }


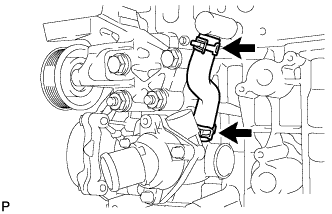
24. INSTALL NO. 4 WATER BY-PASS HOSE


    A201736
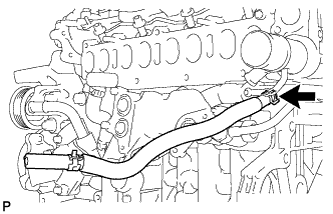
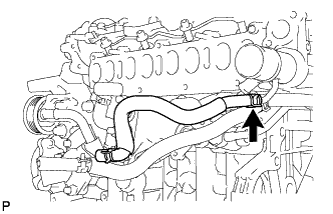
  1. Install the No. 4 water by-pass hose.


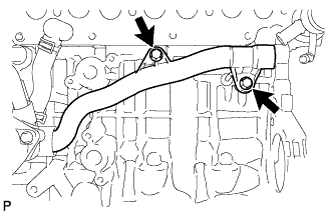
25. INSTALL NO. 2 WATER BY-PASS PIPE


    A201732
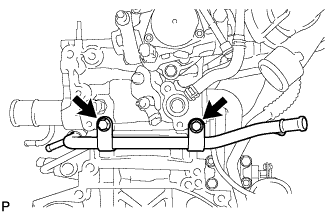
  1. Install a new No. 2 water by-pass pipe with the 2 bolts.

    Torque:
    11 N*m{ 112 kgf*cm , 8 ft.*lbf }


26. INSTALL NO. 1 OIL COOLER BRACKET


    A123533E02
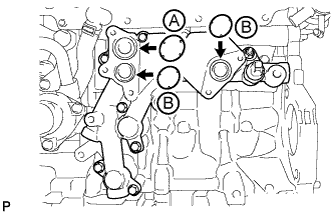
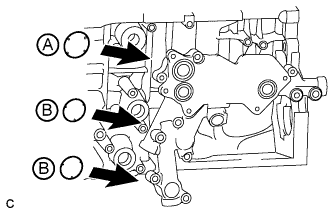
  1. Apply engine oil to the 2 new O-rings labeled B in the illustration.

    NOTICE:
    Do not apply engine oil to the new O-ring labeled A in the illustration.

  1. Install 3 new O-rings to the No. 1 oil cooler bracket.


    A201729E01
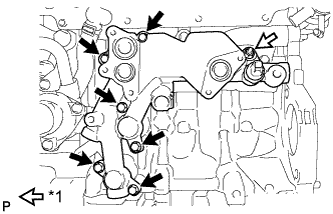
  1. Install the No. 1 oil cooler bracket with the 6 bolts and nut.

    Torque:
    11 N*m{ 112 kgf*cm , 8 ft.*lbf }

    Text in Illustration 
    *1
    Nut


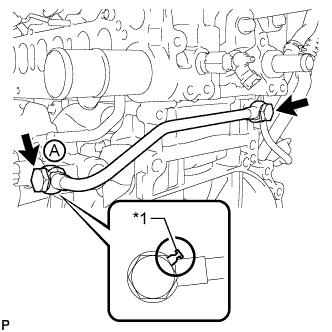
27. INSTALL NO. 1 TURBO OIL PIPE


    A201728E01
  1. Install the No. 1 turbo oil pipe and 2 new gaskets with the 2 union bolts.

    Torque:
    35 N*m{ 357 kgf*cm , 26 ft.*lbf }

    Text in Illustration 
    *1
    Gasket

    NOTICE:
    Make sure the gasket of union bolt A contacts the No. 1 turbo oil pipe as shown in the illustration when tightening the union bolt.


28. INSTALL NO. 3 WATER BY-PASS PIPE
  1. Apply soapy water to a new O-ring and install it to the No. 3 water by-pass pipe.


    A201726
  1. Install the No. 3 water by-pass pipe with the 2 bolts.

    Torque:
    21 N*m{ 214 kgf*cm , 15 ft.*lbf }


29. INSTALL NO. 8 WATER BY-PASS HOSE


    A201725
  1. Install the No. 8 water by-pass hose.


30. INSTALL NO. 6 WATER BY-PASS HOSE


    A201724
  1. Install the No. 6 water by-pass hose.


31. INSTALL OIL COOLER ASSEMBLY


    A201878E01
  1. Apply engine oil to 2 new O-rings labeled B in the illustration.

    NOTICE:
    Do not apply engine oil to the new O-ring labeled A in the illustration.

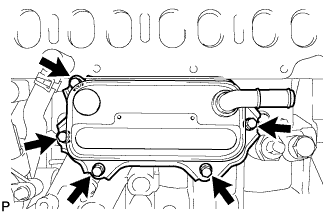
  1. Install 3 new O-rings to the oil cooler bracket.


    A197565
  1. Install the oil cooler with the 5 bolts.

    Torque:
    11 N*m{ 112 kgf*cm , 8 ft.*lbf }


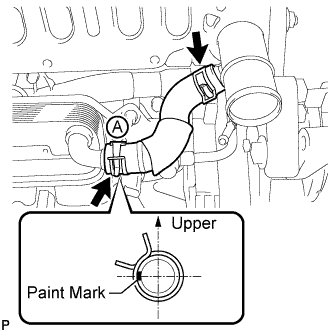
32. INSTALL NO. 1 WATER BY-PASS HOSE

HINT:
A197564E01
Make sure the claws of hose clamp A are positioned above the paint mark as shown in the illustration.


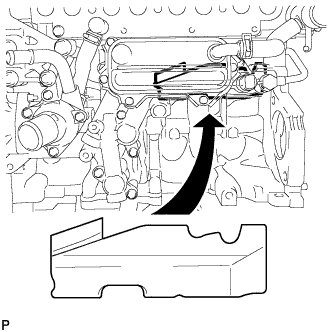
33. INSTALL NO. 1 CYLINDER BLOCK INSULATOR


    A201839
  1. Install the No. 1 cylinder block insulator to the cylinder block.

    NOTICE:
    Be sure to install the oil cooler before installing the No. 1 cylinder block insulator.


34. INSTALL INTAKE MANIFOLD


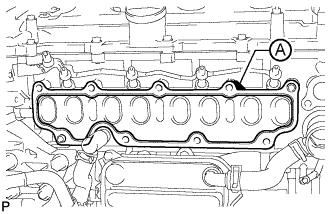
    A197559E01
  1. Install a new gasket to the cylinder head.

    HINT:
    Install the gasket with the part labeled A facing the right side of the vehicle as shown in the illustration.


    A197558E02
  1. Install the intake manifold with the 7 bolts and 2 nuts.

    Torque:
    23 N*m{ 235 kgf*cm , 17 ft.*lbf }

    Text in Illustration 
    *1
    Nut

    Standard Bolt:
    Item
    Length
    Bolt A
    90 mm (3.54 in.)
    Bolt B
    25 mm (0.984 in.)


35. INSTALL NO. 2 INTAKE MANIFOLD


    A197557
  1. Install a new gasket and the No. 2 intake manifold with the bolt and 2 nuts.

    Torque:
    24 N*m{ 245 kgf*cm , 18 ft.*lbf }


36. INSTALL ENGINE COVER BRACKET


    A197556
  1. Install the engine cover bracket with the bolt.

    Torque:
    20 N*m{ 204 kgf*cm , 15 ft.*lbf }


37. INSTALL GAS FILTER BRACKET


    A206312
  1. Install the gas filter bracket with the 2 bolts.

    Torque:
    8.8 N*m{ 90 kgf*cm , 78 in.*lbf }


38. INSTALL NO. 1 GAS FILTER


    A206313E01
  1. Install the No. 1 gas filter to the gas filter bracket.
    Text in Illustration 
    *1
    Protrusion
    *2
    Groove

    NOTICE:
    Make sure the protrusion of the No. 1 gas filter is aligned with the groove of the gas filter bracket.

  1. Connect the vacuum hose.


39. INSTALL DIESEL TURBO PRESSURE SENSOR


    A197552E01
  1. Install the sensor with the bolt.

    Torque:
    8.8 N*m{ 90 kgf*cm , 78 in.*lbf }

    Text in Illustration 
    *1
    Protrusion

    NOTICE:
    Make sure the protrusion of the gas filter bracket is inserted into the hole of the sensor.

  1. Connect the vacuum hose.


40. INSTALL INTAKE MANIFOLD INSULATOR


    A197550
  1. Install the intake manifold insulator to the intake manifold.


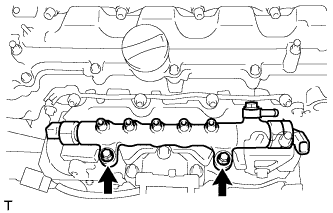
41. INSTALL COMMON RAIL ASSEMBLY


    A201874
  1. Install the common rail with the 2 bolts.

    Torque:
    21 N*m{ 209 kgf*cm , 15 ft.*lbf }


42. INSTALL NO. 4 FUEL HOSE


    A197571
  1. Install the No. 4 fuel hose.


43. INSTALL INJECTION PIPE SUB-ASSEMBLY


    A203045
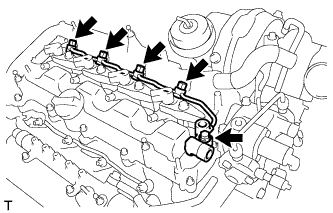
  1. Using a 14 mm union nut wrench, tighten the 4 nuts at the common rail end of the injection pipes.

    Torque:
    30 N*m{ 306 kgf*cm , 22 ft.*lbf }

    NOTICE:
    Use the formula to calculate special torque values for situations where a union nut wrench is combined with a torque wrench (Click here).

  1. Using a 14 mm union nut wrench, tighten the 4 nuts at the injector end of the injection pipes.

    Torque:
    30 N*m{ 306 kgf*cm , 22 ft.*lbf }

    NOTICE:
    Use the formula to calculate special torque values for situations where a union nut wrench is combined with a torque wrench (Click here).

  1. Install the 4 injection pipe clamps with the 2 bolts.

    Torque:
    5.0 N*m{ 51 kgf*cm , 44 in.*lbf }


44. INSTALL FUEL INLET PIPE SUB-ASSEMBLY


    A203057
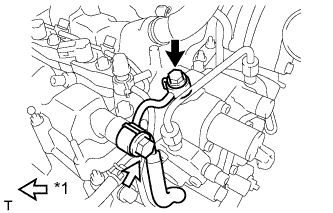
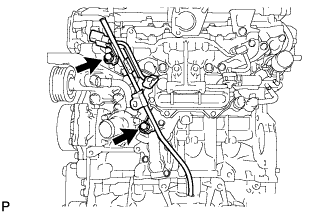
  1. Temporarily install the fuel inlet pipe with the 2 clamps and nut.

  1. Using a 14 mm union nut wrench, first tighten the nut at the common rail end of the fuel inlet pipe.

    Torque:
    30 N*m{ 306 kgf*cm , 22 ft.*lbf }

    NOTICE:
    Use the formula to calculate special torque values for situations where a union nut wrench is combined with a torque wrench (Click here).

  1. Using a 14 mm union nut wrench, tighten the nut at the supply pump end of the fuel inlet pipe.

    Torque:
    30 N*m{ 306 kgf*cm , 22 ft.*lbf }

    NOTICE:
    Use the formula to calculate special torque values for situations where a union nut wrench is combined with a torque wrench (Click here).

  1. Tighten the No. 2 injection pipe clamp nut.

    Torque:
    5.0 N*m{ 51 kgf*cm , 44 in.*lbf }


45. INSTALL ENGINE OIL LEVEL DIPSTICK GUIDE
  1. Install a new O-ring to the engine oil level dipstick guide.


    A197547
  1. Install the engine oil level dipstick guide with the 2 bolts.

    Torque:
    33 N*m{ 337 kgf*cm , 24 ft.*lbf }

  1. Install the engine oil level dipstick.


46. INSTALL ELECTRIC EGR CONTROL VALVE ASSEMBLY


    A197544E01
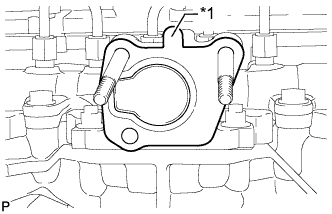
  1. Install a new gasket.
    Text in Illustration 
    *1
    Protrusion

    NOTICE:
    Make sure the protrusion of the gasket is facing upward as shown in the illustration.


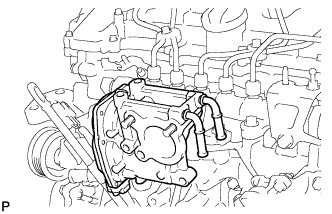
    A197543
  1. Install the electric EGR control valve.


47. INSTALL NO. 2 EGR PIPE SUB-ASSEMBLY
  1. Install a new gasket to the electric EGR control valve.

  1. Install a new gasket to the No. 2 EGR pipe.


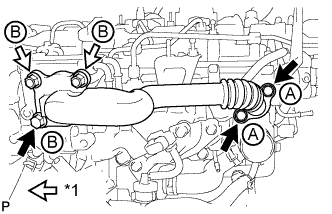
    A197541E02
  1. Temporarily install the No. 2 EGR pipe with the 3 bolts and 2 nuts.
    Text in Illustration 
    *1
    Nut

    Standard Bolt:
    Item
    Length
    Bolt A
    25 mm (0.984 in.)
    Bolt B
    70 mm (2.76 in.)

  1. Tighten the 2 bolts labeled A shown in the illustration.

    Torque:
    24 N*m{ 245 kgf*cm , 18 ft.*lbf }

  1. Tighten the bolt and 2 nuts labeled B shown in the illustration.

    Torque:
    24 N*m{ 245 kgf*cm , 18 ft.*lbf }


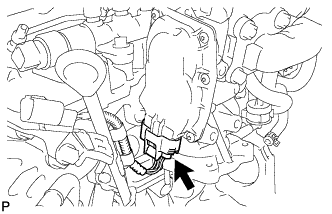
    A197538
  1. Connect the electric EGR control valve connector.


48. INSTALL EGR VALVE BRACKET


    A212572
  1. Install the EGR valve bracket with the 3 bolts.

    Torque:
    24 N*m{ 245 kgf*cm , 18 ft.*lbf }


49. CONNECT NO. 8 WATER BY-PASS HOSE


A201867


50. INSTALL NO. 7 WATER BY-PASS HOSE


A197539


51. INSTALL DIESEL THROTTLE BODY ASSEMBLY


    A203105
  1. Install a new gasket and the diesel throttle body with the 2 bolts and 2 nuts.

    Torque:
    11 N*m{ 112 kgf*cm , 8 ft.*lbf }


    A201844E01
  1. Connect the No. 6 and No. 7 water by-pass hoses.
    Text in Illustration 
    *1
    No. 6 Water By-pass Hose
    *2
    No. 7 Water By-pass Hose


52. INSTALL V-RIBBED BELT TENSIONER ASSEMBLY


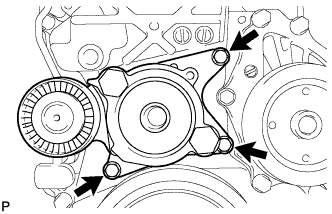
    A201749
  1. Install the V-ribbed belt tensioner with the 3 bolts.

    Torque:
    20 N*m{ 204 kgf*cm , 15 ft.*lbf }

    NOTICE:
    As the heads of the bolts are not as thick as those of typical bolts, be careful not to damage them during installation.


53. INSTALL ENGINE MOUNTING BRACKET
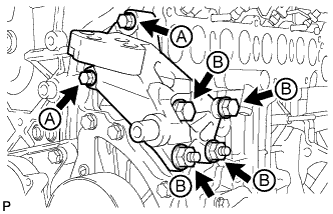
  1. Temporarily install the engine mounting bracket with the 2 bolts labeled A.


    A201748E01
  1. Temporarily install the 2 bolts and 2 nuts labeled B in the illustration.

  1. Tighten the 2 bolts labeled A in the illustration.

    Torque:
    28 N*m{ 286 kgf*cm , 21 ft.*lbf }

  1. Tighten the 2 bolts and 2 nuts labeled B in the illustration.

    Torque:
    80 N*m{ 816 kgf*cm , 59 ft.*lbf }


54. INSTALL NO. 4 WATER BY-PASS PIPE
  1. Install a new O-ring to the No. 4 water by-pass pipe.


    A201735
  1. Install the No. 4 water by-pass pipe with the bolt.

    Torque:
    11 N*m{ 112 kgf*cm , 8 ft.*lbf }


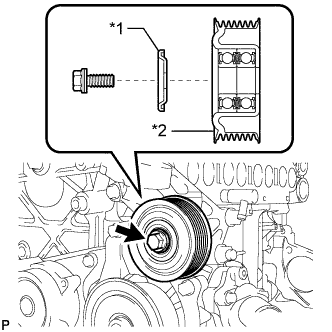
55. INSTALL NO. 2 IDLER PULLEY SUB-ASSEMBLY


    A201747E01
  1. Install the No. 2 idler pulley and No. 2 idler pulley cover plate with the bolt.

    Torque:
    40 N*m{ 408 kgf*cm , 30 ft.*lbf }

    Text in Illustration 
    *1
    No. 2 Idler Pulley Cover Plate
    *2
    No. 2 Idler Pulley

    NOTICE:
    Make sure the No. 2 idler pulley cover plate is facing the direction shown in the illustration.


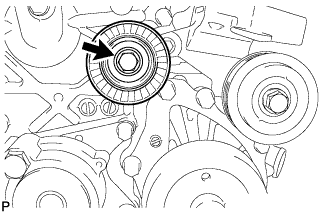
56. INSTALL NO. 1 IDLER PULLEY SUB-ASSEMBLY


    A201746
  1. Install the No. 1 idler pulley with the bolt.

    Torque:
    40 N*m{ 408 kgf*cm , 30 ft.*lbf }


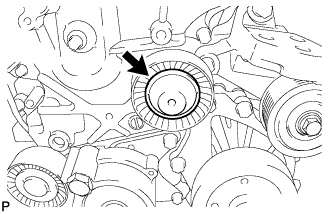
57. INSTALL IDLER PULLEY COVER PLATE


    A201875
  1. Install the idler pulley cover plate to the No. 1 idler pulley.


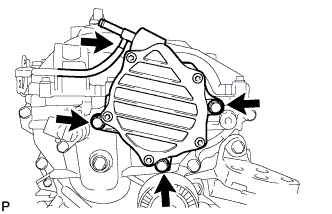
58. INSTALL VACUUM PUMP ASSEMBLY
  1. Apply a light coat of engine oil to 2 new O-rings.

  1. Install 2 new O-rings to the vacuum pump.


    A201743
  1. Install the vacuum pump with 3 new bolts.

    Torque:
    21 N*m{ 214 kgf*cm , 15 ft.*lbf }

  1. Connect the vacuum hose.


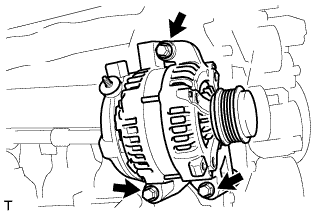
59. INSTALL GENERATOR ASSEMBLY


    A196712
  1. Install the generator with the 3 bolts.

    Torque:
    25 N*m{ 255 kgf*cm , 18 ft.*lbf }


60. CONNECT ENGINE WIRE
  1. Connect the connectors and clamps, and then connect the engine wire to the engine with the bracket bolts.


61. INSTALL ENGINE ASSEMBLY
  1. Install the engine assembly (Click here).