Home › ENGINE ยท 2AD-FHV › ENGINE MECHANICAL › CYLINDER HEAD GASKET

CYLINDER HEAD GASKET > INSTALLATION

for Preparation Click here


1. SELECT CYLINDER HEAD GASKET


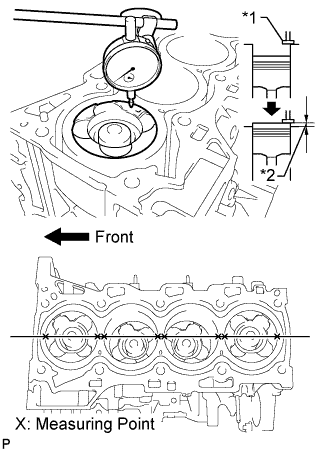
  1. Check the piston protrusions for each cylinder.

    1. Clean the cylinder block with solvent.

    2. Set the piston of the cylinder to be measured to slightly before TDC.


    3. A203749E01
    4. Place a dial indicator on the cylinder block, and set the measuring tip as shown in the illustration.
      Text in Illustration 
      *1
      Measuring Tip
      *2
      Protrusion

    5. Set the dial indicator at 0 mm (0 in.).

      HINT:
      Make sure that the measuring tip is perpendicular to the cylinder block gasket surface and piston head when taking the measurements.

    6. Find where the piston head protrudes most by slowly turning the crankshaft clockwise and counterclockwise.

    7. Measure each cylinder at 2 places as shown in the illustration, making a total of 8 measurements.

    8. For the piston protrusion value of each cylinder, use the average of the 2 measurements of each cylinder.

      Standard piston protrusion:
      0.300 to 0.560 mm (0.0118 to 0.0220 in.)
      If the protrusion is not as specified, remove the piston and connecting rod and reinstall it.


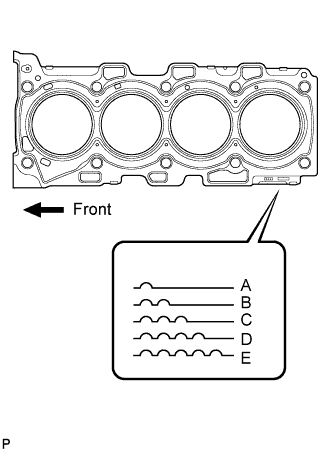
    A111379E02
  1. Select a new cylinder head gasket.

    HINT:
    Cylinder head gaskets are marked A, B, C, D or E accordingly.

    New Installed Cylinder Head Gasket Thickness:
    Cutout Mark
    Specified Condition
    A
    1.00 to 1.10 mm (0.0394 to 0.0433 in.)
    B
    1.05 to 1.15 mm (0.0413 to 0.0453 in.)
    C
    1.10 to 1.20 mm (0.0433 to 0.0472 in.)
    D
    1.15 to 1.25 mm (0.0453 to 0.0492 in.)
    E
    1.20 to 1.30 mm (0.0472 to 0.0512 in.)


    1. Select the largest piston protrusion value from the measurements and then select a new appropriate gasket according to the table below.

      Piston Protrusion:
      Piston Protrusion
      Gasket Size
      0.300 to 0.355 mm (0.0118 to 0.0140 in.)
      A
      0.355 to 0.405 mm (0.0140 to 0.0159 in.)
      B
      0.405 to 0.455 mm (0.0159 to 0.0179 in.)
      C
      0.455 to 0.505 mm (0.0179 to 0.0199 in.)
      D
      0.505 to 0.560 mm (0.0199 to 0.0220 in.)
      E


2. INSTALL CYLINDER HEAD GASKET


3. INSTALL CYLINDER HEAD SUB-ASSEMBLY


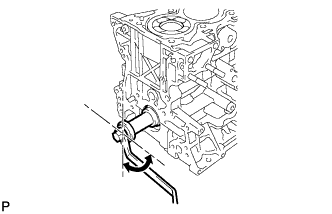
    A111380E01
  1. Using the crankshaft pulley bolt, set the No. 1 cylinder to 90° BTDC/compression.

  1. Place the cylinder head gasket in position on the cylinder block.

  1. Place the cylinder head on the cylinder block.

    NOTICE:
    Be careful of the installation direction.

  1. Apply a light coat of engine oil to the threads and under the heads of the cylinder head bolts.

  1. Temporarily install the cylinder head bolts.
    If any bolt is broken or deformed, replace it.


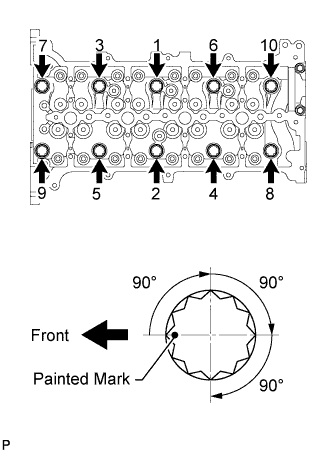
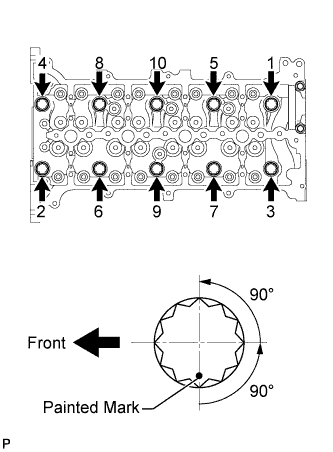
    A205828E01
  1. Step 1:

    HINT:
    For new bolts, perform steps 1 to 3. For used bolts, perform only step 1.


    1. Uniformly tighten the 10 cylinder head bolts in several steps in the sequence shown in the illustration.

      Torque:
      50 N*m{ 510 kgf*cm , 37 ft.*lbf }

      HINT:
      If any one of the cylinder head bolts does not meet the torque specification, replace the cylinder head bolt.

    2. Mark the front of the cylinder head bolts with paint.

    3. Tighten the cylinder head bolts by 90° in the sequence shown in the illustration.

    4. Perform the step above twice.


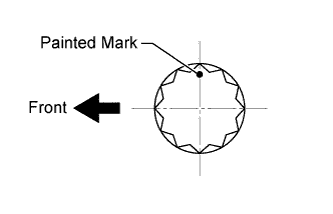
    5. A205829E01
    6. Check that the painted marks are positioned as shown in the illustration.


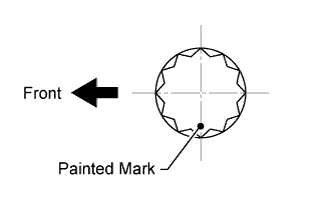
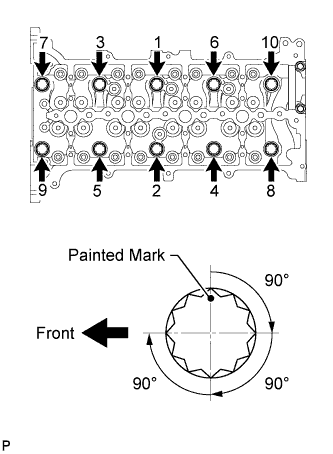
    A205830E01
  1. Step 2:

    1. Loosen the cylinder head bolts by 90° in the sequence shown in the illustration.

    2. Perform the step above again.


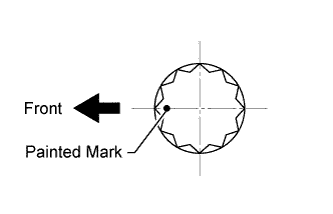
    3. A205831E01
    4. Check that the painted marks are positioned as shown in the illustration.


    A205832E01
  1. Step 3:

    1. Retighten the cylinder head bolts by 90° in the sequence shown in the illustration.

    2. Perform the above step twice.


    3. A205833E01
    4. Check that the painted marks are positioned as shown in the illustration.


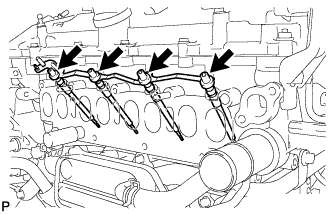
4. INSTALL GLOW PLUG ASSEMBLY


    A203778
  1. Using a 10 mm deep socket wrench, install the 4 glow plugs.

    Torque:
    12 N*m{ 125 kgf*cm , 9 ft.*lbf }

  1. Install the glow plug connector with the 4 nuts.

    Torque:
    2.2 N*m{ 22 kgf*cm , 19 in.*lbf }

  1. Install the 4 grommets.


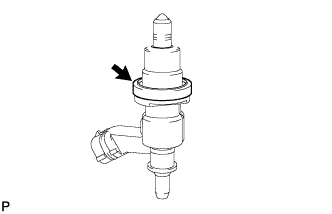
5. INSTALL FUEL INJECTOR SEAL


    A206481
  1. Install a new fuel injector seal to the exhaust fuel addition injector.


6. INSTALL EXHAUST FUEL ADDITION INJECTOR ASSEMBLY

NOTICE:
If there is foreign matter on the installation surface of the exhaust fuel addition injector, be sure to clean it before installation.


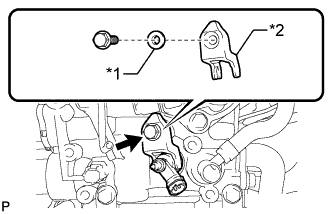
    A201783E01
  1. Install a new gasket, the exhaust fuel addition injector and nozzle holder clamp with the washer and bolt.

    Torque:
    29 N*m{ 296 kgf*cm , 21 ft.*lbf }

    Text in Illustration 
    *1
    Washer
    *2
    Nozzle Holder Clamp

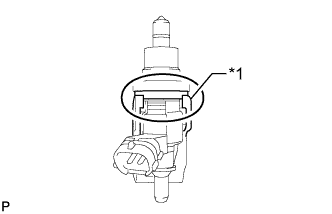
    HINT:
    A201785E01
    Align the nozzle holder clamp with the cutouts of the injector as shown in the illustration.

    Text in Illustration 
    *1
    Nozzle Holder Clamp


7. INSTALL CAMSHAFT
  1. Install the camshafts (Click here).


8. INSTALL EXHAUST MANIFOLD WITH TURBOCHARGER
  1. Install the exhaust manifold with turbocharger (Click here).


9. CONNECT CABLE TO NEGATIVE BATTERY TERMINAL