INTEGRATION RELAY > ON-VEHICLE INSPECTION |
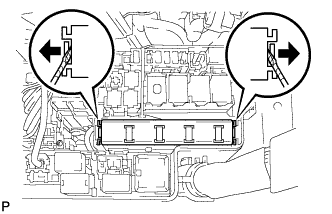
| 1. REMOVE INTEGRATION NO.1 RELAY |
|
Remove the engine room No. 1 relay block cover.
Using a screwdriver, detach the 2 claws and disconnect the integration relay from the engine room No. 1 junction block.
Disconnect the 3 connectors from the integration relay.
| 2. INSPECT EFI MAIN RELAY |
Measure the resistance of the EFI MAIN fuse.
Measure the resistance according to the value(s) in the table below.
| Tester Connection | Condition | Specified Condition |
| EFI MAIN fuse | Always | Below 1 Ω |
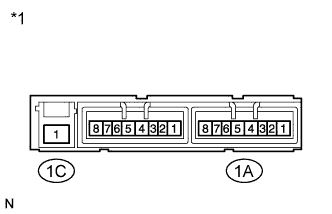 |
Measure the resistance of the EFI MAIN relay.
Measure the resistance according to the value(s) in the table below.
| Tester Connection | Condition | Specified Condition |
| 1C-1 - 1A-4 | Battery voltage not applied to terminals 1A-2 and 1A-3 | 10 kΩ or higher |
| 1C-1 - 1A-4 | Battery voltage applied to terminals 1A-2 and 1A-3 | Below 1 Ω |
| *1 | Component without harness connected (Integration Relay) |
| 3. INSPECT EDU RELAY |
Measure the resistance of the EDU fuse.
Measure the resistance according to the value(s) in the table below.
| Tester Connection | Condition | Specified Condition |
| EDU fuse | Always | Below 1 Ω |
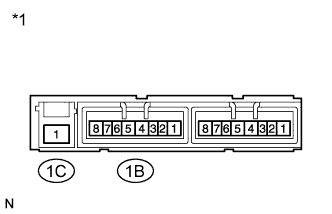 |
Measure the resistance of the EDU relay.
Measure the resistance according to the value(s) in the table below.
| Tester Connection | Condition | Specified Condition |
| 1C-1 - 1B-4 | Battery voltage not applied to terminals 1B-2 and 1B-3 | 10 kΩ or higher |
| 1C-1 - 1B-4 | Battery voltage applied to terminals 1B-2 and 1B-3 | Below 1 Ω |
| *1 | Component without harness connected (Integration Relay) |
| 4. INSPECT A/F RELAY |
Measure the resistance of the A/F fuse.
Measure the resistance according to the value(s) in the table below.
| Tester Connection | Condition | Specified Condition |
| A/F fuse | Always | Below 1 Ω |
|
Measure the resistance of the A/F relay.
Measure the resistance according to the value(s) in the table below.
| Tester Connection | Condition | Specified Condition |
| 1C-1 - 1B-8 | Battery voltage not applied to terminals 1B-6 and 1B-7 | 10 kΩ or higher |
| 1C-1 - 1B-8 | Battery voltage applied to terminals 1B-6 and 1B-7 | Below 1 Ω |
| *1 | Component without harness connected (Integration Relay) |
| 5. INSTALL INTEGRATION NO.1 RELAY |
Connect the 3 connectors.
Attach the 2 claws to install the integration relay to the engine room junction block.