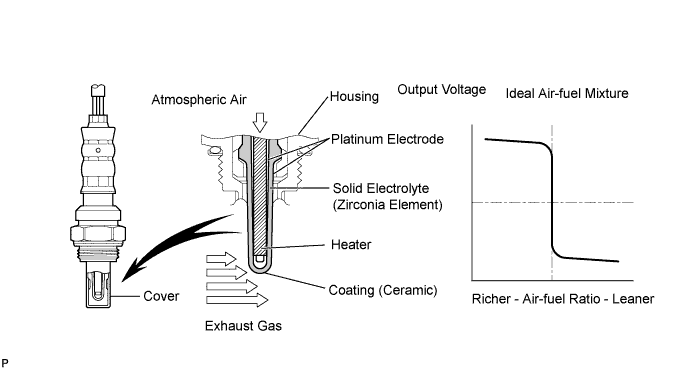
DTC P0136 Oxygen Sensor Circuit Malfunction (Bank 1 Sensor 2) |
DTC P0137 Oxygen Sensor Circuit Low Voltage (Bank 1 Sensor 2) |
DTC P0138 Oxygen Sensor Circuit High Voltage (Bank 1 Sensor 2) |
| DTC No. | DTC Detection Condition | Trouble Area |
| P0136 |
|
|
| P0137 |
|
|
| P0138 |
|
|
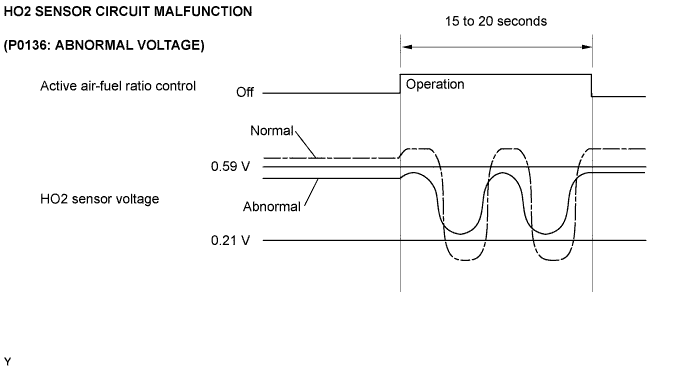
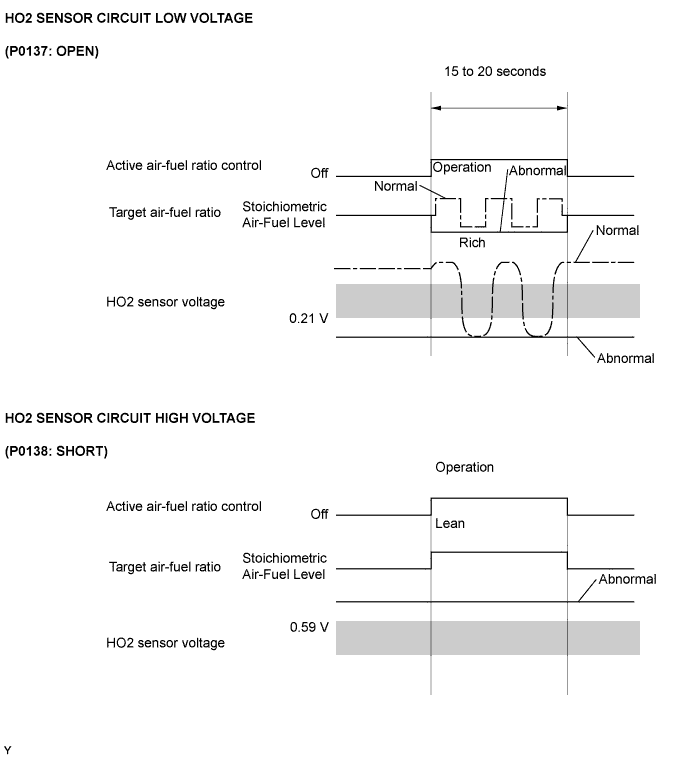
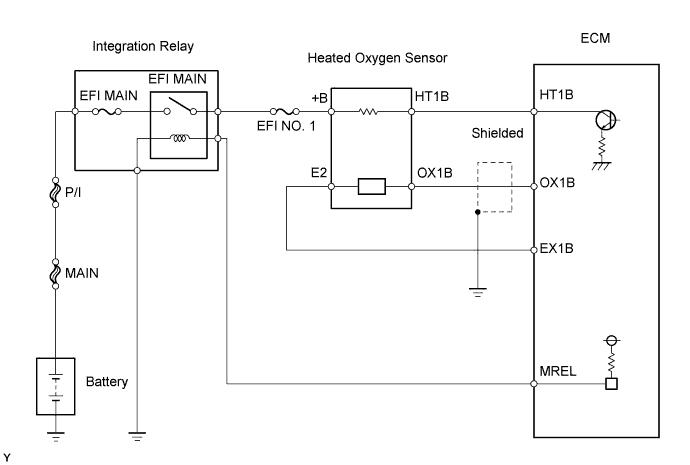
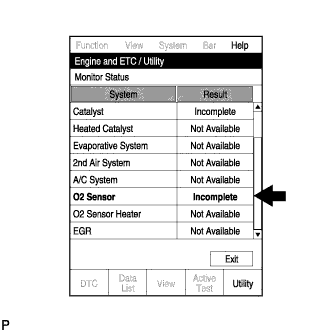
| Tester Display (Sensor) | Injection Volume | Status | Voltage |
| AFS B1 S1 (A/F) | +25% | Rich | Less than 3.0 |
| -12.5% | Lean | More than 3.35 | |
| O2S B1 S2 (HO2) | +25% | Rich | More than 0.5 |
| -12.5% | Lean | Less than 0.4 |
| Case | A/F Sensor (Sensor 1) Output Voltage | HO2 Sensor (Sensor 2) Output Voltage | Main Suspected Trouble Area |
| 1 | 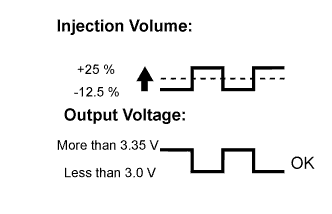 | 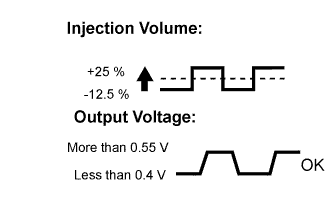 | - |
| 2 | 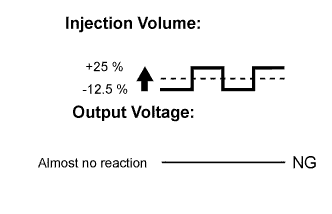 | |
|
| 3 | | |
|
| 4 | | |
|
| 1.READ OUTPUT DTC |
Connect the intelligent tester to the DLC3.
Turn the ignition switch on (IG) and turn the tester ON.
Select the following menu items: Powertrain / Engine and ECT / DTC.
Read DTCs.
| Display (DTC output) | Proceed to |
| P0138 | A |
| P0137 | B |
| P0136 | C |
|
| ||||
|
| ||||
| A | |
 |
| 2.READ VALUE USING INTELLIGENT TESTER (OUTPUT VOLTAGE OF HEATED OXYGEN SENSOR) |
Connect the intelligent tester to the DLC3.
Turn the ignition switch on (IG) and turn the tester ON.
Select the following menu items: Powertrain / Engine and ECT / Data List / A/F Control System / O2S B1 S2.
Allow the engine to idle.
Read the Heated Oxygen (HO2) sensor output voltage while idling.
| HO2 Sensor Output Voltage | Proceed to |
| More than 1.2 V | A |
| Less than 1.0 V | B |
|
| ||||
| A | |
|
| 3.CHECK HARNESS AND CONNECTOR (CHECK FOR SHORT) |
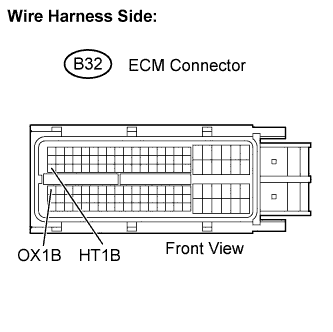 |
Turn the ignition switch off and wait for 5 minutes.
Disconnect the B32 ECM connector.
Measure the resistance.
| Tester Connection | Specified Condition |
| HT1B (B32-47) - OX1B (B32-64) | 10 kΩ or higher |
Reconnect the ECM connector.
|
| ||||
| NG | |
|
| 4.INSPECT HEATED OXYGEN SENSOR (CHECK FOR SHORT) |
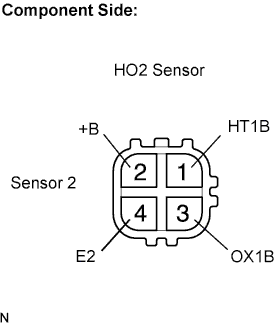 |
Disconnect the B19 HO2 sensor connector.
Measure the resistance.
| Tester Connection | Specified Condition |
| +B (2) - E2 (4) | 10 kΩ or higher |
| +B (2) - OX1B (3) | 10 kΩ or higher |
Reconnect the HO2 sensor connector.
|
| ||||
| OK | ||
 | ||
| ||
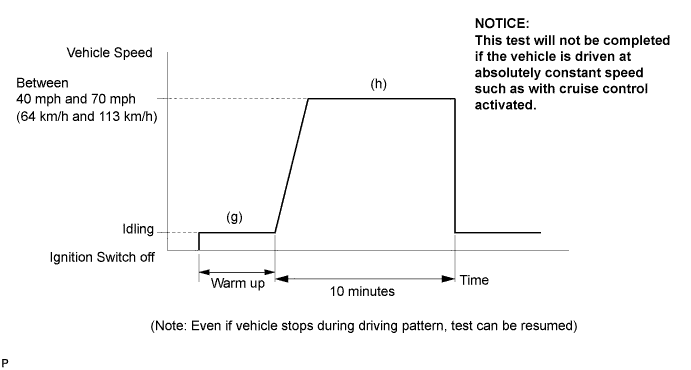
| 5.PERFORM CONFIRMATION DRIVING PATTERN |
| NEXT | |
|
| 6.CHECK WHETHER DTC OUTPUT RECURS (DTC P0138) |
On the intelligent tester, select the following menu items: Powertrain / Engine and ECT / DTC.
Read DTCs.
| Display (DTC Output) | Proceed to |
| P0138 | A |
| No output | B |
|
| ||||
| A | ||
| ||
| ||
| 7.READ VALUE USING INTELLIGENT TESTER (OUTPUT VOLTAGE OF HEATED OXYGEN SENSOR) |
Connect the intelligent tester to the DLC3.
Turn the ignition switch on (IG) and turn the tester ON.
Start the engine.
Select the following menu items: Powertrain / Engine and ECT / Data List / A/F Control System / O2S B1 S2
After warming up the engine, run the engine at an engine speed of 2,500 rpm for 3 minutes.
Read the output voltage of the HO2 sensor when the engine rpm is suddenly increased.
|
| ||||
| OK | |
|
| 8.PERFORM CONFIRMATION DRIVING PATTERN |
| NEXT | |
|
| 9.CHECK WHETHER DTC OUTPUT RECURS (DTC P0136) |
On the intelligent tester, select the following menu items: Powertrain / Engine and ECT / DTC.
Read DTCs.
| Display (DTC Output) | Proceed to |
| P0136 | A |
| No output | B |
|
| ||||
| A | |
|
| 10.REPLACE HEATED OXYGEN SENSOR |
| NEXT | |
|
| 11.PERFORM CONFIRMATION DRIVING PATTERN |
| NEXT | |
|
| 12.CHECK WHETHER DTC OUTPUT RECURS (DTC P0136) |
On the intelligent tester, select the following menu items: Powertrain / Engine and ECT / DTC.
Read DTCs.
| Display (DTC Output) | Proceed to |
| P0136 | A |
| No output | B |
|
| ||||
| A | |
|
| 13.PERFORM ACTIVE TEST USING INTELLIGENT TESTER (INJECTION VOLUME) |
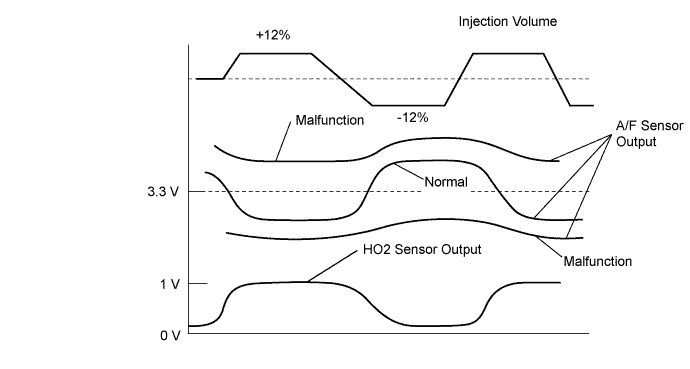
Connect the intelligent tester to the DLC3.
Start the engine and turn the tester ON.
Warm up the engine.
Select the following menu items: Powertrain / Engine and ECT / Active Test / Control the Injection Volume.
Change the fuel injection volume using the tester, monitoring the voltage output of Air-Fuel Ratio (A/F) and HO2 sensors displayed on the tester.
| Tester Display (Sensor) | Voltage Variation | Proceed to |
| AFS B1 S1 (A/F) | Alternates between more and less than 3.3 V | OK |
| Remains at more than 3.3 V | NG | |
| Remains at less than 3.3 V | NG |
|
| ||||
| OK | ||
| ||
| ||
| 14.CHECK FOR EXHAUST GAS LEAK |
|
| ||||
| OK | |
|
| 15.INSPECT HEATED OXYGEN SENSOR (HEATER RESISTANCE) |
|
Disconnect the B19 Heated Oxygen (HO2) sensor connector.
Measure the resistance of the HO2 sensor connector.
| Tester Connection | Specified Condition |
| HT1B (1) - +B (2) | 11 to 16 Ω at 20°C (68°F) |
| HT1B (1) - E2 (4) | 10 kΩ or higher |
Reconnect the HO2 sensor connector.
|
| ||||
| OK | |
|
| 16.INSPECT INTEGRATION RELAY (EFI MAIN RELAY) |
Remove the integration relay from the engine room relay block.
Inspect the EFI MAIN fuse.
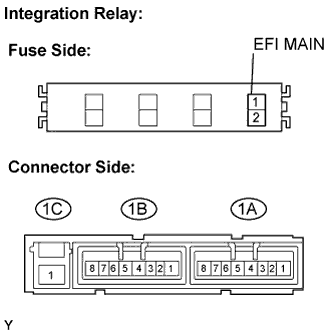 |
Remove the EFI MAIN fuse from the integration relay.
Measure the EFI MAIN fuse resistance.
Reinstall the EFI MAIN fuse.
Inspect the EFI MAIN relay.
Measure the EFI MAIN relay resistance.
| Tester Connection | Specified Condition |
| 1C-1 - 1A-4 | 10 kΩ or higher |
| Below 1 Ω (Apply battery voltage between terminals 1A-2 and 1A-3) |
Reinstall the integration relay.
|
| ||||
| OK | |
|
| 17.CHECK HARNESS AND CONNECTOR (HEATED OXYGEN SENSOR - ECM) |
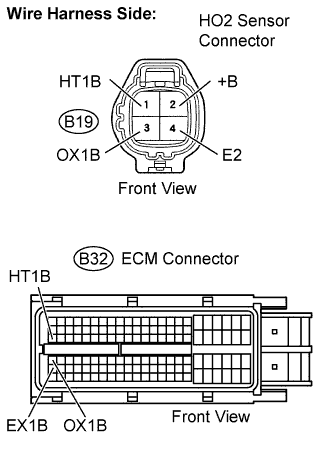 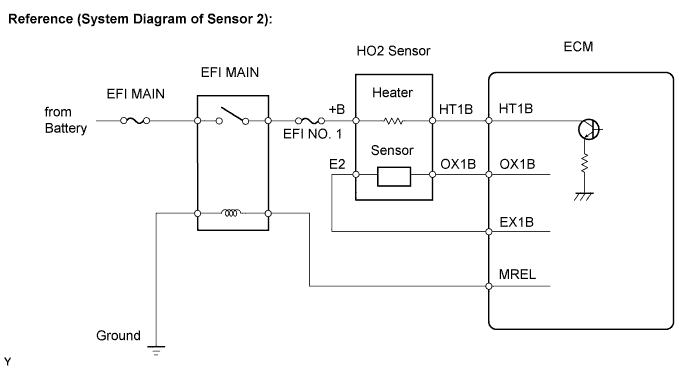 |
Disconnect the B19 HO2 sensor connector.
Turn the ignition switch on (IG).
Measure the voltage between the +B terminal of the HO2 sensor connector and body ground.
| Tester Connection | Specified Condition |
| +B (B19-2) - Body ground | 9 to 14 V |
Turn the ignition switch off.
Disconnect the B32 ECM connector.
Measure the resistance.
| Tester Connection | Specified Condition |
| HT1B (B19-1) - HT1B (B32-47) | Below 1 Ω |
| OX1B (B19-3) - OX1B (B32-64) | Below 1 Ω |
| E2 (B19-4) - EX1B (B32-87) | Below 1 Ω |
| Tester Connection | Specified Condition |
| HT1B (B19-1) or HT1B (B32-47) - Body ground | 10 kΩ or higher |
| OX1B (B19-3) or OX1B (B32-64) - Body ground | 10 kΩ or higher |
| E2 (B19-4) or EX1B (B32-87) - Body ground | 10 kΩ or higher |
Reconnect the HO2 sensor connector.
Reconnect the ECM connector.
|
| ||||
| OK | ||
| ||
| ||

