WATER PUMP > INSTALLATION |
| 1. INSTALL WATER PUMP ASSEMBLY |
Remove any old seal packing material from the contact surface.
![]() |
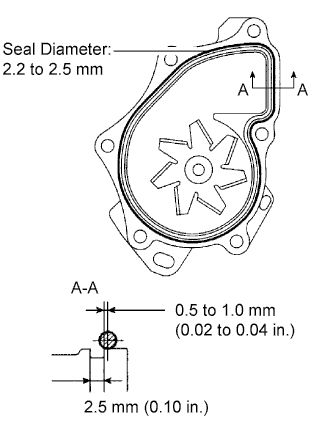
Apply a continuous line of seal packing as shown in the illustration.
Install the water pump and clamp bracket with the 4 bolts and 2 nuts.
Install the wire of the crankshaft position sensor onto the clamp bracket.
Install the clamp of the crankshaft position sensor onto the water pump.
| 2. INSTALL WATER PUMP PULLEY |
![]() |
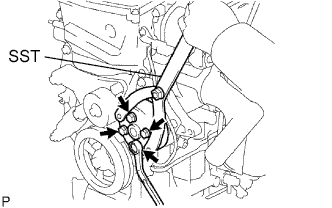
Using SST, install the water pump pulley with the 4 bolts.
| 3. INSTALL GENERATOR ASSEMBLY |
![]() |
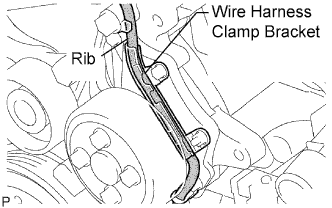
Confirm that the wire harness of the crankshaft position sensor is secured to the wire harness clamp bracket through the back of the rib of the timing chain cover.
![]() |
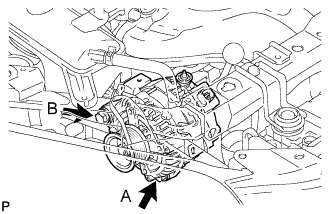
Install the generator with the 2 bolts.
![]() |
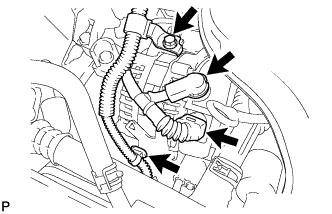
Install the wire harness clamp.
Install the wire harness clamp bracket with the bolt.
Connect the generator wire with the nut.
Install the terminal cap.
Connect the generator connector.
| 4. INSTALL FAN & GENERATOR V BELT |
![]() |
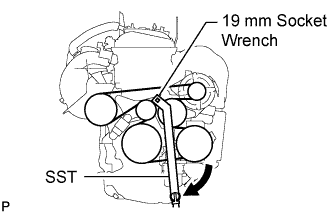
Using SST 19 mm socket wrench, loosen the V-ribbed belt tensioner arm clockwise, then install the fan and generator V belt.
| 5. INSTALL FRONT SUSPENSION MEMBER REINFORCEMENT RH |
Install the reinforcement RH with the 4 bolts.
| 6. ADD ENGINE COOLANT |
Tighten the radiator drain cock plug by hand.
Tighten the cylinder block drain cock plug.
Add TOYOTA Super Long Life Coolant (SLLC) to the radiator reservoir filler opening.
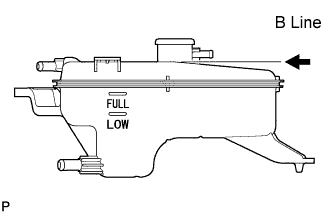
![]() |
Continue adding TOYOTA SLLC until it is filled to the B line at the base of the reservoir's filler neck.
| Item | Specified Condition |
| A/T | 6.4 liters (6.8 US qts, 5.6 Imp. qts) |
| M/T | 6.3 liters (6.7 US qts, 5.5 Imp. qts) |
Press the No. 1 and No. 2 radiator hoses several times by hand, and then check the level of the coolant. If the coolant level drops below the B line, add TOYOTA SLLC to the B line.
Install the radiator reservoir cap.
Start the engine and warm it up until the cooling fan operates. While the cooling fan operates, circulate the coolant for several minutes.
Set the air conditioning as follows while warming up the engine.
| Item | Specified Condition |
| Manual Air Conditioning System | Fan speed: Any setting except OFF |
| Temperature: Toward WARM Air conditioning switch: OFF | |
| Automatic Air Conditioning System | Temperature: Toward MAX Air conditioning switch: OFF |
Maintain the engine speed at 2,000 to 2,500 rpm and warm up the engine until the cooling fan operates.
Press the No. 1 and No. 2 radiator hoses several times by hand to bleed air.
Stop the engine and wait until the coolant cools down to ambient temperature.
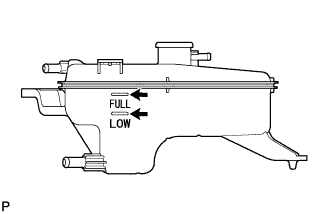
![]() |
Check that the coolant level is between the FULL and LOW line.
If the coolant level is below the LOW line, repeat all of the procedures above.
If the coolant level is above the FULL line, drain coolant so that the coolant level is between the FULL and LOW line.
| 7. CONNECT CABLE TO NEGATIVE BATTERY TERMINAL |
| 8. CHECK FOR ENGINE COOLANT LEAKS |
Remove the radiator reservoir cap.
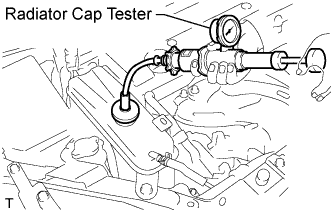
![]() |
Fill the radiator reservoir with coolant, and then attach a radiator cap tester.
Warm up the engine.
Pump the radiator cap tester to 118 kPa (1.2 kgf/cm2, 17.1 psi), and then check that the pressure does not drop.
If the pressure drops, check the hoses, radiator and water pump for leakage.
If there are no signs of external coolant leaks, check the heater core, cylinder block and head.
Reinstall the radiator cap.
| 9. INSTALL RADIATOR SUPPORT OPENING COVER |
| 10. INSTALL FRONT FENDER APRON RH |
| 11. INSTALL NO. 1 ENGINE UNDER COVER |